Wednesday, November 21, 2018

How to Erase Your Device with Recovery Mode


Erase Your Device with Recovery Mode

If you have forgotten your iPhone passcode and you have never synced with iTunes before, then you will need to use recovery mode to restore your iPhone. To erase your device with recovery mode, you will need to follow the steps as bellow.

1. Open iTunes and connect your iOS device to your computer or Mac. If you don’t have one, borrow it from a friend or go to the Apple Retail Store.

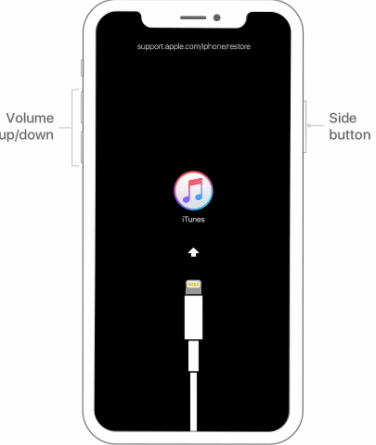
2. After connecting your device to your computer, force restart your device:


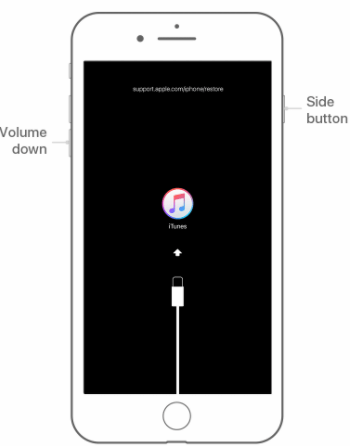
For iPhone 8 or later: press and release the Volume Up button. Then press and release the Volume Down button. Press and hold the Side button until the recovery-mode screen shows up.


For iPhone 7 or 7 Plus: Press and hold both the Side and Volume Down buttons at the same time. Keep holding them until the recovery-mode screen shows up.


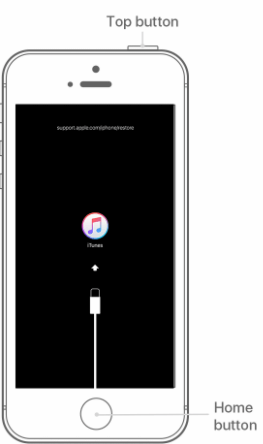
For iPhone 6s and earlier: Press and hold both the Home and the Top (or Side) buttons at the same time. Keep holding them until the recovery-mode screen shows up.


3. Then you will see the option to Restore or Update, click Restore. If it takes more than 15 minutes, you device will exit the recovery mode, then you will need to repeat stpes 2 and 3.

Waif for the process to complete and then you can reuse your device again.
Pros and Cons to erase your device with recovery mode:

Pros:


Fix iOS installation and upgrade error;


Fix touchscreen issue;


Uninstall a bad beta;


Bypass a forgotten passcode;


Reboot loop problem in iPhone and more.

Cons:


It will erase all settings and data;


Not ensure 100% success;


Lose some non-iTunes content like apps and music.


Sponsor ads:


Gihosoft Free iPhone Data Recovery:https://www.gihosoft.com/iphone-data-recovery-free.html


Gihosoft iPhone Data Recovery Free


Free iPhone Data Recovery Software for Windows/Mac


Recover up to 12+ types of files, including contacts, SMS, photos, WhatsApp, Viber, notes, etc.


Restore lost data from iOS devices directly or from iTunes and iCloud backup


Recover iPhone data lost due to iOS upgrade/jailbreak, accidental deletion, device lost or broken


Support all the latest iPhone, iPad and iPod Touch


Both Free and Pro version.


If you lost data after you updated to a new iPhone, you can always use Gihosoft iPhone Data Recovery to get the data back from the old iPhone or backup.You may also like: iphonerecovery.com


If you use android phones, please choose Gihosoft Android Data Recovery.


With Gihosoft Android Data Recovery, no longer afraid of data loss!


Monday, November 12, 2018

How to Fix Forgot iPhone Passcode via iCloud 2019


How to Fix Forgot iPhone Passcode via iCloud 2019
Fix Forgot iPhone Passcode via iCloud

You can use iCloud to fix forgot iPhone passcode as well. iCloud will erase your device and restore it to previous settings. However, before you can use iCloud to fix the problem, you must have enabled Find My iPhone prior to forgotten your passcode.

Step 1: Open a browser on your device or computer, go to icloud.com.

Step 2: Sign in with your Apple ID and passcode which your iPhone is associated with.

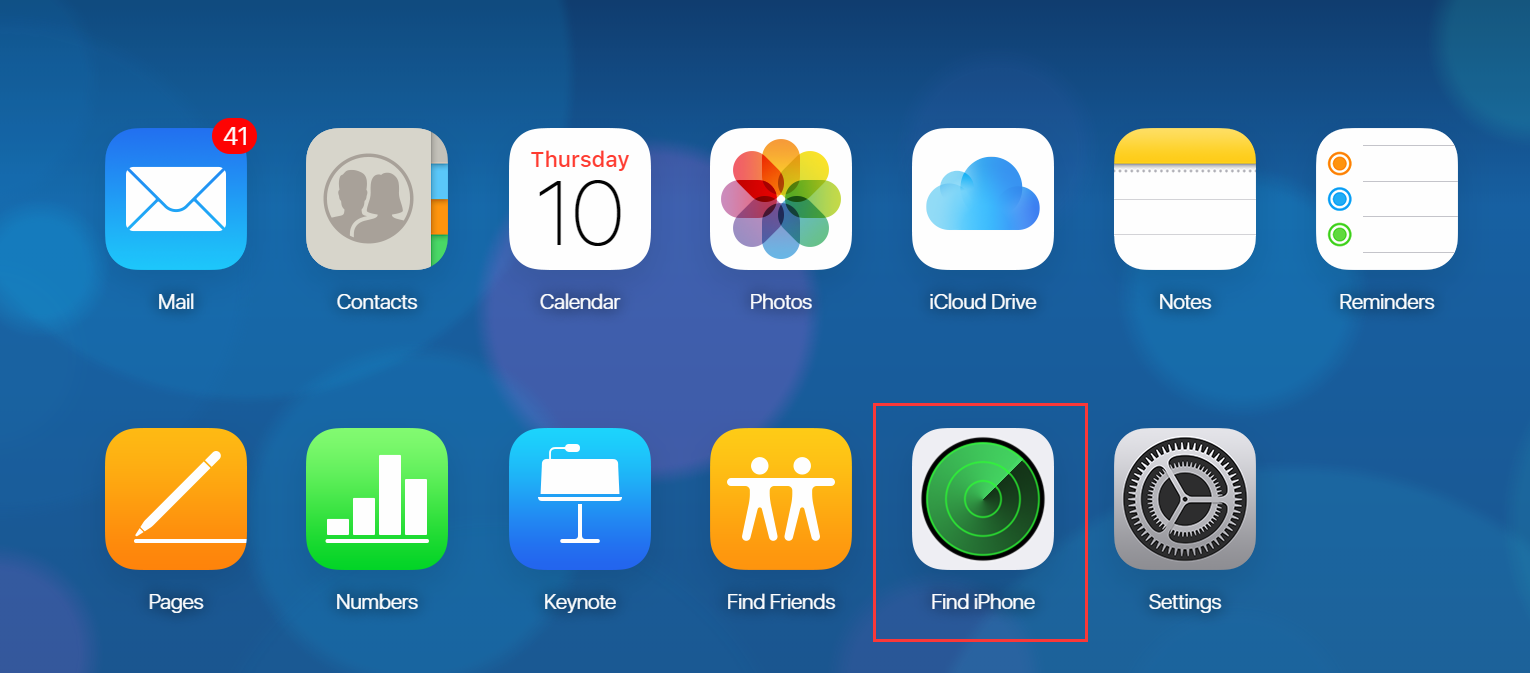
Step 3: Find and click “Find iPhone”.


Step 4: Tap “All Devices” and locate the device you forgot passcode.

Step 5: On the small window, you will see the “Erase iPhone” option, click on it.


Step 6: Confirm that you want to erase your device to get started.

Your iPhone will be remotely erased when it connects to internet. That means, this method is only available when your iPhone has internet.

Ads:

If you lost data after you updated to a new iPhone, you can always use Gihosoft iPhone Data Recovery to get the data back from the old iPhone or backup.

You may also like:iPhone Backup Extractor - Extract Data from iPhone Backup

Must Read:Jihosoft iTunes Backup Unlocker

Friday, November 9, 2018

How to Recover deleted Videos from SD Cards 2019


How to Recover deleted Videos from SD Cards 2019

Normal Solutions to Recover deleted Videos from SD Cards
Image result for Recover deleted Videos from SD

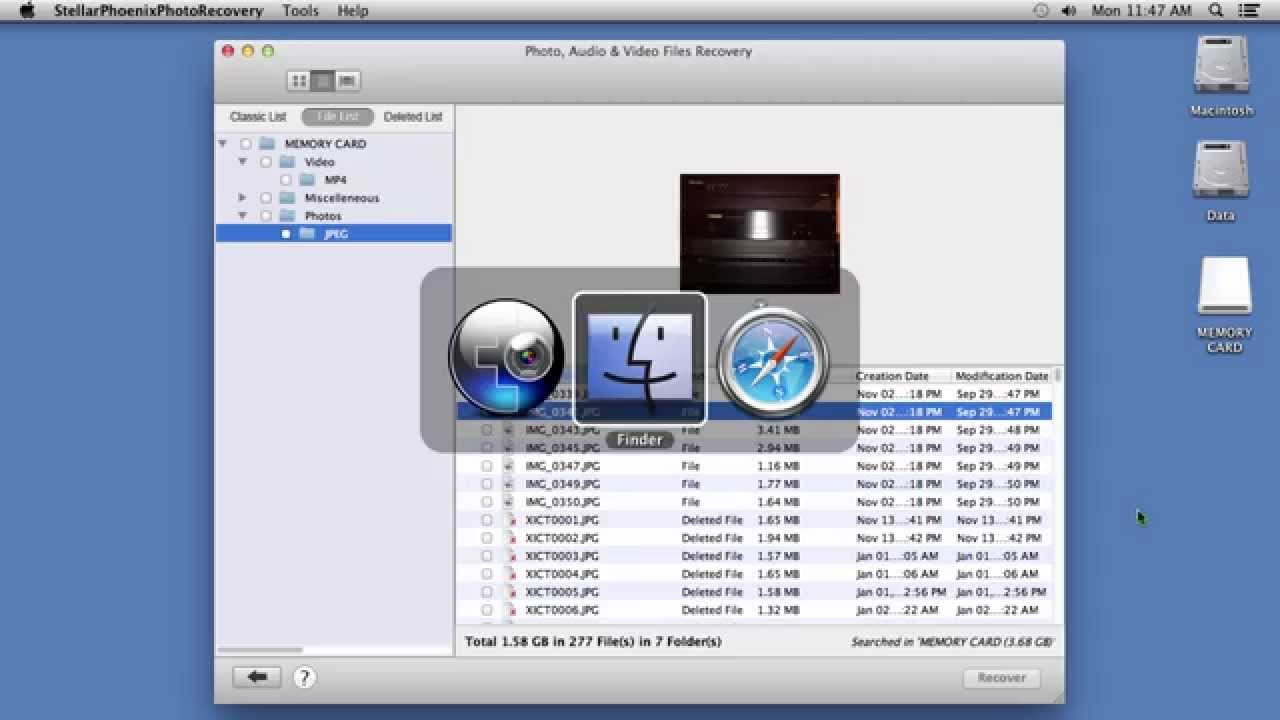
Here, we’ll discuss three troubleshooting solutions to recover lost video files from SD cards.
Solution 1.Reinstall the Driver

If your PC can’t recognize the SD card that contains your videos, reinstall the driver.

Step 1. Launch File Explorer and click on “This PC”.

Step 2. Navigate through these “Manage > Device Manager > Disk Drives”.

Step 3. Right-click your SD card and click “Ok”.

Step 4. Detach your SD card from your PC and restart your PC. Connect it again to see if your PC recognizes it.
Solution 2. Assign A New Driver Letter

Windows or macOS assigns a drive letter to every external hard drive connected to it. However, if you can’t see your SD card among the drives listed disks, then you can manually assign a drive letter to your SD card.

Step 1. Open Windows Dialogue Box by clicking “Windows + R” keys.

Step 2. Type msc and press the Enter key.

Step 3. Go to “Storage” and select “Disk Management”.

Step 4. Right-click on the SD card and choose “Change Letter and Paths”.

Step 5. Click on “Change” and check-in “Assign following drive letter”.

Step 6. Choose the letter you want to give and click “OK”.

ads:

If you lost data after you updated to a new iPhone, you can always use Gihosoft iPhone Data Recovery to get the data back from the old iPhone or backup.

You may also like:iPhone Backup Extractor - Extract Data from iPhone Backup

Must Read:Jihosoft iTunes Backup Unlocker
Solution 3. Perform Chkdsk

If you are getting errors such as “SC card is damaged, Try formatting it.” Then you need to perform a disk check.

Step 1. Connect your SD card to your computer.

Step 2. Open “My Computer” on your PC and take note of the drive letter assigned to your SD card.

Step 3. On your computer, click on “Start > All Programs > Accessories > Command Prompt”.

Step 4. Enter the command: “chkdisk/f” (where “f” is assumed to be the letter assigned to your SD card).

Step 5. Tap “Enter” and Windows will initiate the process to fix your corrupted SD card.

Thursday, November 8, 2018

How to Block or Filter Tags on Tumblr 2019


How to Block or Filter Tags on Tumblr 2019


Block or Filter Tags on Tumblr 2019

Inarguably, Tumblr ranks right up among the craziest places on the internet. You get all sorts of insane stuff on your endlessly scrolling dashboard that can range anywhere from clever political satire to the latest movie spoilers. And needless to say, some of them can keep you glued for hours or be downright irritating. Yes, Tumblr’s appeal lies in the fact that you never know what to expect, but can you do anything about those posts that you really dislike?


Thankfully, yes you can. Tumblr uses tags to categorize posts, and most of the stuff is based on followed blogs and searches. But rather than unfollowing them, you can use the tags to filter certain types of posts from ruining your day. So without further ado, let's see how you should go about doing that. But first, let's figure out how Tag Filtering works.
HOW TAG FILTERING WORKS

Just like with any other tagging system, Tumblr keeps things pretty simple. Those who post content can add relevant tags or create ones from scratch to match what people search. But regardless, any blogs that you actively follow can prompt Tumblr to pump out posts related to tags that you never want to see anywhere within your dashboard feed in the first place.

To stop this from becoming a problem, Tumblr implemented a filtering system a while ago. Filter a tag, and you automatically block all posts that contain the same tag, even if they've got other tags added to them.


Blocked posts, however, aren’t necessarily hidden — you can still see placeholders on your dashboard. If you want, you can simply click or tap the View Post button to open the post within the dashboard sidebar. Very useful if the posts are from a blog that you know and love. Quite intuitive, right?

When it comes down to the process of filtering out tags, Tumblr lets you do that on a desktop, as well as on the Android and iOS mobile apps. But don’t worry. Your changes sync over, so you don’t have to repeat your actions across platforms.

Filter a tag, and you automatically block all posts that contain the same tag, even if they've got other tags added to them

If you are unsure as to what tags to filter, check the bottom of a bothersome post for the complete list of associated tags. Use your intuition to determine the tag that you need to block. For example, if you see both the #starwars and #starwars spoilers tags in one post, choose the latter to stop missing out on Star Wars posts that actually don't have any spoilers in them.
BLOCKING TAGS ON DESKTOP

On a desktop, filtering tags require a brief visit to the Settings panel. Any changes to the dashboard feed are reflected immediately.

Step 1: On the Tumblr dashboard, click the Account icon, and then click Settings.


Step 2: Click the pencil-shaped Edit icon under the Filtering section, and then add the tag that you want to block. When done, click the Add button.


NOTE: Don’t enter the hash (#) symbol — Tumblr automatically fills it for you.

Step 3. Insert any other tags that you want to block, and then head back to the dashboard. All posts related to the filtered tags should now be hidden.


NOTE: While you are at it, you can also block Not Safe For Work (NSFW) posts by turning on the toggle next to Safe Mode.
FILTERING TAGS ON MOBILE

Your filtered tags on the desktop should sync right over to mobile. However, you can still add tags to the list from Tumblr's Android or iOS apps quite easily.

Step 1: On the Tumblr mobile app, tap the Account icon. On the subsequent screen, tap the cog-shaped Settings icon.

NOTE: On the iOS version, you need to select any one of your blogs first before you can see the Settings icon. It doesn't matter what blog you choose.


Step 2: Tap the option labeled General Settings, and then tap Filtering.


Step 3: Tap the +New option, and then enter the tag that you want to filter into the pop-up box. Repeat for any other tags that you want to block, and then head back over to the dashboard.


NOTE: Just like on the desktop, you can block Not Safe For Work (NSFW) content from showing up by turning on the toggle next to Safe Mode.
UNFOLLOW ANNOYING BLOGS

At times, you may receive tons of annoying posts just because you followed the wrong blog. And obviously, you can't just rely on tag filtering to stop seeing them. So, why not consider unfollowing the blog? It's either that or losing out on better posts that carry similar tags from other blogs.

If you are brave enough to take that decision, then simply click the username of the blog from within a post. You should then see the blog loading to the side of the dashboard. Simply click Unfollow, and you should be good.


NOTE: On mobile, you must tap the Profile icon to bring up the Unfollow option.
GROOM YOUR DASHBOARD WELL

The ability to filter or block tags is one of the best, yet relatively unknown, features on Tumblr. Once you've added some of the worst tags out there, you no longer have to worry about seeing stupid posts or surprises on your dashboard. So what are you waiting for? Start blocking them tags!


Must Check Out Posts:

How to Hack an Android Phone without Root?

Best 8 Solutions to Make Android Phone Run Faster

7 Best Free Online Android Emulators For Windows PCs

9 Best Traffic Apps for Android to Make Through the Jam 2019

The Best 5 Call Blocker Apps for Android

How to Backup Android Data without Root


Jihosoft Photo Eraser

Erase unwanted objects and perfect your amazing photos!

Remove objects from photos with Photo Eraser is almost as easy as taking a shot. Now you can use this tool to erase undesirable objects from your pictures, such as tourists, watermarks, logos, texts, blemishes and other unwanted things without real photo-editing skills required at all.


Jihosoft Android Data Recovery

The most powerful and professional data recovery software for Android that can restore deleted or lost contacts, photos, videos, audios, SMS, call logs, WhatsApp chat, Viber messages from any Android devices due to accidental deletion, virus attack, formatting. It supports all popular Android smartphones and tablets like Samsung, HTC, LG, Huawei, Motorola, Nexus, etc. In the meantime, you will be guided step by step if you never used this kind of tool before.

iOS 12.1.1 Will Allow iPhone XR Users to Expand Notifications Using Haptic Touch 2019


To keep its price in check, Apple removed 3D Touch from the iPhone XR. Instead, Apple has replaced it with Haptic Touch which is essentially a long press coupled with haptic feedback. However, due to hardware limitations, Haptic Touch on the iPhone XR only works in a few places across iOS 12 and it is simply not as useful as 3D Touch.

One major omission with Haptic Touch on the iPhone XR is the inability to expand and view rich notifications. This means that one cannot expand a notification to view its content using Haptic Touch. Instead, iPhone XR users are required to swipe on a notification and then tap on view to expand the notification — a slow and tedious process.Must Read:Jihosoft iTunes Backup Unlocker

This was a strange omission on Apple’s part especially since on the iPad and iPad Pro, one could long press banner notifications to view their content. Thankfully, Apple will be fixing this behavior with its upcoming iOS 12.1.1 update which is currently being beta tested. Post the release of iOS 12.1.1, iPhone XR owners will be able to long press on any notification banner to view its content. Apple is expected to release iOS 12.1.1 to the public before the end of this month.

Apple has confirmed that it is expanding Haptic Touch support across iOS 12. We should see the company address more such issues with Haptic Touch on the iPhone XR in future updates.If you lost data after you updated to a new iPhone, you can always use Gihosoft iPhone Data Recovery to get the data back from the old iPhone or backup.

You may also like:iPhone Backup Extractor - Extract Data from iPhone Backup

[Via 9to5Mac]

Tuesday, November 6, 2018

How to Transfer Music from iPhone to Mac with iTunes 2019


How to Transfer Music from iPhone to Mac with iTunes


Connect your iOS device with Mac through USB.


Open and register your device with the recommended latest version of “iTunes”.


On iTunes, click on "File>Devices>Transfer Purchases from iPhone".


Limitations:

All in all, while iTunes fully supports the functionality to transfer Music from iPhone to Mac and vice versa, still the user can face some issues in syncing or locating the destination device for the files to be transferred. Also, the user can only transfer purchased music on your iPhone.If you lost data after you updated to a new iPhone, you can always use Gihosoft iPhone Data Recovery to get the data back from the old iPhone or backup.

You may also like:iPhone Backup Extractor - Extract Data from iPhone Backup

Must Read:Jihosoft iTunes Backup Unlocker

Thursday, November 1, 2018

How to Deactivate Facebook Messenger on iPhone 2019


How to Deactivate Facebook Messenger on iPhone

If you need a break from Facebook Messenger, you can deactivate it by following these simple steps:


Open Messenger app on your iPhone.


Click on your profile picture at the top left corner of the page.


Click “Privacy & Terms > Deactivate Messenger”.


Type in your password and click “Continue”.


Click “Deactivate” tab.

Note that reactivating Facebook Messenger will also reactivate the Facebook account. However, before you can successfully deactivate Facebook Messenger, you need to have deactivated your Facebook account. Therefore, if you’re yet to deactivate your Facebook account, you can check the part 2 of this article to do that.
How to Deactivate Facebook But Keep Messenger Active

If you've tired 0f the overload of information coming from Facebook feeds, feel you’ve had enough of the posts, tired of messages from friends and family members, or feel addicted to checking your social media network site every minute, then the temporary solution is to deactivate your Facebook account. If you later feel different about Facebook in the future, you can activate it again.

Here are the steps to deactivate your Facebook account on iPhone:


Go to Facebook’s deactivate account page. Log in if it asks you.


Ignore the distracting photos of those who will miss you and head to the bottom of the page.


The last option on the page will notify you that you can continue using Facebook Messenger even after deactivating your Facebook account. Click “Deactivate” tab.


Confirm it by clicking “Deactivate Now”.


After the deactivation, all your Facebook data will be safe until you’re ready to activate Facebook again.

If you lost data after you updated to a new iPhone, you can always use Gihosoft iPhone Data Recovery to get the data back from the old iPhone or backup.

You may also like:iPhone Backup Extractor - Extract Data from iPhone Backup

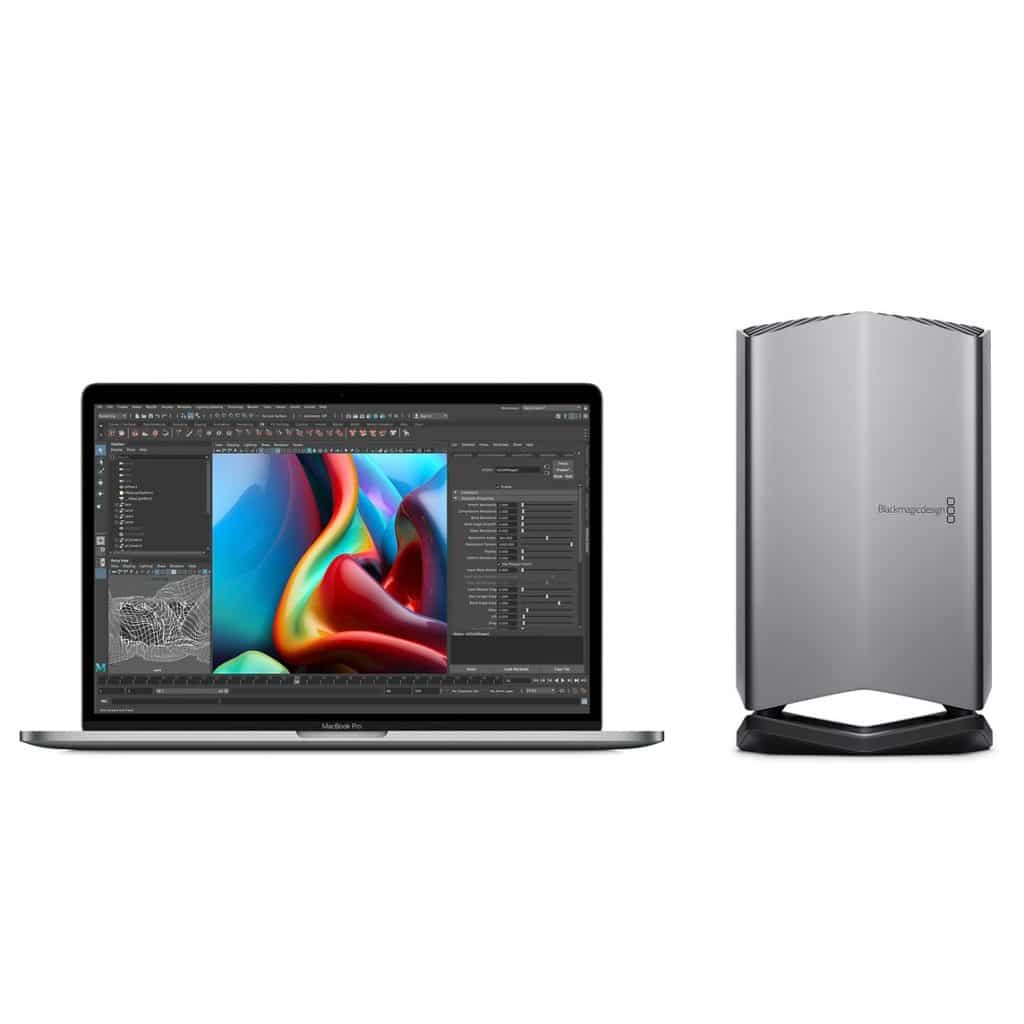
macOS Catalina Is Causing Issues with Select eGPUs

macOS Catalina is apparently breaking many apps. Users have reported that they are facing problems after updating to macOS Catalina with...