Friday, August 31, 2018
How to Bypass iCloud Activation 2019
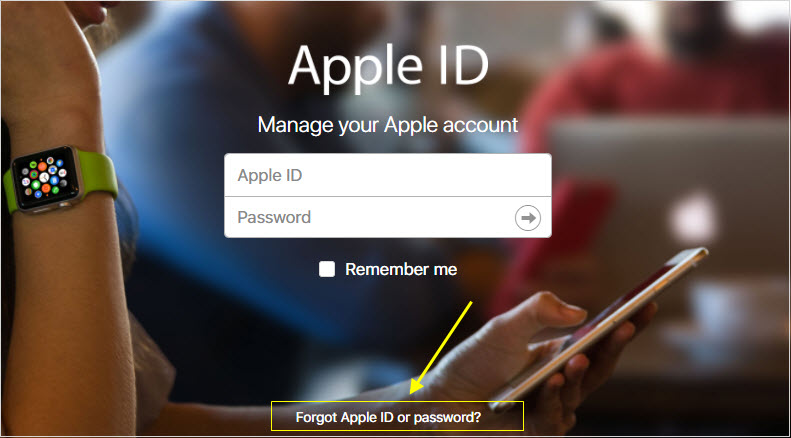
How to Bypass iCloud Activation
1. Contact the Previous Owner
The easiest way to do this is to call the previous owner and ask them to turn off their Find My iPhone. If you bought it from someone, they might have forgotten to remove all their personal information and accounts from the phone before handing it over.
If the device has already been erased, you will have to take it back to them to input their Apple ID and password. This way, they will remove the device from their account and the device will become available for use. If you can’t get to them physically, they can still remove the device from their account using the following steps:
Sign into iCloud.com with Apple ID and go to Find My iPhone.
Select on the Device List and then select your device and click Remove from Account.
Once you get confirmation that they have removed the phone, turn off the phone, turn it back on and you will be prompted to begin the setup process.
2. Bypass iCloud Activation Using Online Unlock Service
iphoneimei.net is an online unlock service that unlocks iPhones for a fixed fee. The unlocking process takes a few working days. They can also unlock iPhones from anywhere in the world as long as they have the phone’s details- IMEI and model. The IMEI is a number used to identify mobile devices. Every phone has a unique one.
If you do not know your IMEI, here’s how to find it:
If you use an iPhone 5 or a newer model, your IMEI is printed on the back of your phone
If you have an older model, dial *#06#
Here is How to Use This Service:
Go to the website and fill in the required information. Click on the Unlock Now tab and a secure page will open where you can fill in your payment details. They accept both Visa and MasterCard.
The unlocking process will begin once you pay and you will be sent periodic emails to keep you informed on their progress.You may also like:Gihosoft Mobile Transfer: 1 Click Data Transfer from Phone to Phone
Gihosoft Android data recovery Free is a super awesome software specialized in Android file recovery. With this program, you are able to recover deleted photos, music, videos, messages, contacts, call logs, WhatsApp messages, Viber chat history and more from Samsung, Huawei, LG, HTC, Motorola, Google, Oneplus, Sony, Lenovo, ZTE and other Android devices directly. Meanwhile, this Android data recovery software is available for both Windows and Mac platforms.For now, check:Free iTunes/iPhone Backup Extractor for iPhone, iPad
Jihosoft iTunes Backup Extractor free is a powerful tool to recover and extract important data from iPhone, iPad & iPod touch backup on Windows or Mac.
If you can’t sync with iTunes and want to rescue data from a disable iPhone, you could try Gihosoft iPhone Data Recovery. Also feel free to ask questions on the iDevice is disabled error in the comments section below.
Thursday, August 30, 2018
The best way to create reusable custom lists in Excel on Mac
How to create reusable custom lists in Excel on Mac

Along with its robust features like automatic calculations, conditional formatting, charts, and such, Microsoft Excel offers some simple features that can save you time.You may also like:Gihosoft Mobile Transfer: 1 Click Data Transfer from Phone to Phone
One of these features is the ability to create custom lists. Custom lists can be used over and over on your spreadsheets. This is handy for things you use often like product, employee, or attribute lists.
Here’s how to easily create and use custom lists in Excel.
Create custom lists in Excel
Open Microsoft Excel on your Mac. You can open the workbook where you want to insert the custom list or any other workbook since the lists are reusable.
1) Click Excel from your menu.
2) Select Preferences.
3) Click Custom Lists in the window that pops open.

Another window will open where you can create your custom lists and there are two ways to do it.
Create custom lists manually
You can add your list items one-by-one easily.
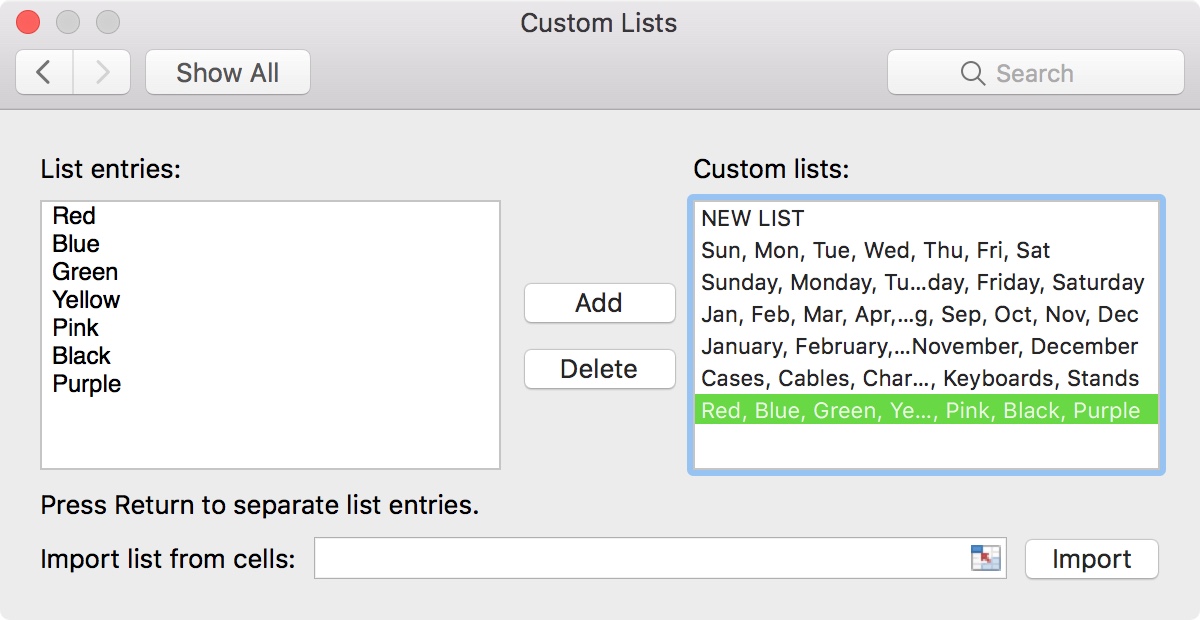
1) Select New List from the Custom Lists box on the right.
2) Click inside the List entries box.
3) Add your items, separating each on its own line by hitting the Enter key.
4) When you finish adding items, click Add. You will see those list items automatically populate in the Custom Lists box.
Create custom lists from a spreadsheet
You may already have a list of items in an Excel spreadsheet that you want to transform into a custom list. This is also easy to do.
1) To speed up the process, move to the spreadsheet that contains the list items.
2) Reopen the Custom Lists window if necessary.
3) Select New List from the Custom Lists box on the right.
4) Click inside the Import list from cells box.
5) Either select the cells on your spreadsheet by dragging through them and hitting the Enter key or typing the cell range in the box.

6) Click Import.
You will see those items populate in both the List entries and Custom Lists boxes.

Use your Excel custom lists
When you want to add items to a spreadsheet from a custom list you’ve created, start by adding the first item you put on that list.
1) Select the cell for your first item.
2) Move your cursor to the bottom right corner of the cell until the handle appears.
3) Drag to populate subsequent cells with your list items.
4) Release the cursor.
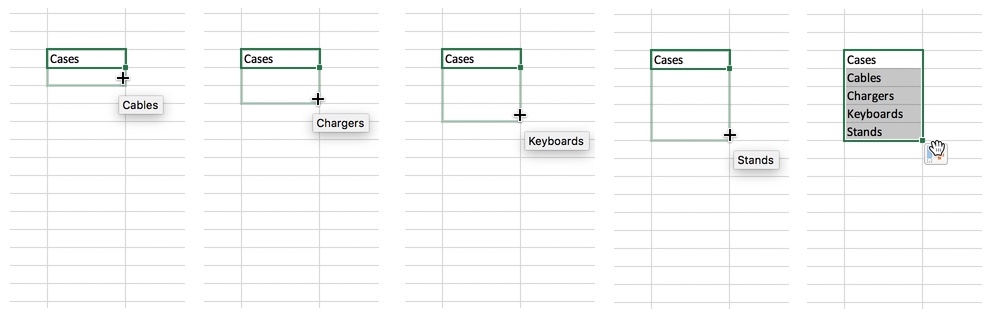
You’ll notice as you continue to drag from the first cell, items from your list will appear briefly. When you release the cursor, your list items will display in the cells.
You can drag to display your list items in either a column or a row, whichever works best for your spreadsheet.You may also like:Gihosoft Mobile Transfer: 1 Click Data Transfer from Phone to Phone
If you stop dragging before the end of your list, only those items up until that point will display.
If you continue dragging longer than the number of items in your list, the list items will begin again.
Wrapping it up
The ability to create custom lists in Excel is just one of those little time savers that comes in handy. Is this a feature that you currently use in Excel or are you going to give it a try now? Let us know what you think of it!
Also, if you want to extract contacts or other data from iPhone or iTunes backup as readable formats like CSV or HTML for printing or other action, you may use the handy Jihosoft iPhone Backup Extractor tool.
Free iTunes/iPhone Backup Extractor for iPhone, iPad
Jihosoft iTunes Backup Extractor is a powerful tool to recover and extract important data from iPhone, iPad & iPod touch backup on Windows or Mac.
How to Connect to iTunes When iPhone 6 Is Disabled 2019
How to Connect to iTunes When iPhone 6 Is Disabled
If someone attempts to unlock your iPhone 6, 7, 8 or X and ends up putting the wrong passcode for too many times, your iPhone will be disabled and a notification that “iPhone is disabled, connect to iTunes” will be shown on your lock screen.
When you see such notification, you mind maybe that once you connect to iTunes, the lock screen will be automatically removed; that’s not true! The truth is that you’ll go through many steps and navigate through multiple iTunes windows before you can fix your disabled iPhone.
Here are the steps to connect to iTunes when iPhone is disabled:
If you’ve synced your iPhone 6 with iTunes in time past, then connect your iPhone to the computer you synced with. If you haven’t synced your device on iTunes before, try the way in the next part.
Launch iTunes on your PC while connecting your iPhone.
iTunes will make a backup of your iPhone, wait for it to finish. After the sync, click “Restore iPhone”.
From the Set-Up page, click “Restore from iTunes backup” to lift a backup from your library.
Select your iPhone in iTunes, and choose a relevant backup to restore your iPhone with. Consider backup date and size when choosing.

If iTunes says your iPhone is locked, this way to connect to iTunes is ineffective for you. You should try the next solution.Jihosoft Android Data Recovery: the best Android Data Recovery software for Windows and Mac to recover deleted contacts, messages, photos, videos, WhatsApp and etc from Android devices.
Gihosoft Android data recovery Free is a super awesome software specialized in Android file recovery. With this program, you are able to recover deleted photos, music, videos, messages, contacts, call logs, WhatsApp messages, Viber chat history and more from Samsung, Huawei, LG, HTC, Motorola, Google, Oneplus, Sony, Lenovo, ZTE and other Android devices directly. Meanwhile, this Android data recovery software is available for both Windows and Mac platforms.For now, check:Free iTunes/iPhone Backup Extractor for iPhone, iPad
Jihosoft iTunes Backup Extractor free is a powerful tool to recover and extract important data from iPhone, iPad & iPod touch backup on Windows or Mac.
You may also like:Gihosoft Mobile Transfer: 1 Click Data Transfer from Phone to Phone
If you can’t sync with iTunes and want to rescue data from a disable iPhone, you could try Gihosoft iPhone Data Recovery. Also feel free to ask questions on the iDevice is disabled error in the comments section below.
If someone attempts to unlock your iPhone 6, 7, 8 or X and ends up putting the wrong passcode for too many times, your iPhone will be disabled and a notification that “iPhone is disabled, connect to iTunes” will be shown on your lock screen.
When you see such notification, you mind maybe that once you connect to iTunes, the lock screen will be automatically removed; that’s not true! The truth is that you’ll go through many steps and navigate through multiple iTunes windows before you can fix your disabled iPhone.
Here are the steps to connect to iTunes when iPhone is disabled:
If you’ve synced your iPhone 6 with iTunes in time past, then connect your iPhone to the computer you synced with. If you haven’t synced your device on iTunes before, try the way in the next part.
Launch iTunes on your PC while connecting your iPhone.
iTunes will make a backup of your iPhone, wait for it to finish. After the sync, click “Restore iPhone”.
From the Set-Up page, click “Restore from iTunes backup” to lift a backup from your library.
Select your iPhone in iTunes, and choose a relevant backup to restore your iPhone with. Consider backup date and size when choosing.
If iTunes says your iPhone is locked, this way to connect to iTunes is ineffective for you. You should try the next solution.Jihosoft Android Data Recovery: the best Android Data Recovery software for Windows and Mac to recover deleted contacts, messages, photos, videos, WhatsApp and etc from Android devices.
Gihosoft Android data recovery Free is a super awesome software specialized in Android file recovery. With this program, you are able to recover deleted photos, music, videos, messages, contacts, call logs, WhatsApp messages, Viber chat history and more from Samsung, Huawei, LG, HTC, Motorola, Google, Oneplus, Sony, Lenovo, ZTE and other Android devices directly. Meanwhile, this Android data recovery software is available for both Windows and Mac platforms.For now, check:Free iTunes/iPhone Backup Extractor for iPhone, iPad
Jihosoft iTunes Backup Extractor free is a powerful tool to recover and extract important data from iPhone, iPad & iPod touch backup on Windows or Mac.
You may also like:Gihosoft Mobile Transfer: 1 Click Data Transfer from Phone to Phone
If you can’t sync with iTunes and want to rescue data from a disable iPhone, you could try Gihosoft iPhone Data Recovery. Also feel free to ask questions on the iDevice is disabled error in the comments section below.
Wednesday, August 29, 2018
How to Return a Recent Call on Your iPhone?
How to Return a Recent Call on Your iPhone?
Now that you know how you can view iPhone recent calls list, the next step is usually to return certain calls that you had missed. Below are 2 cases that you may encounter and the steps that you need to follow in each case are outlined accordingly.You may also like:Gihosoft Mobile Transfer: 1 Click Data Transfer from Phone to Phone
a. Dialing a number from a call you received or made from another Phone
There are times when you want to dial a number altogether from a call that you received or made on another phone. In this case, you need to do as follows:
Tap on the Phone app on your iPhone.
The number pad will appear automatically. Dial the number that you want to call and then tap Call.
b. Only viewing calls that you have missed
If you would only like to view calls that you have missed, follow the steps mentioned below:
Tap the “Phone” app on the home screen.
Tap on “Recents”.
Tap “Missed”. All the missed calls will be displayed.
How to Fix Recent Calls appearing on another iPhone
Having recent calls appearing on another phone is an issue that confuses many. However, this is not much of a big problem and it has to do with your iCloud Account settings.Sponsor ads: Transfer Music from Android to Android
It is often the case that many of us share the same account with our family and friends to log in to Apple devices. This is what causes other call histories appearing on the same phone.
To solve the issue, simply go to Settings -> iCloud -> iCloud Drive and switch off the toggle.
You may also like:Gihosoft iPhone Data Recovery
Must Read:Gihosoft Free Android Data Recovery
Must Read:Jihosoft iTunes Backup Unlocker
Jihosoft iTunes Backup Extractor free is a powerful tool to recover and extract important data from iPhone, iPad & iPod touch backup on Windows or Mac.
You may also like:
Gihosoft Total Video Converter is a professional all-in-one video tool that enables you to convert videos and audios into various different formats.
You may also like:online youtube downloader
Tuesday, August 28, 2018
How to enable Dark Mode and other user interface themes in Wikipedia for iPhone
How to enable Dark Mode and other user interface themes in Wikipedia for iPhone
Many developers are seeing sense in adding dark themes to their warez. Not only do darkened interfaces look stunning, they also help conserve power on iPhones that utilize OLED technology. Having previously explained using black themes in desktop and mobile apps like iMazing, Bear, Outlook.com, Mail, YouTube, Apollo and others, this step-by-step tutorial will now teach you to turn on Wikipedia Dark Mode on iPhone and iPad.
How to enable Wikipedia Dark Mode
Follow the steps below to activate Wikipedia Dark Mode on iPhone or iPad.
1) Open Wikipedia for iOS on your iPhone or iPad.You may also like:Gihosoft iPhone Data Recovery
Must Read:Gihosoft Free Android Data Recovery
Must Read:Jihosoft iTunes Backup Unlocker
Jihosoft iTunes Backup Extractor free is a powerful tool to recover and extract important data from iPhone, iPad & iPod touch backup on Windows or Mac.
You may also like:
Gihosoft Total Video Converter is a professional all-in-one video tool that enables you to convert videos and audios into various different formats.
You may also like:online youtube downloader
2) Tap the Explore tab at the bottom.
3) Hit the cog wheel icon in the top-right corner to pull up settings.
4) Choose Reading Preferences from the list.
5) Now pick a desired look.
Choose among the following themes listed underneath the Reading Themes heading.
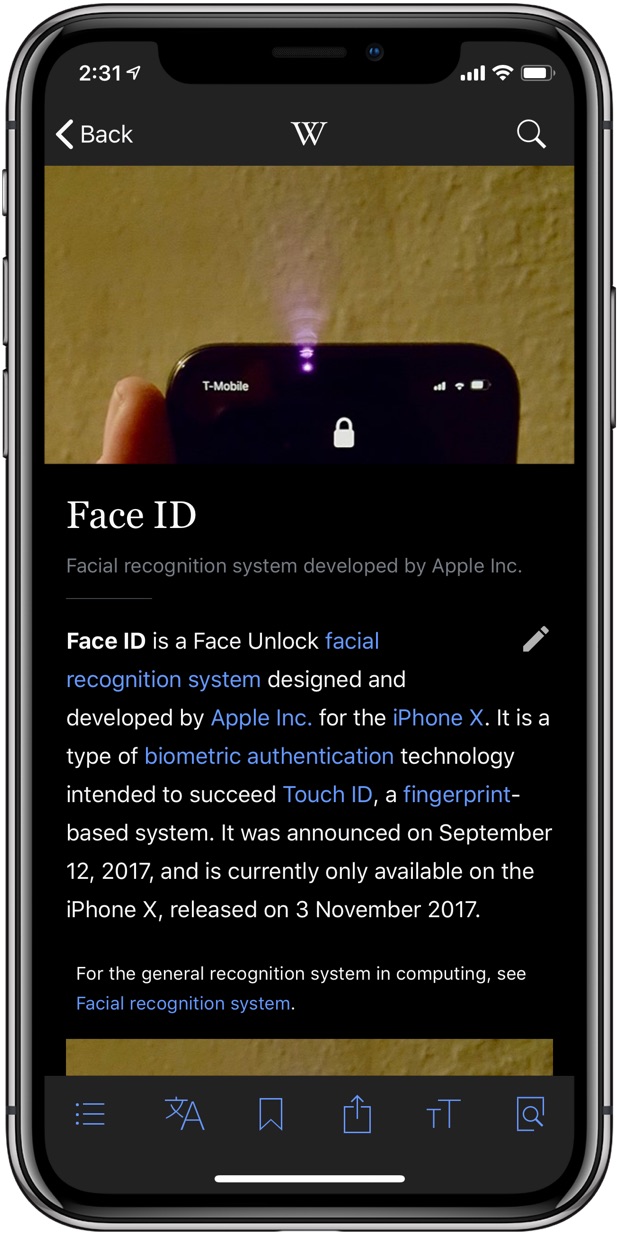
Default: Uses the white theme, enabled by default.
Sepia: Switches to a reddish-brown scheme like an old photo.
Dark: Toggles on a darkened interface.
Black: Switches to a pure black interface.
Read Wikipedia your way by choosing between the sepia, dark, black and white looks.
The app includes an image-dimming option which decreases the opacity of images on the Dark and Black themes, making browsing Wikipedia more pleasurable.
Enable this so images don’t look as harsh when scrolling through Wikipedia entries.
To let you read in full comfort, Wikipedia includes a handy shortcut for changing theme on-the-fly. Tap the “Aa“ button in the tab area at the bottom to access your appearance controls where you can pick a different theme, adjust your text size and increase or decrease brightness.
Appearance controls lets you access themes on-the-fly.
Do you browse Wikipedia or read entries mainly in low-light environments, or at night? If so, you’re recommended to use Dark or, better yet, Black theme—your eyes will thank you.
And that, boys and girls, is how you turn on Wikipedia Dark Mode.
Many developers are seeing sense in adding dark themes to their warez. Not only do darkened interfaces look stunning, they also help conserve power on iPhones that utilize OLED technology. Having previously explained using black themes in desktop and mobile apps like iMazing, Bear, Outlook.com, Mail, YouTube, Apollo and others, this step-by-step tutorial will now teach you to turn on Wikipedia Dark Mode on iPhone and iPad.
How to enable Wikipedia Dark Mode
Follow the steps below to activate Wikipedia Dark Mode on iPhone or iPad.
1) Open Wikipedia for iOS on your iPhone or iPad.You may also like:Gihosoft iPhone Data Recovery
Must Read:Gihosoft Free Android Data Recovery
Must Read:Jihosoft iTunes Backup Unlocker
Jihosoft iTunes Backup Extractor free is a powerful tool to recover and extract important data from iPhone, iPad & iPod touch backup on Windows or Mac.
You may also like:
Gihosoft Total Video Converter is a professional all-in-one video tool that enables you to convert videos and audios into various different formats.
You may also like:online youtube downloader
2) Tap the Explore tab at the bottom.
3) Hit the cog wheel icon in the top-right corner to pull up settings.
4) Choose Reading Preferences from the list.
5) Now pick a desired look.
Choose among the following themes listed underneath the Reading Themes heading.
Default: Uses the white theme, enabled by default.
Sepia: Switches to a reddish-brown scheme like an old photo.
Dark: Toggles on a darkened interface.
Black: Switches to a pure black interface.
Read Wikipedia your way by choosing between the sepia, dark, black and white looks.
The app includes an image-dimming option which decreases the opacity of images on the Dark and Black themes, making browsing Wikipedia more pleasurable.
Enable this so images don’t look as harsh when scrolling through Wikipedia entries.
To let you read in full comfort, Wikipedia includes a handy shortcut for changing theme on-the-fly. Tap the “Aa“ button in the tab area at the bottom to access your appearance controls where you can pick a different theme, adjust your text size and increase or decrease brightness.
Appearance controls lets you access themes on-the-fly.
Do you browse Wikipedia or read entries mainly in low-light environments, or at night? If so, you’re recommended to use Dark or, better yet, Black theme—your eyes will thank you.
And that, boys and girls, is how you turn on Wikipedia Dark Mode.
How to Sort Files by Date, Name, Size, or Tags on iPad 2019 Top Guide
How to Sort Files by Date, Name, Size, or Tags on iPad
Changing how files are sorted in the Files app for iOS on iPad is simple enough, the screenshots here show the Files app in horizontal landscape orientation but it works the same in vertical portrait orientation too:
Open the “Files” app in iOS

Navigate to any folder within the Files app
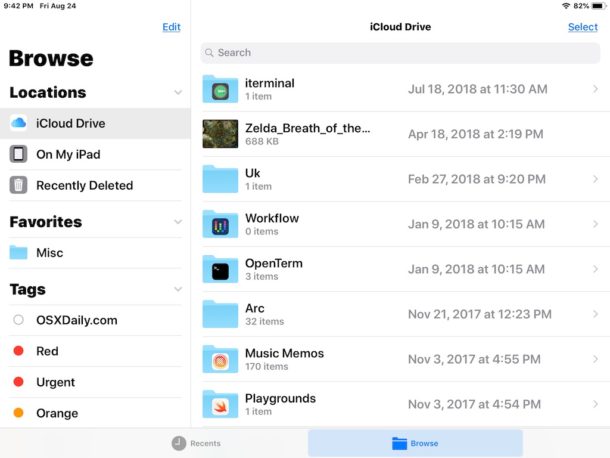
From the file view, tap and pull down on the file listing to reveal additional options including the Sorting options for Files appYou may also like:Gihosoft iPhone Data Recovery
Must Read:Gihosoft Free Android Data Recovery
Must Read:Jihosoft iTunes Backup Unlocker
Jihosoft iTunes Backup Extractor free is a powerful tool to recover and extract important data from iPhone, iPad & iPod touch backup on Windows or Mac.
You may also like:
Gihosoft Total Video Converter is a professional all-in-one video tool that enables you to convert videos and audios into various different formats.
You may also like:online youtube downloader

Choose the Files sorting you’d like to apply to the active folder:
Name – sort alphabetically by file / folder name
Date – sort by date of file / folder added
Size – sort by file size
Tags – sort by tags used on files / folders
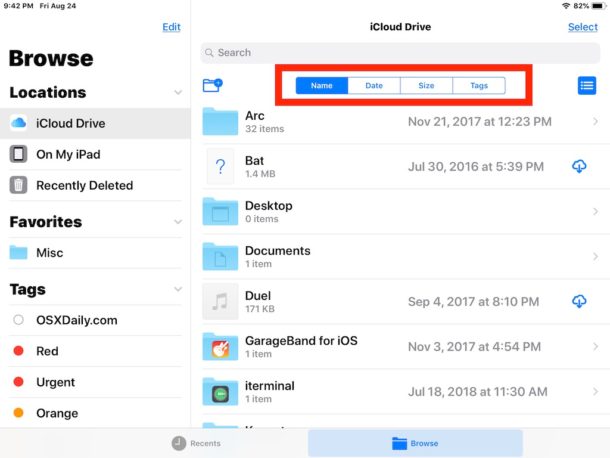
Changes to file sorting takes effect immediately.
How to delete multiple contacts on iPhone 2019
How to delete multiple contacts on iPhone
The Contacts app on iPhone has not seen any noticeable change since past several years. While the interface of the app is quite user-friendly, the fact that users cannot delete multiple contacts at the same time can be a bit painful at times. But did you know that Apple allows removing multiple contacts from iCloud and iTunes on your PC or Mac. Wondering how?
Here's our ready-to-use-guide for you:

Pre-requisites:
Make sure you are running the latest version of iTunes
Your iCloud contact sync is turned ‘On’
Working internet connectionYou may also like:Gihosoft iPhone Data Recovery
Must Read:Gihosoft Free Android Data Recovery
Must Read:Jihosoft iTunes Backup Unlocker
Jihosoft iTunes Backup Extractor free is a powerful tool to recover and extract important data from iPhone, iPad & iPod touch backup on Windows or Mac.
You may also like:
Gihosoft Total Video Converter is a professional all-in-one video tool that enables you to convert videos and audios into various different formats.
You may also like:online youtube downloader
Method 1: Using iCloud website
1. Go to ‘www.icloud.com’ using any browser on your PC or Mac
2. Login using your ID and password
3. Now, click on the ‘Contacts’ icon
4. Select all the contacts you want to delete and hit ‘Delete’ button on your keyboard
5. Click ‘Delete’ button, if prompted for a confirmation to delete your selected contacts
Method 2: Using third-party apps
Alternatively, you can also download any third-party app from AppStore such as AnyTrans, Cleaner Pro, Delete contacts+ and more and delete multiple contacts
Method 3: Using your Mac
Unlike the Contacts app on your iPhone/iPad, the Mac version of the app allow users to select multiple contacts and delete those in one go.
How to Force Your iPhone to Switch Cell Towers for a Stronger Signal
Having a dropped call can be incredibly frustrating, especially when you look down and see that your iPhone has full reception. While there's any number of issues that can cause this, one common and often overlooked issue is your iPhone failing to switch cell towers as appropriately needed.
When you're not switched to the appropriate tower, it means there's a problem with the communication between your smartphone and cellular network. Either your iPhone tries to hold its connection to a cell tower that's well outside the optimal range or the new cell tower is already overloaded with other connected devices.
How Cell Phones Switch Towers
Cell phones work with networks to determine the best tower to connect to based on range, signal strength, and the frequency being used. When a phone is connected to a cellular network, it continually checks the signal strength of nearby towers and communicates that information to the network. In theory, when a phone's connection to a cell tower drops below signal strength of a nearby one, the network should switch the phone to the new tower.
Practically, however, this doesn't always occur as smoothly as it should and common fixes, such as cycling Airplane Mode, don't always work. While using the "Reset Network Settings" option will always work, it's a drastic step that will also erase any saved Wi-Fi login credentials. Fortunately, there's another simple way to force your iPhone to switch towers.
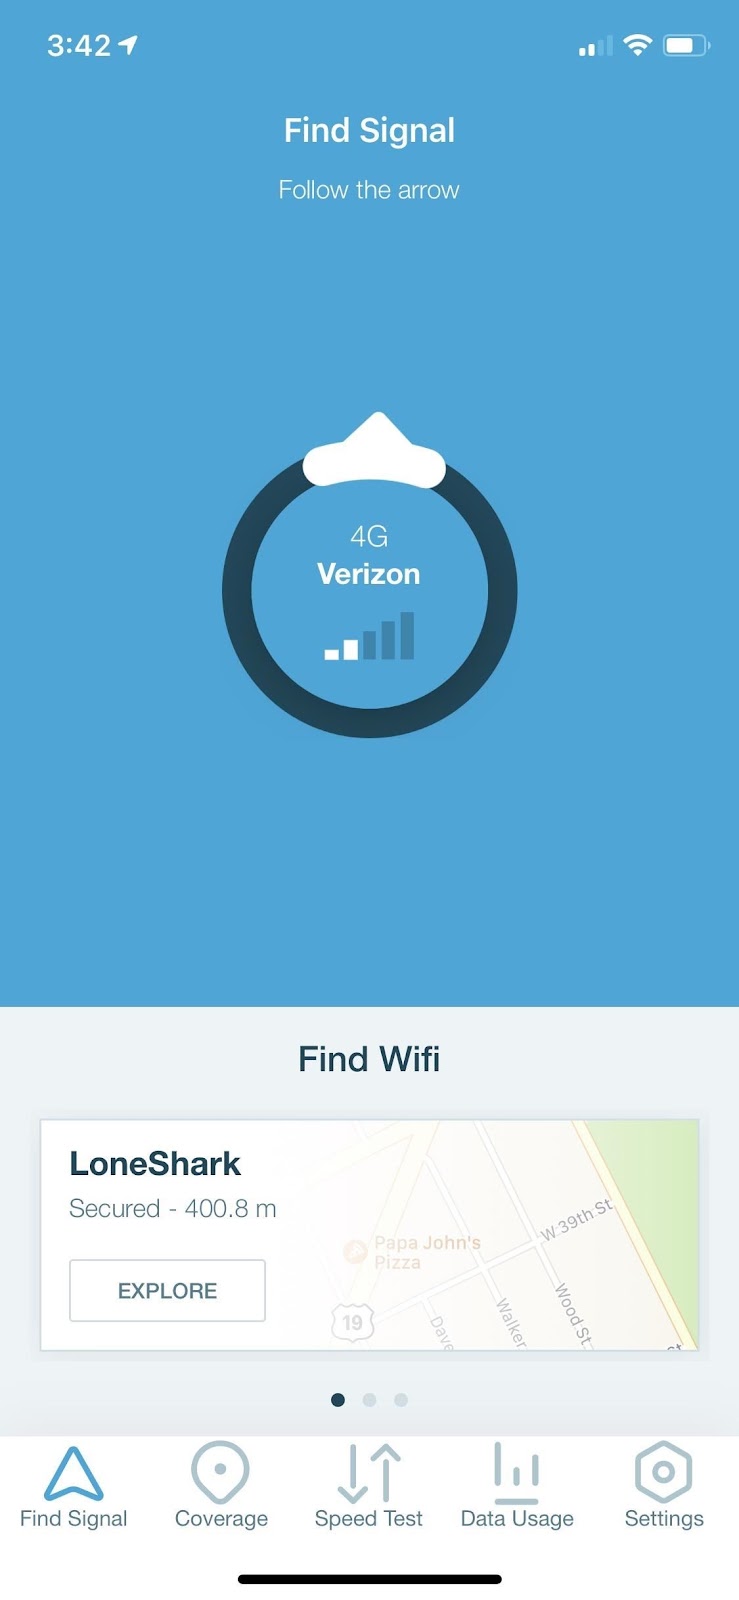
Step 1Install OpenSignal
OpenSignal is a network performance monitoring app that not only tells you the speed of your connection but also shows you what tower you're currently connected to. You can search for "OpenSignal" in the iOS App Store directly or use the link below to jump right to it. Install just like any other app.
App Store Link: OpenSignal - Speed Test & Maps (free)

Step 2Configure & Check Your Current Tower
Once you have OpenSignal installed and open, you'll need to give it access to your location in the notification prompt. OpenSignal uses your position to show you nearby cell towers.
The app will also ask if you want to contribute signal data. OpenSignal uses this information to rate the carriers and provide customers with input on what carriers offer the best coverage in any given region; This is entirely voluntary, but if you do opt in, any information collected will be strictly anonymous.

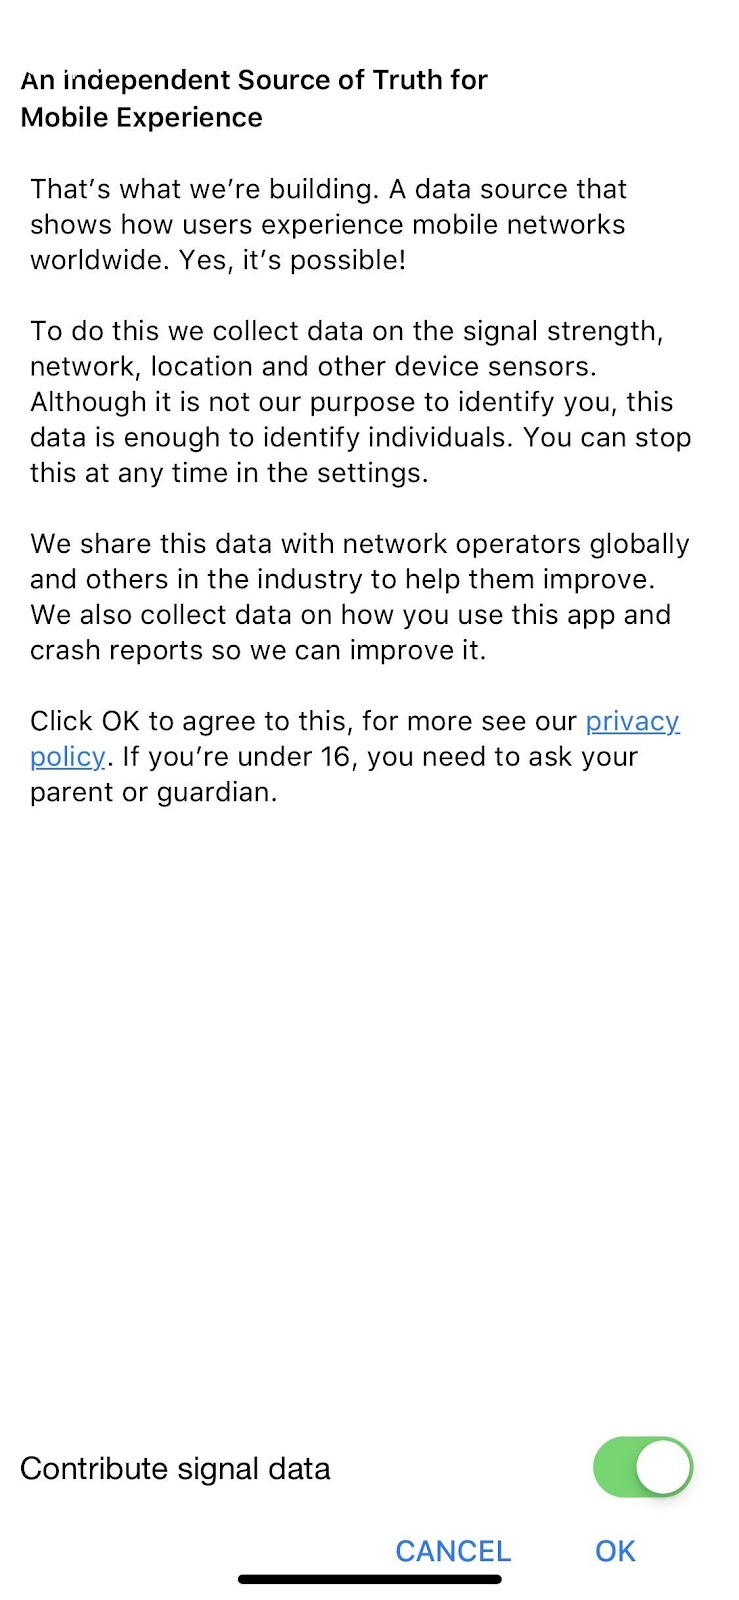
Another Way to Get a Stronger Signal: Get a SureCall Flare Signal Booster Kit for iPhones (Amazon | Best Buy | Walmart)
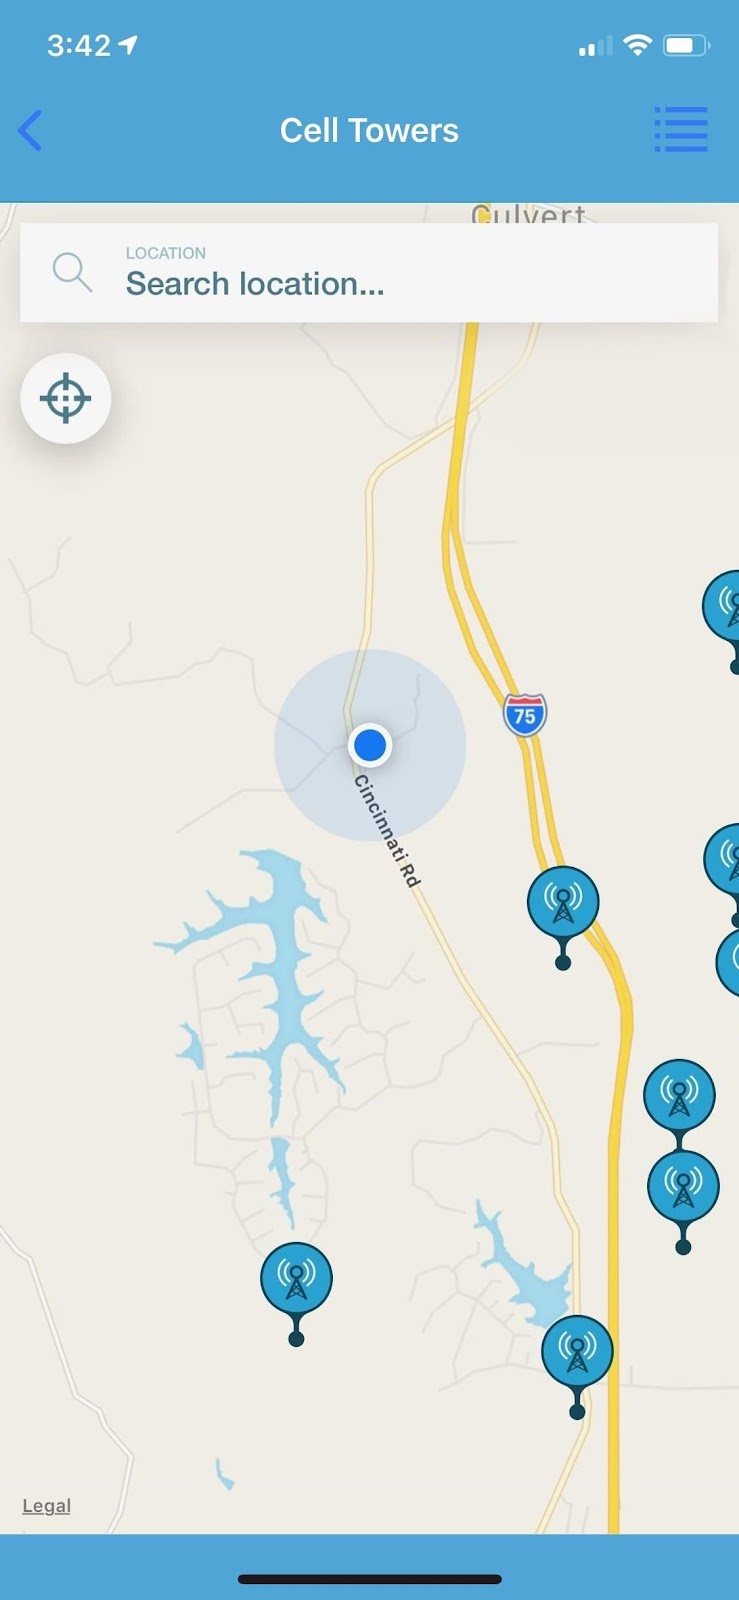
After that, you'll see a screen with an arrow pointing to the tower your iPhone is currently connected to. You can also tap the arrow to pull up a map displaying all the nearby towers operated by your carrier. You'll want to recheck this after forcing a switch to confirm it was successful.You may also like:Gihosoft iPhone Data Recovery
Must Read:Gihosoft Free Android Data Recovery
Must Read:Jihosoft iTunes Backup Unlocker
Jihosoft iTunes Backup Extractor free is a powerful tool to recover and extract important data from iPhone, iPad & iPod touch backup on Windows or Mac.
You may also like:
Gihosoft Total Video Converter is a professional all-in-one video tool that enables you to convert videos and audios into various different formats.
You may also like:online youtube downloader
Don't Miss: Network-Unlock Your iPhone to Use with Any GSM Carrier on iOS 11
Step 3Force Your iPhone to Switch to a Better Tower
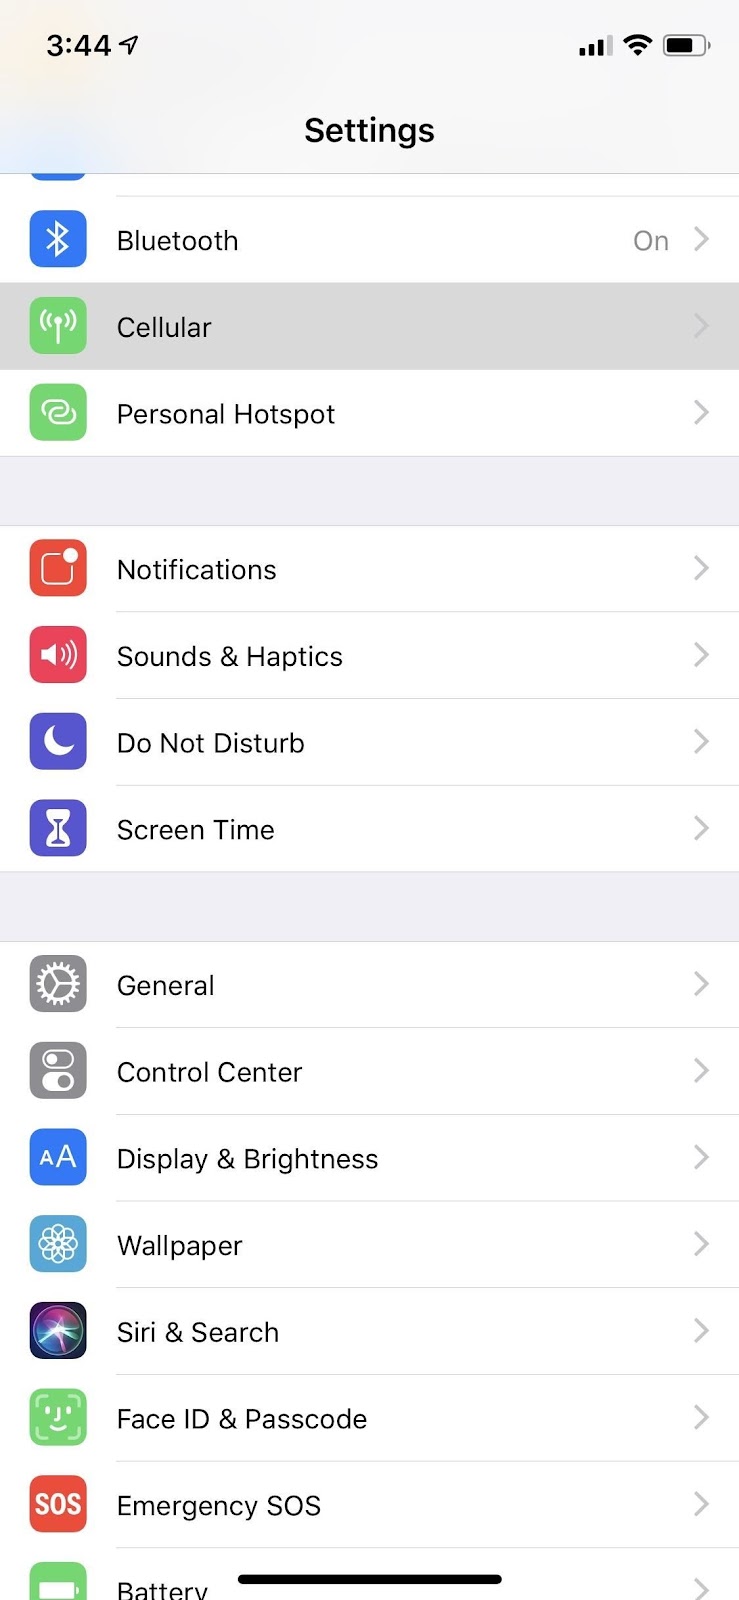
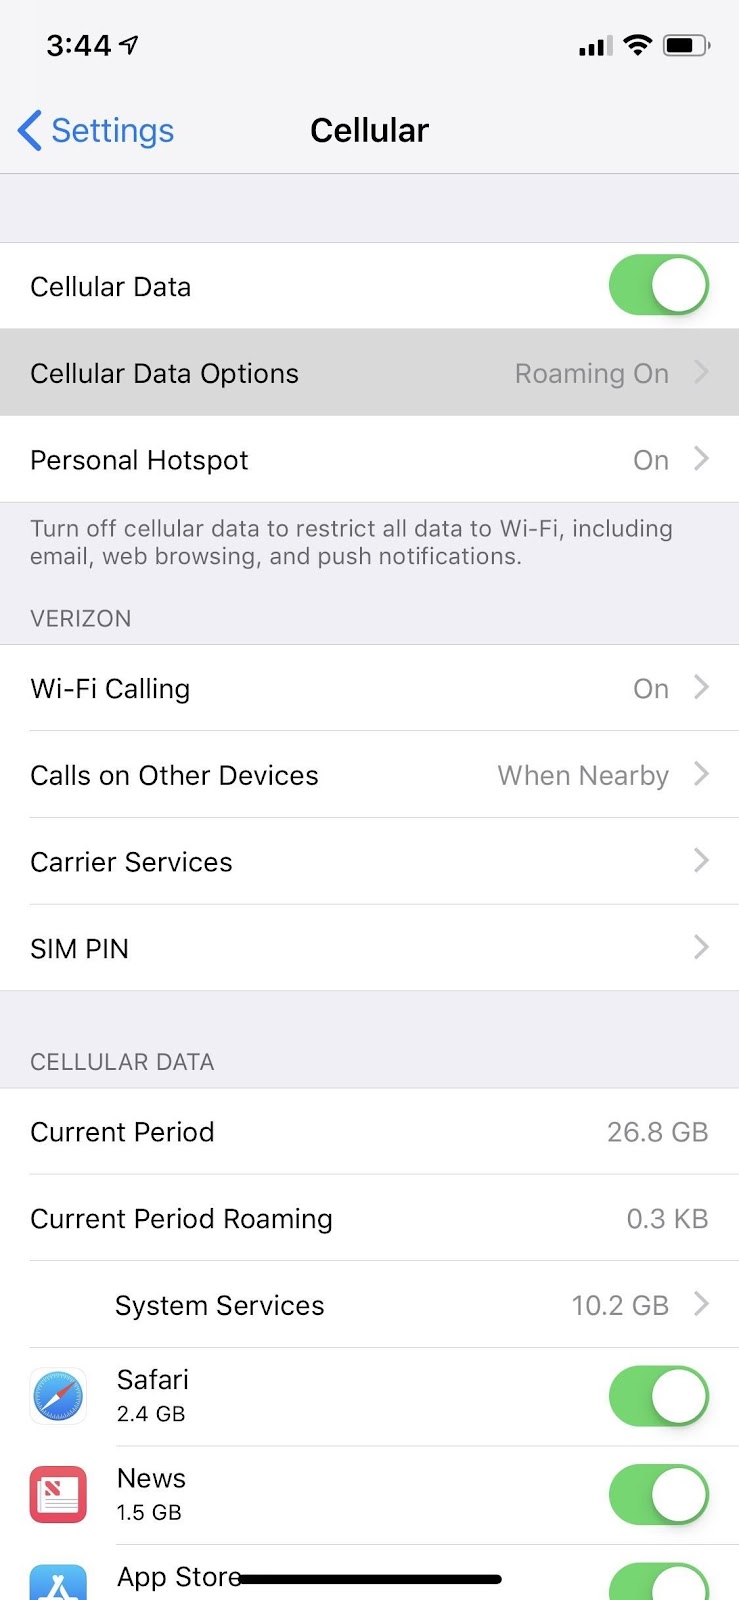
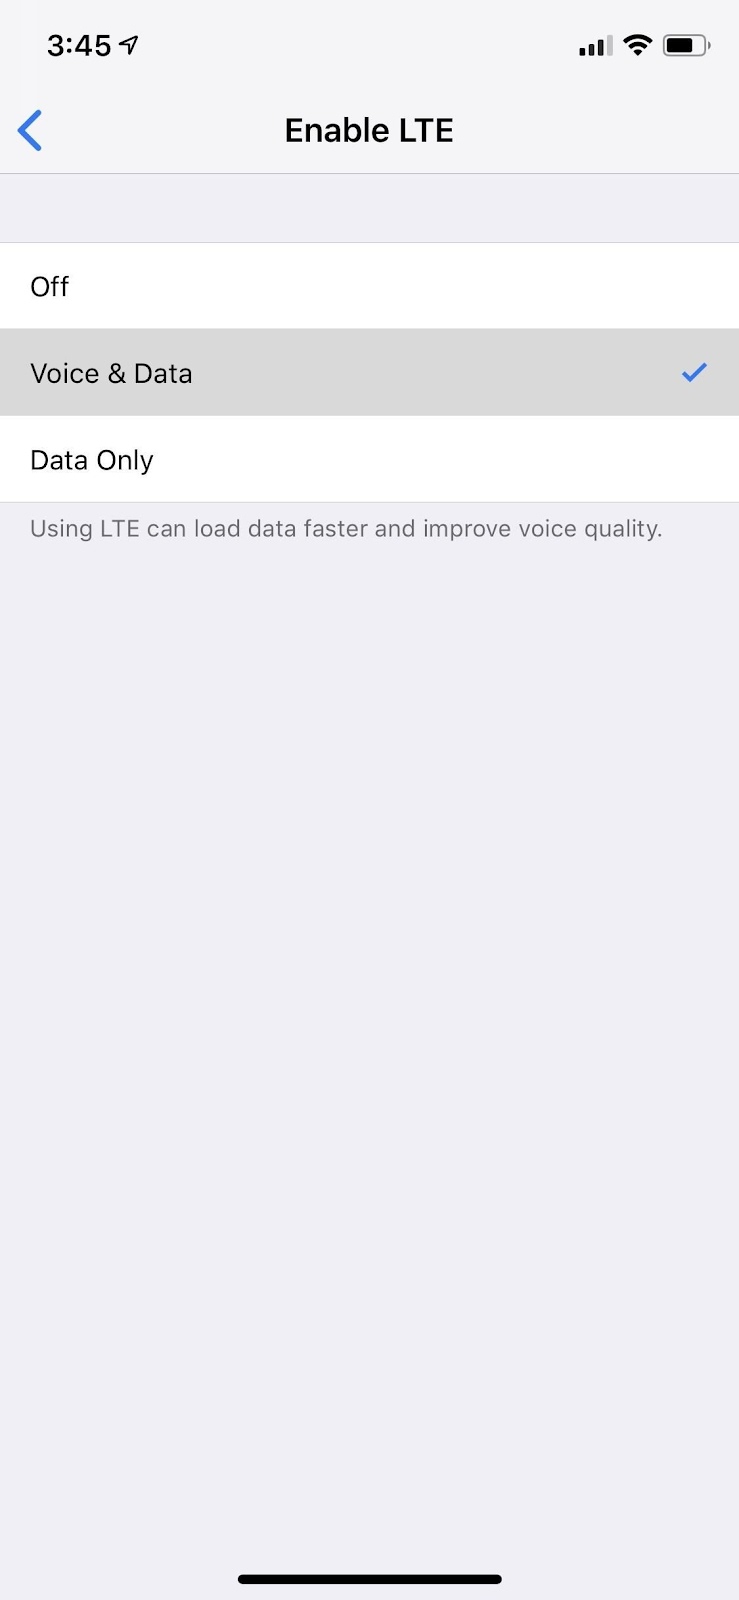
To manually force your iPhone to switch cell towers, open the Settings app, then tap "Cellular." Next, select "Cellular Data Options," then tap "Enable LTE."
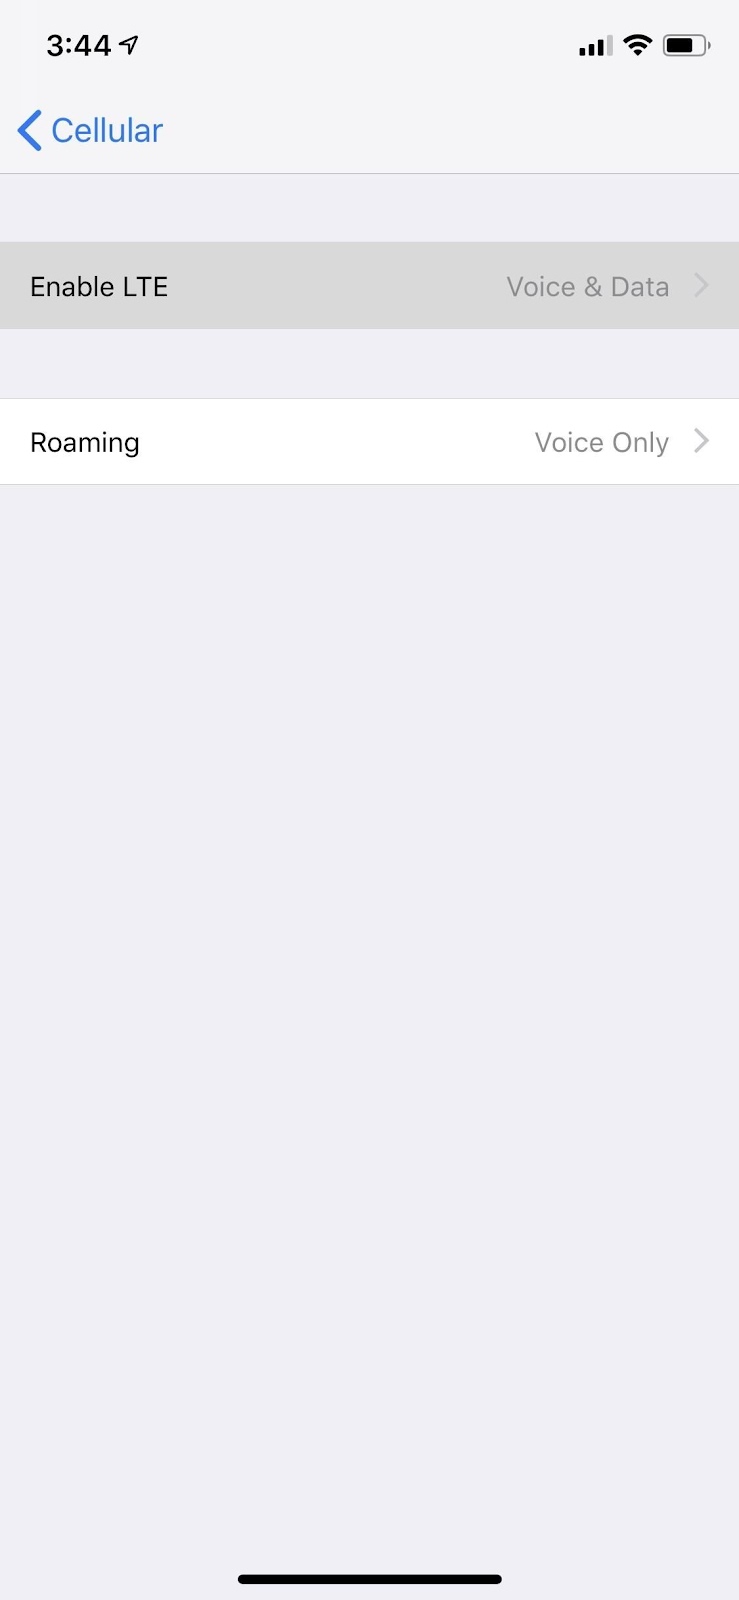
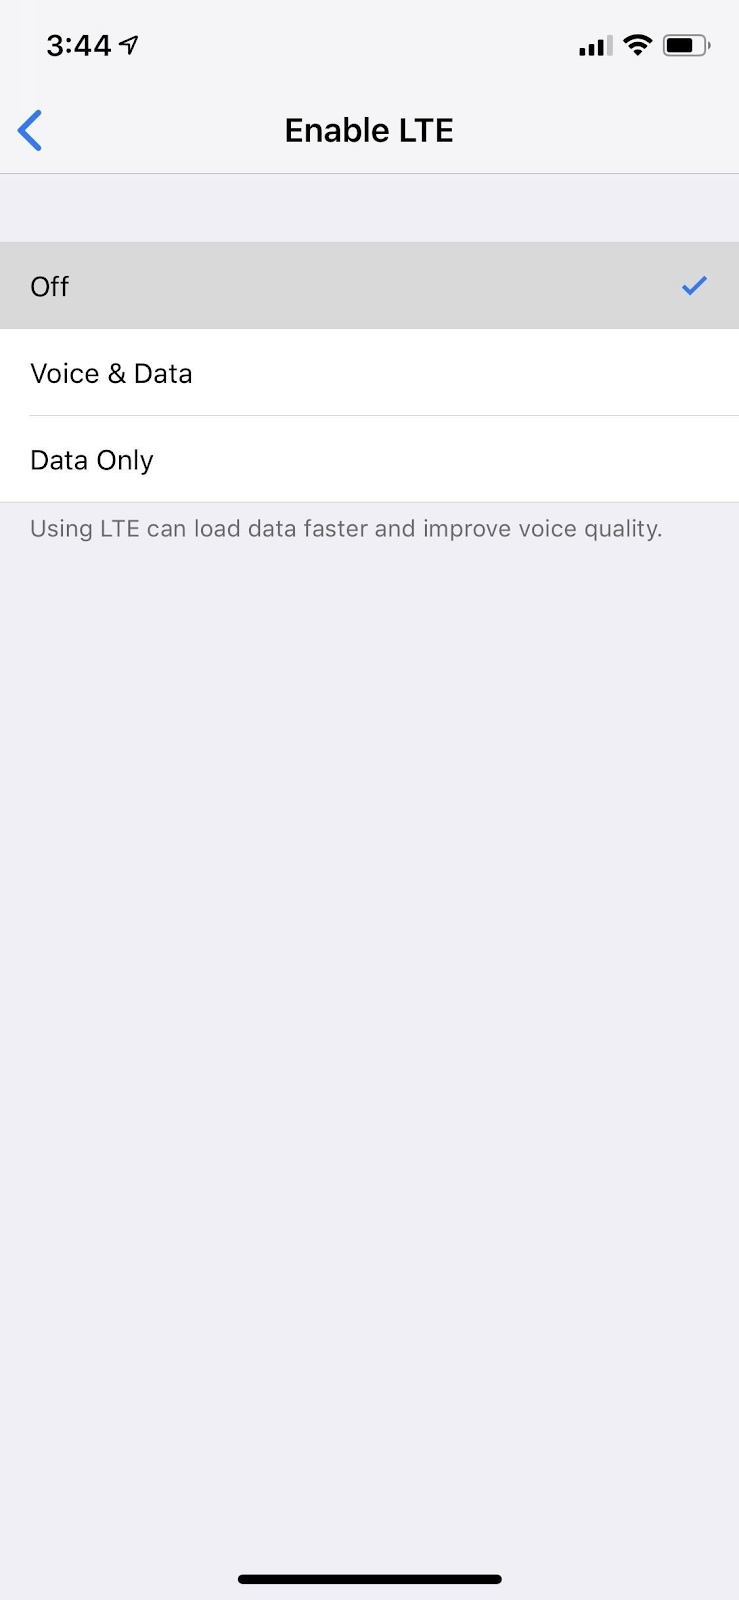
The setting will likely be set to "Voice & Data." Cycle it to "Off," wait 30 seconds, and then cycle it back to the previous setting, either "Voice & Data" or "Data Only." Once your iPhone's LTE antenna reconnects, it will search out the antenna with the strongest signal and connect to it, likely a different one that you were initially having issues with.
Step 4Verify the Tower Change with OpenSignal
Reopen OpenSignal to see if your iPhone is connected to a different tower. If the force switch was successful, the arrow on the main screen should be pointing to a different tower.
If it appears you're still connected to the same one, it likely means there isn't a better tower nearby. Other towers may be farther away, have a weaker signal, might not be using compatible frequencies, or may already be overloaded.
Monday, August 27, 2018
How to Wipe a Locked iPad to Factory Settings without Passcode 2019
How to Wipe a Locked iPad to Factory Settings without Passcode 2019
How to Wipe A Locked iPad using iTunes
You can wipe your iPhone to factory settings to remove your passcode using iTunes. However, iTunes only works for those who have synced their iPad with iTunes in the past.
Step 1. Connect your device to the PC you used to sync your device.
Step 2. Open iTunes on your PC. If iTunes request for your passcode or that you trust the computer, try another computer you synced with, or directly try iMyFone LockWiper.
Step 3. Wait for iTunes to back up of your iPad, and when the backup is complete, click “Restore iPad”.

Step 4. When you get to the Set Up screen, click “Restore from iTunes Backup”.
Step 5. Select your device in iTunes, and choose a relevant iTunes backup to restore your device by valuing the size and date of each backup.
You may like: iPhone Could Not be Restored Can be Easily Solved >
How to Wipe a Locked iPad with Apple ID
You can wipe your locked iPad without passcode using iCloud’s Find My iPad feature. This method takes too long to complete and only works for those who have enabled this feature on their iPhone before now. Besides, you need to ensure your iPhone is connected to internet.
Step 1. Use your computer to log in to iCloud.com/find. Sign into the service using your Apple ID and password.
Step 2. Find and choose “Find iPhone”.
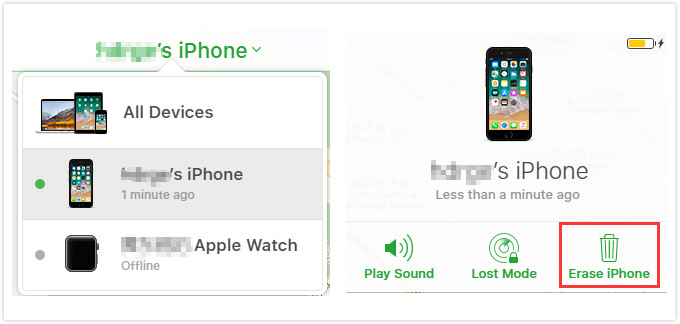
Step 3. Click on the option “All Devices”, if Find My iPad is enabled in your iPhone, your iPad will be showing on this page.
Step 4. Choose “Erase iPad” option to delete/wipe all the data on your iPad, and open your iPad. Afterward, iCloud will restore your iPad data.
How to Wipe A Locked iPad in Recovery Mode
If you’ve never synced your iPad on iTunes, then you can use Recovery mode to wipe your iPad. However, this service only works when Find My iPhone is not enabled on the iPad.
Step 1. Connect your iPad to your PC using a USB cable. Download, install and launch iTunes on your PC. If you don’t have a PC, borrow from a friend.
Step 2. Force restart your iPad: Press and hold both the Home and Top (or Side) buttons simultaneously. Keep holding the two buttons until you see the recovery mode screen.
Step 3. iTunes will give you 3 options: Cancel, Restore, or Update. Choose “Restore”.
Step 4. Wait for the process to finish, then set up your iPad.
Jihosoft Android Data Recovery: the best Android Data Recovery software for Windows and Mac to recover deleted contacts, messages, photos, videos, WhatsApp and etc from Android devices.
Gihosoft Android data recovery Free is a super awesome software specialized in Android file recovery. With this program, you are able to recover deleted photos, music, videos, messages, contacts, call logs, WhatsApp messages, Viber chat history and more from Samsung, Huawei, LG, HTC, Motorola, Google, Oneplus, Sony, Lenovo, ZTE and other Android devices directly. Meanwhile, this Android data recovery software is available for both Windows and Mac platforms.For now, check:Free iTunes/iPhone Backup Extractor for iPhone, iPad
Jihosoft iTunes Backup Extractor free is a powerful tool to recover and extract important data from iPhone, iPad & iPod touch backup on Windows or Mac.
If you can’t sync with iTunes and want to rescue data from a disable iPhone, you could try Gihosoft iPhone Data Recovery. Also feel free to ask questions on the iDevice is disabled error in the comments section below.
You may also like:online youtube downloader

Monday, August 20, 2018
How to Clear Cache Via Chrome Settings
How to Clear Cache Via Chrome Settings
Clear Cache Via Chrome Settings
If you don’t want to keep your Chrome cache, cookies, browsing history, etc. stored on your iPad, then you will be glad to know that you can easily clear that data via Chrome settings. You don’t need to use any third-party software to do this. Simply using Chrome and following a few steps will allow you to erase that private data from your iPad conveniently.
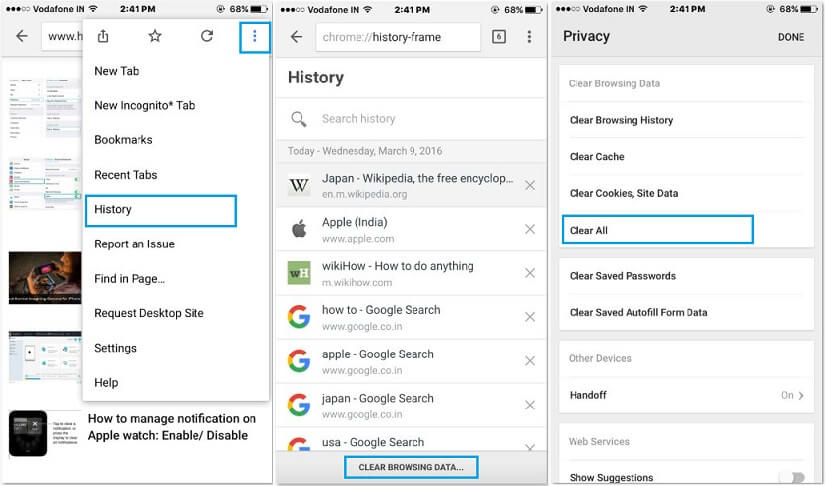
On your iPad, find and open Chrome web browser. And tap the menu button. It will be located on the upper right corner of the interface.
From the drop-down menu, tap on History. A History window of the browser will open.

Now navigate to CLEAR BROWSING DATA....
In the Privacy section, find and tap the option called Clear Cache.
You may also like:
Gihosoft Total Video Converter is a professional all-in-one video tool that enables you to convert videos and audios into various different formats. You can also download videos from YouTube or other online video sharing sites and convert them easily. Plus, you’re able to personalize your videos with its inbuilt editor, such as, trimming, cropping, applying video effects, adding watermark, subtitles, and more. If you need a powerful and professional desktop video converter program, just download Total Video Converter and follow the step-by-step guide here to have a try.
For now, check:Free iTunes/iPhone Backup Extractor for iPhone, iPad
Jihosoft iTunes Backup Extractor Free is a powerful tool to recover and extract important data from iPhone, iPad & iPod touch backup on Windows or Mac.
How to Add the Secret Weather Widget to Your iPhone’s Lock Screen in iOS 12
How to Add the Secret Weather Widget to Your iPhone’s Lock Screen in iOS 12
iOS’ Lock screen widgets, unlike Android, are placed on a different page of the Lock screen, and because of that I rarely use them. Many of us have been hoping that Apple brings the ability to add widgets directly to the main Lock screen page, but unfortunately this feature is still missing from iOS 12.
You may also like: 4 Tips to Fix Unable to Install iOS 12 Update
The good news is that there’s a hidden feature in iOS 12 that allows you to add a weather widget to your Lock screen and it looks pretty cool. The only drawback is that you can’t keep it there forever as the widget is part of “Bedtime Mode” so you’ll be able to view it once after Bedtime mode has ended and your iPhone is locked.
If you’re still interested to have this widget appear on your Lock screen after waking up, then keep on reading as we outline the steps required for adding this fancy new widget to your iOS 12 Lock screen.
How to Add the Hidden Weather Widget to Your iOS 12 Lock Screen
The first thing that you’ll have to do is to make sure that the Weather app has access to your location at all times so that it can display the latest weather information whenever the widget appears on the Lock screen.
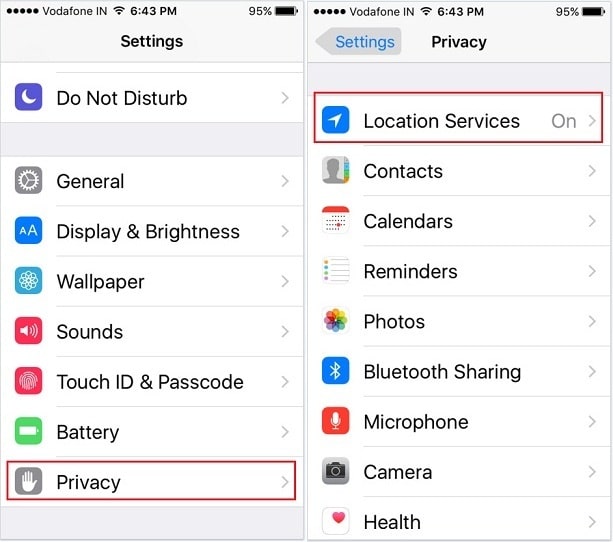
So get started by opening the Settings app, then head to Privacy > Location Services.
Turn on Location Services if you haven’t done so, then find and open the Weather option and set the location access to “Always”.
As mentioned earlier, the weather widget appears only after a Do Not Disturb schedule has ended, so the next thing you’ll have to do is to enable it and set up a schedule.
From the Settings app, go to Do Not Disturb and toggle it on. Then turn on the Scheduled toggle and set the start and end time.
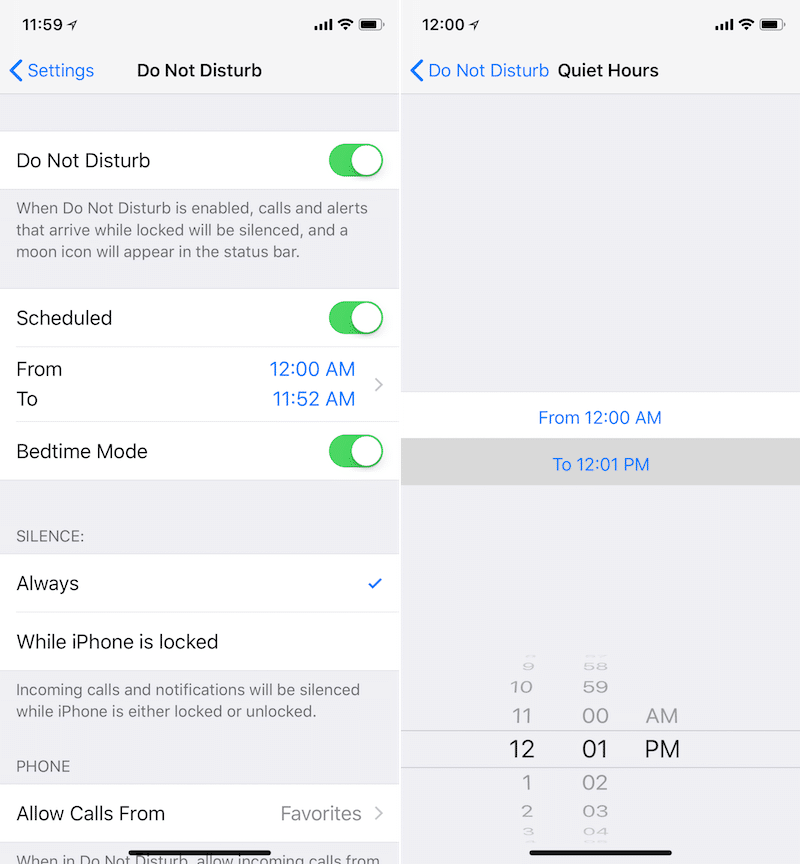
Next, toggle on Bedtime Mode. This is the feature that adds the secret weather widget to your Lock screen after the schedule has ended.
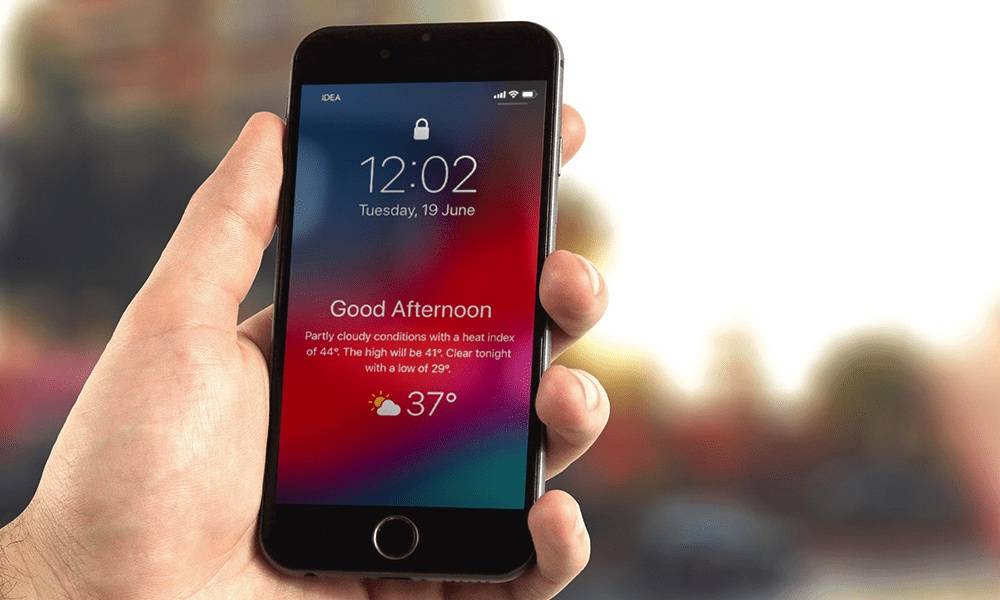
Now you’re all set up. Whenever the Do Not Disturb schedule ends, you are greeted with weather information on the Lock screen along with a Good Morning/Afternoon/Night message based on the time of the day.

This is how you can add the hidden weather widget to your Lock screen in iOS 12. It is particularly useful when you wake up so you can get a quick glimpse of the current weather condition. Once you unlock your iPhone, the weather widget will disappear until the next Do Not Disturb schedule.
While this hidden feature is a temporary solution for Lock screen widgets, we can hope that Apple will introduce a permanent solution that will allow us to keep widgets on the main Lock screen forever. Until then, we can live with this cool new feature introduced in iOS 12.
If you lost data after updating to iOS 12, you can use Gihosoft iPhone Data Recovery to retrieve lost data like messages, contacts, photos, voicemails and so on.

Free iTunes/iPhone Backup Extractor for iPhone, iPad
Jihosoft iTunes Backup Extractor is a powerful tool to recover and extract important data from iPhone, iPad & iPod touch backup on Windows or Mac.
You may also like:Gihosoft Total Video Converter is a professional all-in-one video tool that enables you to convert videos and audios into various different formats. You can also download videos from YouTube or other online video sharing sites and convert them easily. Plus, you’re able to personalize your videos with its inbuilt editor, such as, trimming, cropping, applying video effects, adding watermark, subtitles, and more. If you need a powerful and professional desktop video converter program, just download Total Video Converter and follow the step-by-step guide here to have a try.
Sunday, August 19, 2018
How to Reset iPhone Battery to Improve Performance 2019
How to Reset iPhone Battery to Improve Performance 2019
Part 1: Detailed Steps on How to Calibrate iPhone Battery
Calibrating your iPhone battery gives it the right push for better battery indicator accuracy. Here are the calibration steps:
Step 1To start the calibration process, completely drain your iPhone battery to 0%; keep using it until it powers down automatically.
Step 2Leave your iPhone powered down for about 6 hours to further drain the battery.
Step 3Plug your iPhone into a charging source, and charge it with the right charger up-to 100%. When it has charged up-to 100%, let it charge for another 2 hours.
Step 4Unplug your iPhone from the charging source, and use as normal again. Drain the battery life to zero again.
Step 5Repeat the 3rd step. This time, after it charges to 100% let it charge to another 1 hour.

After these steps, your iPhone battery is fully calibrated for accuracy.
Part 2: 5 Tips to Reset iPhone Battery
How to reset iPhone battery? There are some precautionary methods and guides that can help you. Here are some of them:
Tip 1: Switch Off Background App Refresh
Having the knowledge on how to manage background app refresh on iPhone, iPad or iPod touch is important in resetting iPhone battery. It helps you to control which apps can refresh in the background, in order to minimize tons of battery power and resources these apps consume. Here is how to turn off background app refresh on iPhone, iPad or iPod touch.
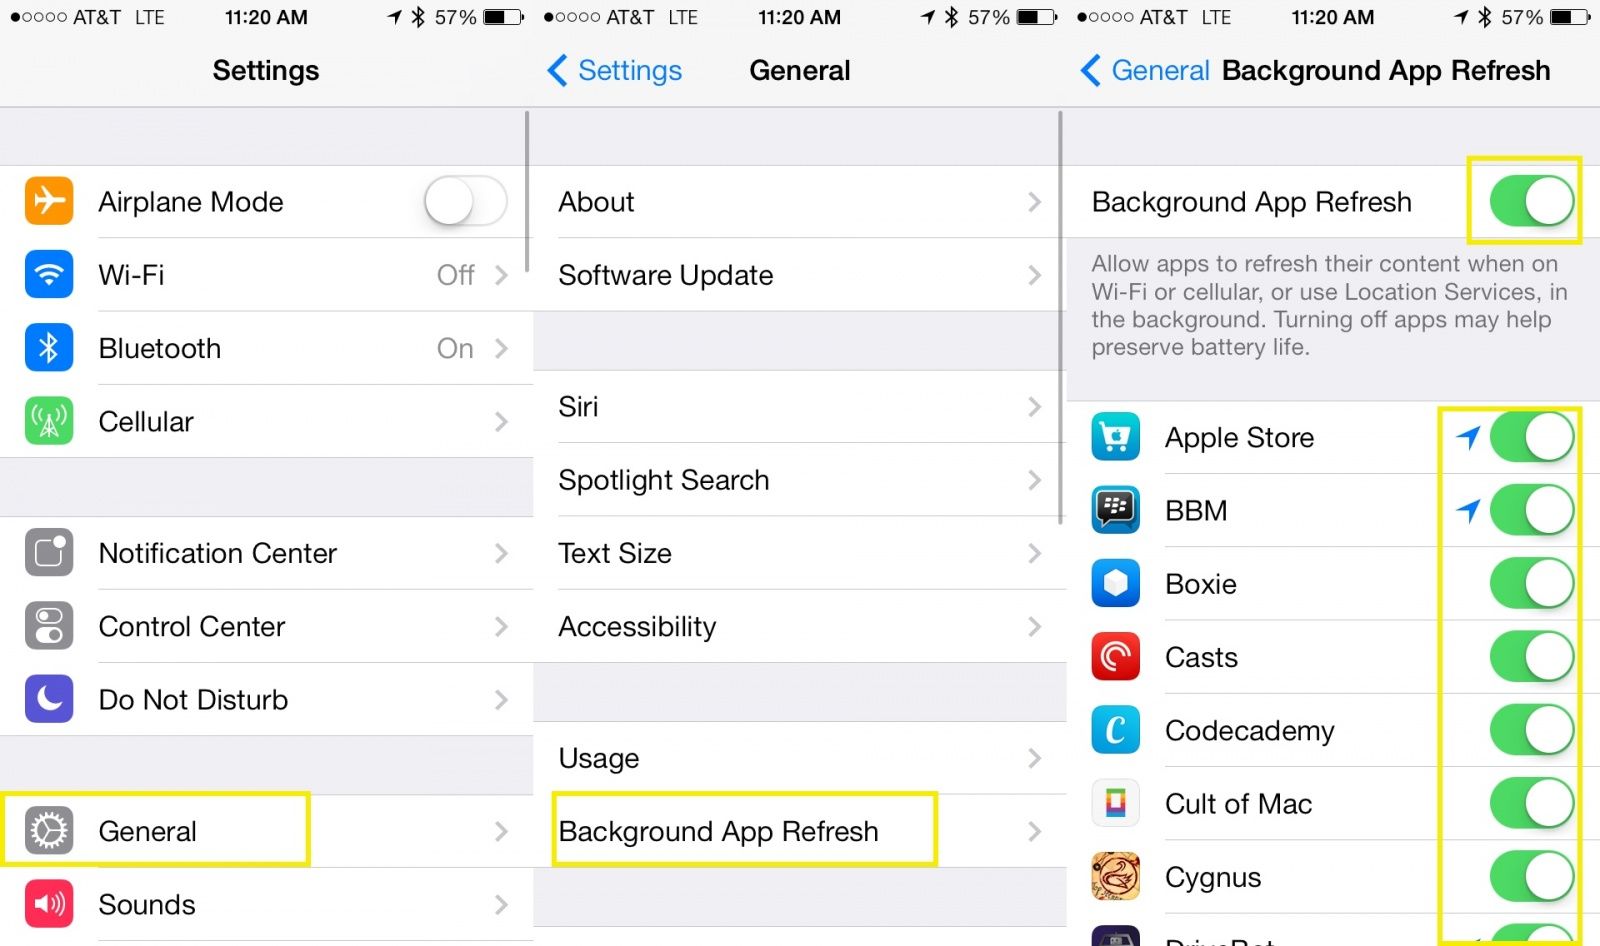
Step 1Launch the Settings app on your iPhone.
Step 2Click General > Background App Refresh.
Step 3Slide Background App Refresh switch to the left to Off. The switch will turn gray when off.
Tip 2: Deactivate Location Services
iPhone location service is another default application that consumes tons of iPhone battery power and leads to wrong battery calibration. Turning this service off is usually helpful in maximizing iPhone battery life.
Step 1Open your iPhone Settings app.
Step 2Scroll down to open the Privacy menu item, and click Location Services at the top of the screen.
Step 3Next to Location Services is a green switch that you can slide to the left to disable Location Services. Tap it to turn gray, and your location service is off.
Tip 3: Decrease iPhone Screen Brightness
Bright iPhone screen is good for sight, but it’s also a huge battery drainer. If you adjust the screen brightest, you’ll tend to have more battery life over time. But before you can manually decrease your iPhone screen brightness, you’ll have to switch off Auto-brightness feature.
Step 1Click Settings > Display & Brightness.
Step 2Auto Brightness is the green switch, click on it to disable it. It will turn gray when switched off.
Step 3Adjust the manual screen brightness meter to your comfort level.

Tip 4: Opt for Manual Downloads
You already know that automatic update of iOS apps and manual downloads have effects on battery life. Some of your iPhone apps are rarely used but they are the ones getting the most update and draining your battery. You can off this feature by following these steps:
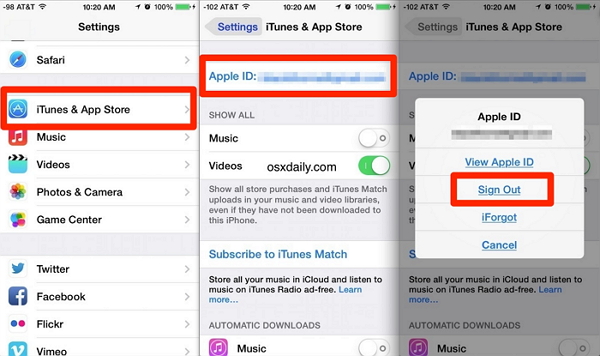
Step 1Click Settings app from your iPhone Home interface.
Step 2Tap iTunes & App Store.
Step 3Scroll down to Automatic Downloads and you’ll see four options: Music, Apps, Books & Audiobooks, and Updates.
Step 3Slide the switch button next to the options to the left to turn them off.

If you can’t sync with iTunes and want to rescue data from a disable iPhone, you could try Gihosoft iPhone Data Recovery. Also feel free to ask questions on the iDevice is disabled error in the comments section below.
Sponsor Ads:
For now, check:Free iTunes/iPhone Backup Extractor for iPhone, iPad
Jihosoft iTunes Backup Extractor free is a powerful tool to recover and extract important data from iPhone, iPad & iPod touch backup on Windows or Mac.
How to Erase Apple ID from iPhone without Password?
How to Erase Apple ID from iPhone without Password?
Following are different scenarios and ways to erase Apple ID from iPhone when you don't have password:
Solution 1. When You are the Original Owner of the Apple ID
If you are the original owner but forgot the Apple ID or password, you will need to use the following methods:
Find Apple ID You may also like:online youtube downloader
If you have forgotten your Apple ID, don’t worry; you can find it within a few simple steps.You may also like:online youtube downloader
Step 1: Visit the Apple ID website and navigate to Find Apple ID page.
Step 2: You will need to input your first and last name linked with your Apple account.

Step 3: Input your current Email address and select ‘recover by Email’ option. Alternatively, you can also use the ‘answer security questions’ option.
Step 4: You will receive your Apple ID via email. Then you can reset the Apple ID and password. It is recommended that you use two-factor authentication or two-step verification process as they are more reliable when it comes to recovering a forgotten Apple ID.
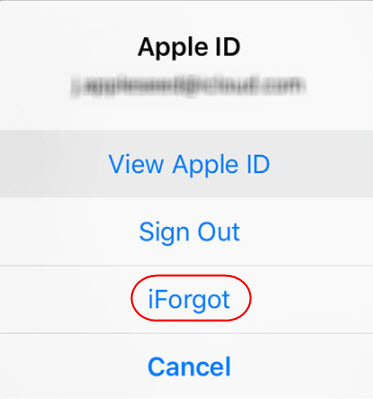
Reset Apple Password on iPhone
You will need to reset the Apple password if you have forgotten it. Resetting Apple password can be achieved via iCloud.
Step 1: Open Settings app on your iDevice and navigate to iTunes & App Store.
Step 2: Once there, tap the email address shown on top of the page.
Step 3: Now find and select ‘iForgot’ option.If you can’t sync with iTunes and want to rescue data from a disable iPhone, you could try Gihosoft iPhone Data Recovery. Also feel free to ask questions on the iDevice is disabled error in the comments section below.
You may also like:
How to Rescue iPhone Photos and Videos When Stuck in Recovery Mode
How to Get iMessage on Windows PC
4 Easy Ways to Transfer Photos from iPhone to Computer
Sponsor Ads:
Jihosoft Android Data Recovery: the best Android Data Recovery software for Windows and Mac to recover deleted contacts, messages, photos, videos, WhatsApp and etc from Android devices.
To reset the password, you will have to answer a few security questions. Once you successfully answer all the security question, you will be able to reset the Apple ID password. After resetting it, simply input your new password and then confirm it.
Solution 2. When Apple ID Belongs to Another Person
If you have got the iPhone from another user and you know that person, then you will need to ask that user to remove activation lock using iCloud. After it’s done, the steps to erase Apple ID from iPhone are straightforward.
Step 1: Open Settings in iDevice and tap the iTunes & App Store.
Step 2: Find and select the Sign Out option and then select ‘Delete from My iPhone’ when prompted.
Step 3: Now let the previous owner of the device enter the password. You can choose to keep copies of the iCloud data for Safari, Reminders, Contacts, Calendars, etc. if you want.
After the above step, tap Sign Out or Turn Off option. Once the device is signed out, tap the Sign in option and login in via your Apple ID and start using the device.
Friday, August 17, 2018
How to Fix iPhone Update Deleted Music
Fix iPhone Update Deleted Music
How to Fix iPhone Update Deleted Music
The solutions to ‘iPhone update deleted music’ should come from the study of what caused the issue. Your iPhone music may be missing because “Show Apple music” is switched off, or due to iTunes or iCloud syncing error.

In any case, you need to understand where the issue is coming from so as to find a suitable solution for it.
Case 1: When the Issue is Caused by “Show Apple Music”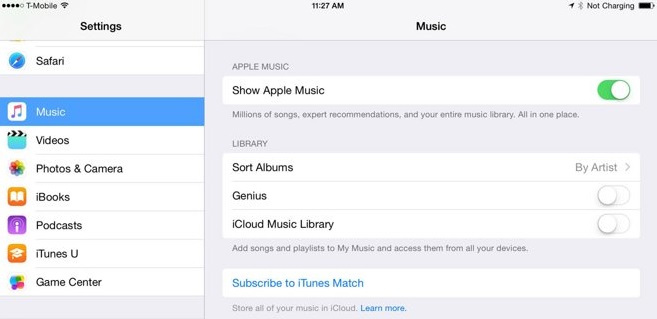
If you found your iPhone update deleted music, there is a possibility that the solution could be to just switch “Show Apple Music” button on. You can switch “Show Apple Music” by following these steps:
Step 1: From your iPhone Home screen, click on Settings > Music.
Step 2: Turn “Show Apple Music” switch button on.
Step 3: Off and on your iPhone before checking to know if iPhone music has been restored.
Case 2: When the Issue is Caused by iTunes Syncing Error
If you tried updating your iOS to 11.2.1 via iTunes, and you realized that your iPhone update deleted music, then the solution to restoring your songs will lie in restoring music backups through iTunes, iCloud or iPhone transfer tool.
2.1: Restore iTunes Backup
If you recently made a backup of your iPhone music to iTunes Music Library, then you don’t have anything to worry. You can conveniently fix the iPhone update deleted music problem from iTunes.
Here is how to restore iTunes backup:
Step 1: Open iTunes on your Mac or PC that you last used to back up your iPhone.
Step 2: Connect your iPhone to your PC using a USB cable. Trust the computer if requested to by entering your Apple ID and Passcode.
Step 3: Click on your iPhone logo when it appears on iTunes.
Step 4: Choose “Restore Backup in iTunes”, then look at the date and size of each backup and choose the most relevant.You may also like:online youtube downloader
Step 5: Click “Restore” and wait for the restore time to complete. Restart your iPhone, and check to see if your music has been restored.
2.2: Restore iCloud Backup
A good way to restore your ‘iPhone update deleted music’ is via iCloud. So, if you enabled iCloud backup on your iPhone, you can restore your iPhone data from your iCloud backup through these steps:
Step 1: Turn on your iPhone, and you’ll see the hello screen. You need to erase all your iPhone content before going to the next step.
Step 2: Follow the onscreen setup steps until you get to App &Data screen. Then click “Restore from iCloud Backup”.
Step 3: Sign in to your iCloud account using your Apple ID and Passcode.
Step 4: Select a backup (pick the most relevant and recent by date and size). At this point, the transfer will start. Stay connected to the progress bar to appear and complete.
Sponsor Ads:
Gihosoft Free iPhone Data Recovery is a professional iPhone Data Recovery software to get back all your lost text message, photo, video, call history, note, contact and more from iPhone/iPad/iPod Touch. It offers a full solution to recover your lost data in different tough situations. Besides recovering data directly from iPhone, iPad and iPod touch, it also allows you to recover data from iCloud and iTunes backup files.
How to Fix iPhone Update Deleted Music
The solutions to ‘iPhone update deleted music’ should come from the study of what caused the issue. Your iPhone music may be missing because “Show Apple music” is switched off, or due to iTunes or iCloud syncing error.
In any case, you need to understand where the issue is coming from so as to find a suitable solution for it.
Case 1: When the Issue is Caused by “Show Apple Music”
If you found your iPhone update deleted music, there is a possibility that the solution could be to just switch “Show Apple Music” button on. You can switch “Show Apple Music” by following these steps:
Step 1: From your iPhone Home screen, click on Settings > Music.
Step 2: Turn “Show Apple Music” switch button on.
Step 3: Off and on your iPhone before checking to know if iPhone music has been restored.
Case 2: When the Issue is Caused by iTunes Syncing Error
If you tried updating your iOS to 11.2.1 via iTunes, and you realized that your iPhone update deleted music, then the solution to restoring your songs will lie in restoring music backups through iTunes, iCloud or iPhone transfer tool.
2.1: Restore iTunes Backup
If you recently made a backup of your iPhone music to iTunes Music Library, then you don’t have anything to worry. You can conveniently fix the iPhone update deleted music problem from iTunes.
Here is how to restore iTunes backup:
Step 1: Open iTunes on your Mac or PC that you last used to back up your iPhone.
Step 2: Connect your iPhone to your PC using a USB cable. Trust the computer if requested to by entering your Apple ID and Passcode.
Step 3: Click on your iPhone logo when it appears on iTunes.
Step 4: Choose “Restore Backup in iTunes”, then look at the date and size of each backup and choose the most relevant.You may also like:online youtube downloader
Step 5: Click “Restore” and wait for the restore time to complete. Restart your iPhone, and check to see if your music has been restored.
2.2: Restore iCloud Backup
A good way to restore your ‘iPhone update deleted music’ is via iCloud. So, if you enabled iCloud backup on your iPhone, you can restore your iPhone data from your iCloud backup through these steps:
Step 1: Turn on your iPhone, and you’ll see the hello screen. You need to erase all your iPhone content before going to the next step.
Step 2: Follow the onscreen setup steps until you get to App &Data screen. Then click “Restore from iCloud Backup”.
Step 3: Sign in to your iCloud account using your Apple ID and Passcode.
Step 4: Select a backup (pick the most relevant and recent by date and size). At this point, the transfer will start. Stay connected to the progress bar to appear and complete.
Sponsor Ads:
Gihosoft Free iPhone Data Recovery is a professional iPhone Data Recovery software to get back all your lost text message, photo, video, call history, note, contact and more from iPhone/iPad/iPod Touch. It offers a full solution to recover your lost data in different tough situations. Besides recovering data directly from iPhone, iPad and iPod touch, it also allows you to recover data from iCloud and iTunes backup files.
How to Save Other People's Snapchat Videos to iPhone?
How to Save Other People's Snapchat Videos to iPhone?
Method 1: Screenshot or Screen Record Your iPhone
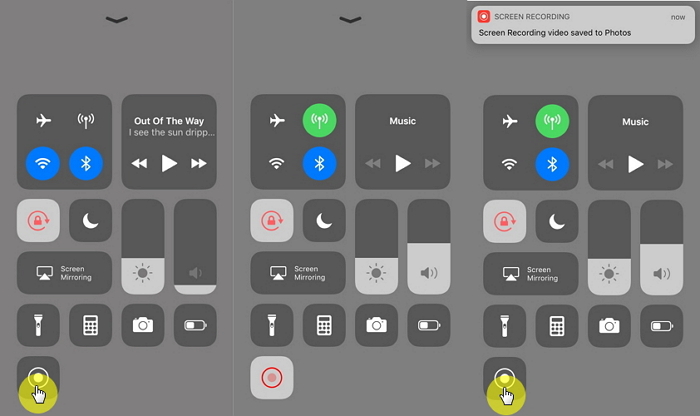
Fortunately, iOS 11 offers a screen recording option that can help with this problem. You can use to record the screen and thereby capture the video and save it on your device. If you don’t have the screen recording icon in Control Center, you first need to add it. You can do that in the settings, following these simple steps.
Step 1: Open the settings app on your iPhone.
Step 2: From the options listed, select “Control Center”.
Step 3: Select “Customize Controls” and then tap the “+” button next to the “Screen Recording” option.
Once the option is now in control center, you are ready to begin recording the screen. Follow these simple steps to do it.
Step 1: Open the Snapchat video you’d like to save to the camera roll, bring up the Control Center and then tap on the screen recording icon (two circles).
Step 2: After a three-second countdown, the screen recording will begin. A red bar will appear at the top of the screen to indicate that you are currently recording the screen.
Step 3: To end the recording, open the Control Center again and tap in the screen recording icon. You can also simply tap on the red bar at the top of the screen and confirm that you want to end the recording.
Method 2: Record A Video of the Video with Another Device
If for some reason you are not able to record the iPhone screen while the video is playing, the other option would be to use another device such as another iPhone, iPad or even Camcorder and record the Snapchat video as a separate video. The quality of the video may be compromised when you use this method, but if you have an additional device, this is a great way to save another person’s Snapchat videos.
Method 3: Use a Third Party Tool
Another way to save Snapchat videos to your Camera roll is to use a third-party tool. Despite the fact that Snapchat’s announced ban of third-party apps accessing the device, you can still find a lot of apps on the App Store that claims to help you record Snapchat videos. If you do decide to use a third-party app, it is important to be very cautious. Even Snapchat cautions against it. These apps could access your login information which could compromise the security of the device and the photos and apps on them. That said there are two third-party apps that you can use to save Snapchat videos to your iPhone.
Sponsor Ads:Gihosoft Free iPhone Data Recovery is a professional iPhone Data Recovery software to get back all your lost text message, photo, video, call history, note, contact and more from iPhone/iPad/iPod Touch. It offers a full solution to recover your lost data in different tough situations. Besides recovering data directly from iPhone, iPad and iPod touch, it also allows you to recover data from iCloud and iTunes backup files.
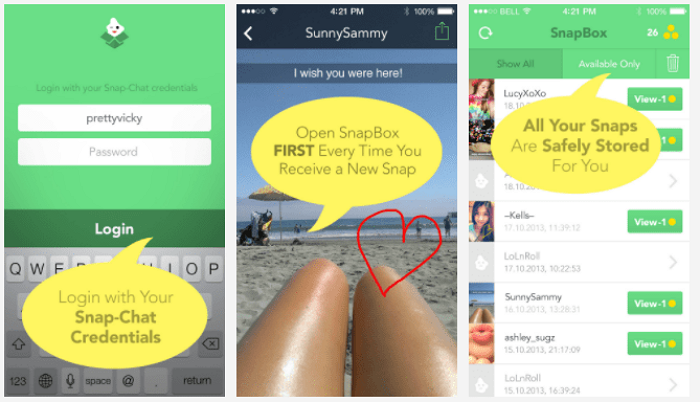
Snapbox
Snapbox is one of the apps you can use to save Snapchat videos. But the app is no longer on the app store since the ban on third-party apps by Snapchat. If you are still willing to take the risk, click here to download the app to your device. Once Snapbox is installed on your device, follow these simple steps to use the app:
Step 1: Open Snapbox on your device and then enter your Snapchat log in information to log-in.
Step2: Once logged in, the app is very easy to use. All you have to do is locate the video you would like to save and then tap “Save.”
With Snapbox, you can also choose to automatically save photo and videos. This option can be enabled in the app’s settings. Once the auto-save feature is enabled, all you have to do is open the photo or video in Snapchat and it will be saved to the camera roll.
QuickTime on Mac
If you don’t want to install an app on your iPhone, you can use QuickTime on Mac to record the screen on your device, thereby capturing the Snapchat video. QuickTime is also owned by Apple and therefore relatively safer than an app on your device. If you don’t already have QuickTime on your Mac, click here to download and install it to your device and then follow these simple steps to use it:
Step 1: Launch QuickTime and then connect the iPhone to the Mac using a USB cable.
Step 2: Click on “File” and then choose “New Movie Recording” to begin the process.Must Read:Jihosoft iTunes Backup Unlocker
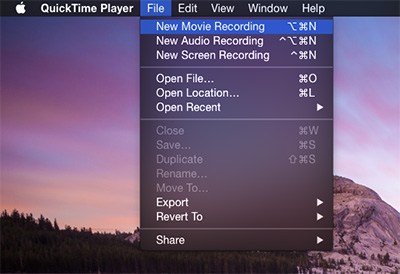
Step 3: In the window that appears, you will need to select the source for your recording. Click on the red drop-down arrow next to the recording icon and select the iPhone.

Step 4: QuickTime will mirror the iPhone’s screen. Open Snapchat on the iPhone but before tapping on the video you would like to record, click “Record” in QuickTime.Must Read:Jihosoft iTunes Backup Unlocker

Step 5: When done, click on the stop button to save the video on your Mac. You can now simply transfer the video from the Mac to the iPhone.
Jihosoft Giveaway Alert:
iPhone Backup Extractor - Extract Data from iPhone Backup
The best iPhone Backup Extractor software to extract photos, text messages, contacts, voice memos, note, WhatsApp, Viber and etc from iPhone/iPad backup.
As you can see, there are ways to save a video from Snapchat to your iPhone’s camera roll. Let us know in the comments section below which one works for you.
Subscribe to:
Posts (Atom)
macOS Catalina Is Causing Issues with Select eGPUs
macOS Catalina is apparently breaking many apps. Users have reported that they are facing problems after updating to macOS Catalina with...

-
In April 2019, Google announced the launch of a free, ad-supported version of its YouTube Music streaming service for use with Google Hom...
-
How to Fix iPhone Overheating after Updating to iOS 12? iOS 12 Overheating? Quit All Running Apps First As is known to all, iOS keeps ...
-
You might be under the impression that there is no way to download free music on an iPhone or iPad. That’s just not true anymore. As long as...


