Friday, December 28, 2018
Managing Your Screen Time Passcode on IOS 12
Managing Your Screen Time Passcode on IOS 12
1) How to Change Screen Time Default Passcode on iOS 12
Like everything else that has a password, you may want to change the screen time passwords regularly. Luckily, doing so is easy. Here’s how:
Step 1: Go to the Screen Time Settings page.
Step 2: Tap “Change Screen Time Passcode” .
Step 3: Enter the passcode and follow instructions.
2) How to Disable Screen Time Default Passcode on iOS 12
If you want to use screen time but just don’t want a password, you can do that too. Here’s how to disable your screen time passcode:
Step 1: Go to the Screen Time Settings page.
Step 2: Click “Screen Time Passcode”.
Step 3: Choose “Turn off Screen Time Passcode”.
Step 4: Enter your 4 digit code to complete.
Bonus Tips:
Restoring Lost Photos and Videos from iPhone
If you have deleted some of your pictures or videos from your gallery, then there is a straightforward way to Recover Deleted Files iPhone back.
After you delete the media files from your gallery, be it photos or videos, then you must know that iOS has a feature that the deleted media files doesn’t get deleted immediately, but it gets compiled to a temporary folder from where it gets deleted after 30 days. If you lost data after you updated to a new iPhone, you can always use Gihosoft iPhone Data Recovery to get the data back from the old iPhone or backup. Should you wish to recover these files, you must go to that “recently deleted” folder and retrieve these files before 30 days.
If you use android phones, please choose Gihosoft Android Data Recovery.
Worth reading:Best youtube downloader online download youtube 1080p
Must Read:
How to transfer messages from iPhone to iPhone
Tips:
How to transfer messages from iPhone to iPhone
Must read:icloud activation lock removal
Must read:Gihosoft Free iPhone Data Recovery:https://www.gihosoft.com/iphone-data-recovery-free.html
Common Ways to Recover Deleted Photos on Windows 10
Common Ways to Recover Deleted Photos on Windows 10
Method 1. Recover from Recycle Bin
This is the easiest but the most useful way that knows by everyone. When you delete a photo or any file on windows, it isn’t immediately deleted—it’s just moved to the Recycle Bin on the desktop of your PC. The Recycle Bin works like any other folder, so to recover a file from there, just open it, select the file you want.
Method 2. Restore from Previous Version
What if you emptied your recycle bin or you permanently deleted the file using “Shift + delete”, don’t panic yet. Another method is to recover from previous version.
To use this method, a windows restore point must have been created. Open a window and browse to the folder that contains (or contained) the file you want to recover. Simply right click on the folder and select “restore previous version”. If this method does not work, then what do we do?

Restoring Lost Photos and Videos from iPhone
If you have deleted some of your pictures or videos from your gallery, then there is a straightforward way to Recover Deleted Files iPhone back.
After you delete the media files from your gallery, be it photos or videos, then you must know that iOS has a feature that the deleted media files doesn’t get deleted immediately, but it gets compiled to a temporary folder from where it gets deleted after 30 days. If you lost data after you updated to a new iPhone, you can always use Gihosoft iPhone Data Recovery to get the data back from the old iPhone or backup. Should you wish to recover these files, you must go to that “recently deleted” folder and retrieve these files before 30 days.
If you use android phones, please choose Gihosoft Android Data Recovery.
Worth reading:Best youtube downloader online download youtube 1080p
Tuesday, December 25, 2018
Recover Accidentally Erased Notes on iPhone via Restoring
Recover Accidentally Erased Notes on iPhone via Restoring
This way is rely on using the official iTunes/iCloud backup restore to recover the Accidentally erased notes on iPhone with restoring.
1.1 Restore Full iTunes Backup including notes
Here is how you can restore full iTunes backup to get Notes. Please make sure you choose the right backup to restore, because iTunes does not allow you to view the backup. If you need to confirm the backup, use D-Back to view it in advance.
Step 1. Launch iTunes on your desktop PC or Mac.
Step 2. Connect the iPhone with the computer and enter the passcode if your iTunes is encrypted.
Step 3. Select your iOS device i.e. iPhone and determine the most relevant iTunes backup.
Step 4. Select the correct iTunes backup by looking at the size and date of the backups.
Step 5. Click “Restore Backup” and wait for the process to complete.

1.2 Restore Full iCloud Backup including notes
Follow these steps to restore full iCloud Backup including accidentally erased notes on iPhone.
However, make sure to restore all your iPhone content before restoring through iCloud. Go to Settings > General > Reset > Erase All Content and Settings > Enter Password to complete the process. Please note that after this your device will be like a new device and all your current data will be wiped.
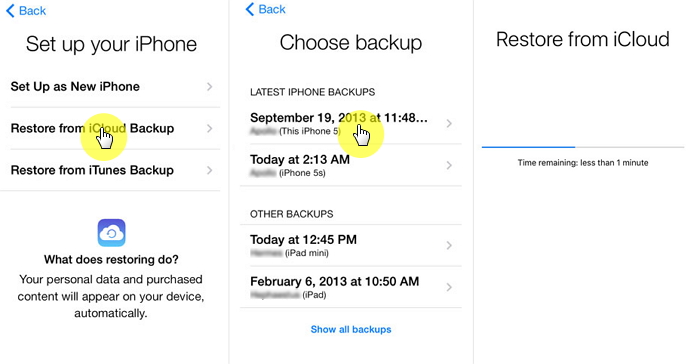
Step 1. When the iPhone reboots after the restoration, click “Restore from iCloud Backup” on the “App & Data” page.
Step 2. Log in to your iCloud account using the Apple ID.
Step 3. Look at the date and size of each backup and select the most relevant backup.
Step 4. Stay connected to the internet until the iCloud Backup restoration completes.
Tips on Accidentally Erased Notes on iPhone
In addition, here are some basic tips that may come into handy which are related to accidentally erased notes on iPhone.
Basic Way: Recover Erased Notes on iPhone with Recently Deleted
Here is how you can recover erased notes on iPhone with recently deleted folder:
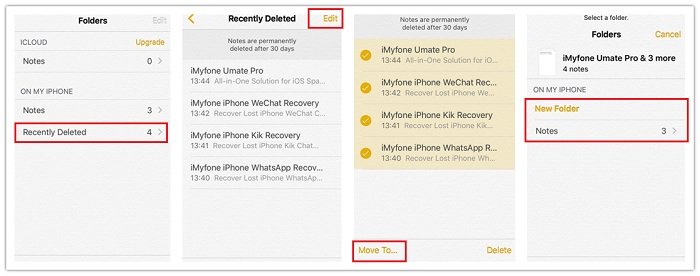
Step 1. Open Notes app and make sure you are in the folder view of the notes folder.
Step 2. Your notes may be stored in the recently deleted folder of iCloud, Gmail or etc.
Step 3. Go through each account and determine the relevant folder which has a recently deleted folder.
Step 4. After going to the relevant recently deleted folder. Tap “Edit” and select the required notes.
Step 5. Tap “Move To” on the bottom left corner and set a destination folder.
Step 6. Recover the files by moving notes from Recently Deleted to another folder.
Make a Regular Backup of iPhone
Though you are most likely to recover the erased notes on iPhone with the listed solutions, if you failed to do so, make sure to make a regular backup of iPhone to avoid such problems in future.
Tips:
Restoring Lost Photos and Videos from iPhone
If you have deleted some of your pictures or videos from your gallery, then there is a straightforward way to Recover Deleted Files iPhone back.
After you delete the media files from your gallery, be it photos or videos, then you must know that iOS has a feature that the deleted media files doesn’t get deleted immediately, but it gets compiled to a temporary folder from where it gets deleted after 30 days. If you lost data after you updated to a new iPhone, you can always use Gihosoft iPhone Data Recovery to get the data back from the old iPhone or backup. Should you wish to recover these files, you must go to that “recently deleted” folder and retrieve these files before 30 days.
If you use android phones, please choose Gihosoft Android Data Recovery.

Worth reading:Best youtube downloader online download youtube 1080p
Monday, December 24, 2018
How to View iCloud Photos on iPhone
How to View iCloud Photos on iPhone
Use the Photos App
The Photos app on iPhone has always been the go-to place to revisit memories. That doesn’t change with iCloud Photo Library turned on. Launch the Photos app to view iCloud photos on iPhone. You’ll find your up-to-date iCloud Photo Library ready and waiting.
Any changes made to your photo library on one device are reflected across all the others. Whether editing individual pictures or creating new albums. That means you need to be particularly careful when deleting pictures — you don’t want to lose them for good.
What to Do if Photos Are Missing
Have you ever bragged about an awesome photo you took only to fail at finding it missing from your library? With iCloud Photo Library that could happen for a few different reasons. It can be frightening at first — the fear that a once-in-a-lifetime photo is lost. Fortunately, that’s rarely the case. Here are some things to try if photos are missing from your iCloud Photo Library.
1. Wait for the Upload to Complete
The most common cause for photos to be missing is that they haven’t finished uploading to iCloud. Revisit the original device, the one you took the photo on to see if it’s still there. If so, you can rest assured that it isn’t lost — you simply need to upload it to iCloud.
This is an automatic process that your device will complete whenever it has enough battery power and a Wi-Fi connection. At the bottom of the Photos app, you should find a message informing you of any photos that are waiting to upload. You might be able to prompt them into action here at the risk of draining your battery. Or, keep your iPhone connected to power and Wi-Fi overnight. The photos should be uploaded by morning.
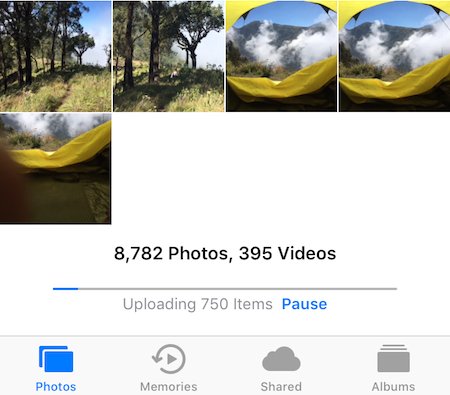 Check how many photos need uploading from the Photos app
Usually, it’s just a case of waiting for your device to do its thing. Once the photos are on iCloud, they’ll be accessible on all your other devices as well.
2. Test Your iPhone Internet Connection
If your photos are definitely on iCloud — you check by viewing your full iCloud Photo Library online — but they aren’t on your iPhone, you might need to test your internet connection.
To view iCloud photos on iPhone needs an internet connection to download any new photos added to iCloud Photo Library. Without a connection, your latest photos won’t appear in the Photos app. Try loading a website in Safari to check your iPhone internet connection. If relying on Mobile Data, you’ll also want to ensure that Mobile Data is switched on for photos.
Turn on Mobile Data for Photos:
Go to Settings > Mobile Data
Scroll down to Photos and tap to turn on
Note: The extra data usage may incur additional charges from your network
3. Make Sure that iCloud Photo Library is On
Check that iCloud Photo Library is turned on for all the relevant devices. Also, ensure they are using the same Apple ID account. Accidentally registering with different Apple ID’s results in multiple photo libraries.
You need to turn iCloud Photo Library on for any device that you take, or view, photos on. That means if you want to view your iPad photos on your Apple TV then iCloud Photo Library must be turned on for both of them.
What to Do if iCloud Photos Are Blurry
Blurry iCloud photos are the result of iPhone Storage Optimization. This feature saves iPhone storage by downloading only low-resolution images. That means the pictures appear blurry when you view them.
If your iPhone is connected to the internet it will download a full-resolution image from iCloud when you open the photo. This is shown by a ring filling up in the bottom right corner. Once completed, the image will pop into focus and remain in full quality on your device for a few days.
For many people, Optimize iPhone Storage is a necessary feature as their iCloud Photo Library is too large to keep on their device. However, you can turn the feature off if you have enough free space and you’re fed up with blurry photos. To do so, visit the Photos section in Settings. It may take some time to download all of your pictures, but once completed you’ll never be confronted with blurred memories again.
 This blurry photo is still waiting to download
Now you know how to view iCloud photos on iPhone, you should check out Apple’s latest campaign to help us take better pictures. In the meantime, feel free to ask any questions you’ve got about iCloud, photo libraries, or anything else!
Tips:
Restoring Lost Photos and Videos from iPhone
If you have deleted some of your pictures or videos from your gallery, then there is a straightforward way to Recover Deleted Files iPhone back.
After you delete the media files from your gallery, be it photos or videos, then you must know that iOS has a feature that the deleted media files doesn’t get deleted immediately, but it gets compiled to a temporary folder from where it gets deleted after 30 days. If you lost data after you updated to a new iPhone, you can always use Gihosoft iPhone Data Recovery to get the data back from the old iPhone or backup. Should you wish to recover these files, you must go to that “recently deleted” folder and retrieve these files before 30 days.
If you use android phones, please choose Gihosoft Android Data Recovery.
Friday, December 14, 2018
Recover Data from Damaged External Hard Disk
Recover Data from Damaged External Hard Disk Using CMD
If you don’t want to use a data recovery tool, then you will be glad to know that there is a method available that you can use to recover deleted data from your damaged external hard disk. You will need to use CMD for this purpose. Keep in mind that this method does not always recover the deleted files but it is worth a try.

Follow these instructions:
Step 1: On your Windows PC, launch Command Prompt (CMD) via the Start Menu. Run it as administrator.
Step 2:Once it is opened, type “‘chkdsk’ ‘X’ f” (X here is the drive letter of your external hard disk) and press Enter. Windows will scan the hard disk and check for errors.
Step 3:You can also add more options such as “C:\WINDOWS\system32>chkdsk F: /F /X /R”. Windows will attempt to repair your external hard disk. Wait until the repairing process is complete.
This method will scan and repair the bad sectors of your external hard disk and also recover the lost files. Once the process is complete, close the CMD window and navigate to your external hard disk via This PC/My Computer. You will see that your lost/deleted files are now shown on the disk.
Tips to Protect External Hard Disk from Getting Damaged
Data loss is inevitable in case of hard disk damage. You can minimize the risk of your external hard disk getting damaged by taking certain precautionary measures.jihosoft File Recovery https://www.jihosoft.com/recovery/file-recovery.html
Following are some tips to protect your external hard disk from getting damaged:
Avoid Direct Sunlight: Direct sunlight can harm your external hard disk. That’s why it is recommended that you store it away from direct sunlight.
Never Unplug the Disk When it’s in Use: Unplugging the external hard disk can lead to data corruption or even damage. So, you should always make sure it is not in use before unplugging.
Keep it Away from Magnets: A magnet will delete all data stored on your external hard disk. That’s why you should keep them away from the disk.
Avoid Physical Damage: Factors such as power fluctuation, fire, dust, etc. can lead to external hard disk failures. So, you should take proper care of the disk and avoid physical damage.
Handle with Care: Don’t throw your external hard disk anywhere because it contains your valuable data. You should handle it with care and make sure it is kept in a right place. Use a padded box if you want to carry it from one place to another.
jihosoft File Recovery https://www.jihosoft.com/recovery/file-recovery.html
Thursday, December 13, 2018
How to Restart & Force Restart iPhone
Part 1: Different Ways to Restart iPhone
Two methods for restarting different iPhones are given below. Depending on the condition of your iPhone you can choose either of the two methods.
1.1 How to Restart iPhone Using Buttons
The steps for restarting each version of iPhone vary from one another. Follow the steps below to know how to restart iPhone using buttons.
Restarting iPhone X/XS/XS Max/XR:
Step 1: Press the “Sleep/Wake” button and “Volume Down” button and hold it till the slider appears.
Step 2: Move the “Power Off” slider from the left side to the right side.
This would shut down the iPhone and you can restart it by pressing and holding the “Sleep/Wake” button until the Apple logo appears.
Restarting iPhone 8/7(Plus):
Step 1: Press the “Sleep/Wake” button on top of the iPhone and hold it till the “Power Off” slider appears on the screen.
Step 2: Move the “Power Off” slider from the left side to the right to shut down the iPhone.
By pressing and holding the “Sleep/Wake” button again until the Apple logo appears, your iPhone will restart.
Restarting iPhone 6/5 and older models:
To know how to restart iPhone 6/5 and earlier models, follow the steps below.
Step 1: Press the “Sleep/Wake” button on right side of the iPhone and hold it till the “Power Off” slider appears on the screen.
Step 2: Move the “Power Off” slider from the left side to the right to shut down the iPhone.
By pressing and holding the “Sleep/Wake” button again until the Apple logo appears, your iPhone will restart.

1.2 How to Restart iPhone If Buttons Are Broken
In some cases, it may happen that your iPhone’s buttons are broken, jammed or stuck. In such cases you can still restart your iPhone by creating a virtual “Home” button on the screen with the help of AssistiveTouch. For AssistiveTouch to work you would have to enable it, you can do this and then restart your iPhone by following the steps below:
Step 1: From “Settings” go to “General” and then navigate to “Accessibility” and then to “AssistiveTouch” and move the slider to the right to enable it.
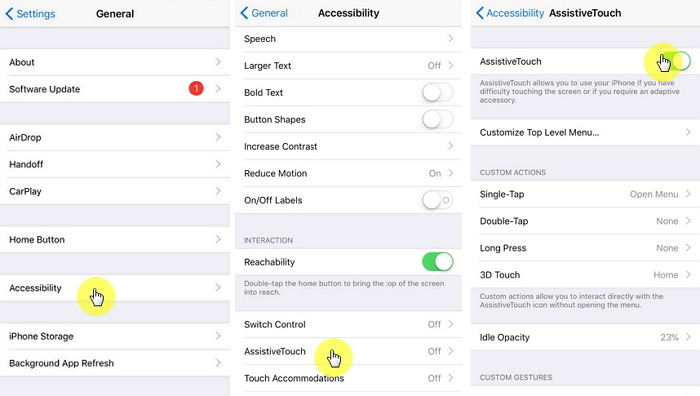
Step 2: After this, a virtual AssistiveTouch button will appear on your iPhone screen, tap on that.
Step 3: Tap on the device icon and then on more which will be represented with three dots.
Step 4: Tap on the restart icon to restart your iPhone.
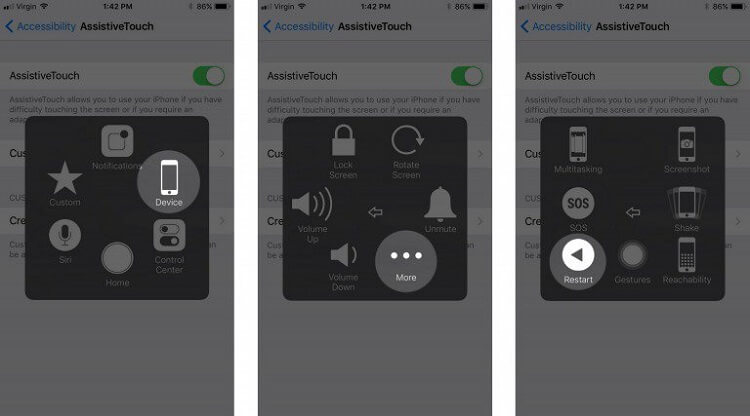
Your iPhone will turn off and then after about 30 seconds it will turn on again.
Part 2: Different Ways to Force Restart iPhone
If in case you are locked out of your device or your screen is not working, you can opt for the option of force restarting your iPhone. You can force restart iPhone by following the steps below for different models of iPhone.
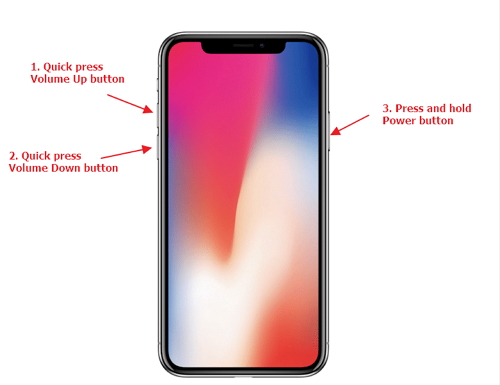
Force Restart iPhone XS/XR/X/8
Follow the steps below to force restart iPhone XS/XR/X/8.
Step 1: Press and release the “Volume Up” and then the “Volume Down” switch simultaneously.
Step 2: Press the “Power” button until the screen displays Apple logo.
Force Restart iPhone 7/7 Plus
Follow the steps below to force restart iPhone 7/7 Plus.
Step 1: You can find the “Power” button on the right side of your iPhone, press and hold it.
Step 2: At the same time, carefully press and keep holding the “Volume Down” switch until the Apple logo appears on the screen.
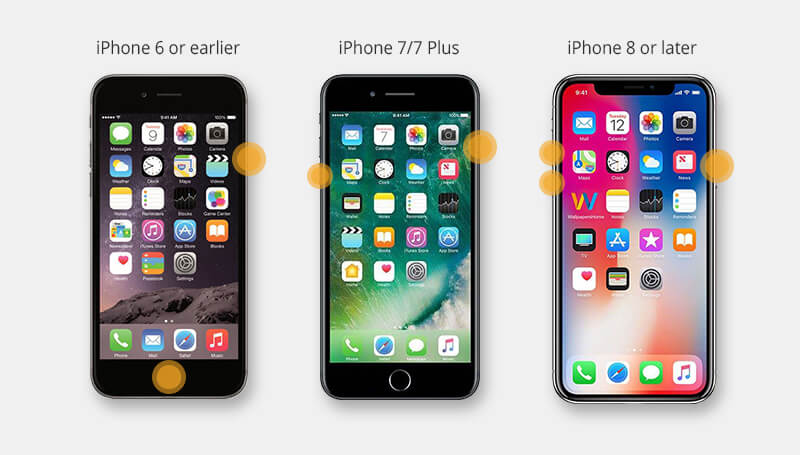
Force Restart iPhone 6/6s/SE/5 And Earlier Models
Follow the steps below to know how to restart iPhone 6/6s/SE/5 and earlier models.
Step 1: Press and hold both “Power” button and “Home” button at the same time.
Step 2: Keep holding the buttons firmly till you see the Apple logo.
Part 3: What to Do If Restart/Force Restart Won’t Solve Your Problem
Sponsor ads:
Gihosoft Free iPhone Data Recovery:https://www.gihosoft.com/iphone-data-recovery-free.html
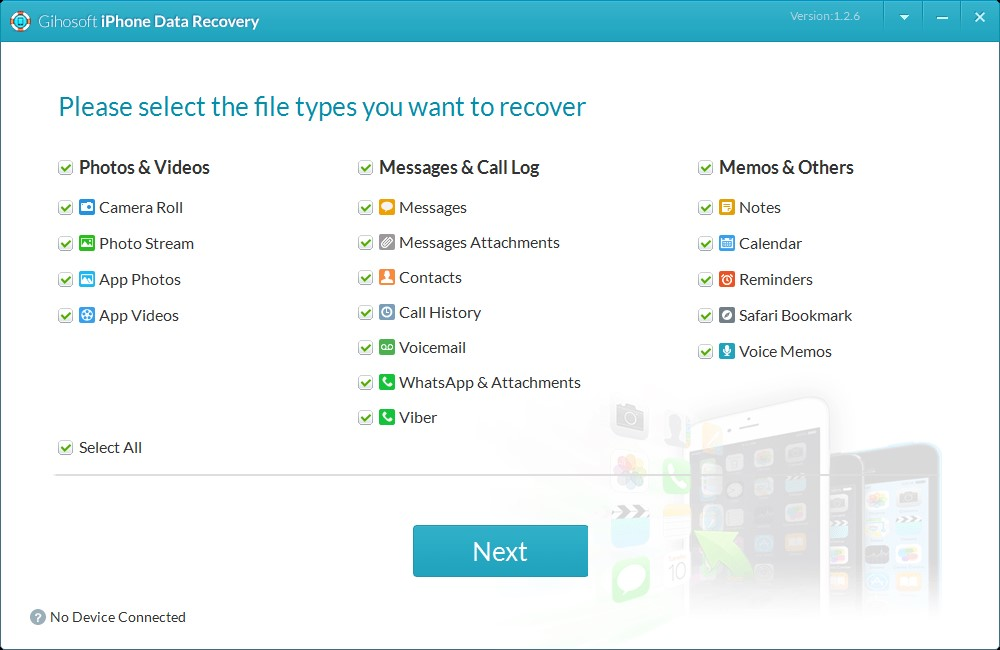
Gihosoft iPhone Data Recovery Free
Free iPhone Data Recovery Software for Windows/Mac
Recover up to 12+ types of files, including contacts, SMS, photos, WhatsApp, Viber, notes, etc.
Restore lost data from iOS devices directly or from iTunes and iCloud backup
Recover iPhone data lost due to iOS upgrade/jailbreak, accidental deletion, device lost or broken
Support all the latest iPhone, iPad and iPod Touch
Both Free and Pro version.
If you lost data after you updated to a new iPhone, you can always use Gihosoft iPhone Data Recovery to get the data back from the old iPhone or backup.You may also like: iphonerecovery.com
If you use android phones, please choose Gihosoft Android Data Recovery.
With Gihosoft Android Data Recovery, no longer afraid of data loss!
Gihosoft RePicvid Free Photo Recovery Software provides a free photo recovery software for windows to help users recover the deleted or lost photo for free.
Jihosoft Android Data Recovery: the best Android Data Recovery software for Windows and Mac to recover deleted contacts, messages, photos, videos, WhatsApp and etc from Android devices.
jihosoft Free iPhone Data Recovery
Worth reading:Best youtube downloader online download youtube 1080p
Subscribe to:
Posts (Atom)
macOS Catalina Is Causing Issues with Select eGPUs
macOS Catalina is apparently breaking many apps. Users have reported that they are facing problems after updating to macOS Catalina with...

-
In April 2019, Google announced the launch of a free, ad-supported version of its YouTube Music streaming service for use with Google Hom...
-
How to Fix iPhone Overheating after Updating to iOS 12? iOS 12 Overheating? Quit All Running Apps First As is known to all, iOS keeps ...
-
You might be under the impression that there is no way to download free music on an iPhone or iPad. That’s just not true anymore. As long as...


