Thursday, February 28, 2019

Fix iTunes Could Not Backup or Restore


We can totally understand the pain and frustration you undergo when you are trying to backup your iOS device data (including iOS 12) onto your computer or restore an iTunes backup to your iPhone, but suddenly the iTunes could not back up or restore the iPhone because an error occurred while reading or writing. This problem also happens to the users who are using iOS 12. This problem is prevalent mostly during data backup and restore using iTunes. Don't worry now since we would like to assist you to fix the problem with the following solutions.
2. Other Solutions to Fix iTunes Could Not Backup or Restore
Sponsor ads: Transfer Music from Android to Android
Apart from iMyFone iTransor we would like to introduce you to the following solutions in order to troubleshoot the problems with iTunes. As iTunes could not backup or restore the iPhone because an error occurred while reading from or writing to the iPhone, these solutions would help you to a great extent in minimizing any kind of inconvenience for you while restoring or backing up iPhone data.
2.1. Update iTunes

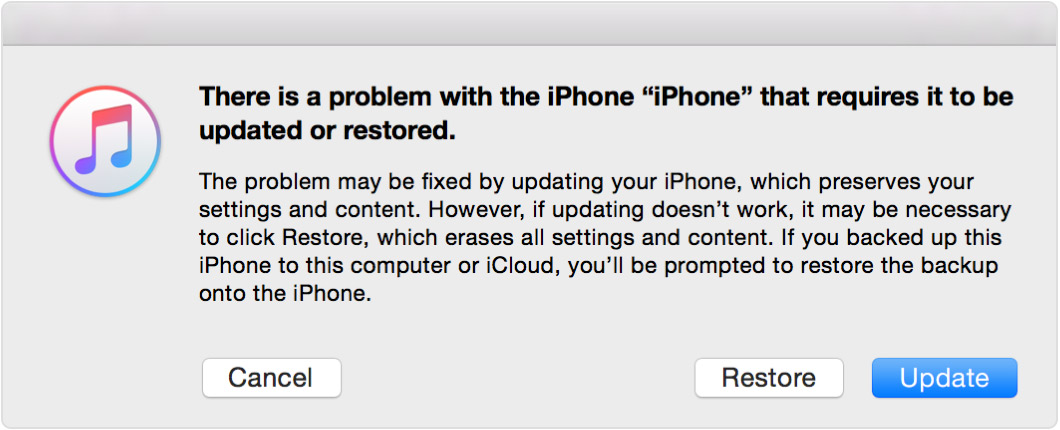
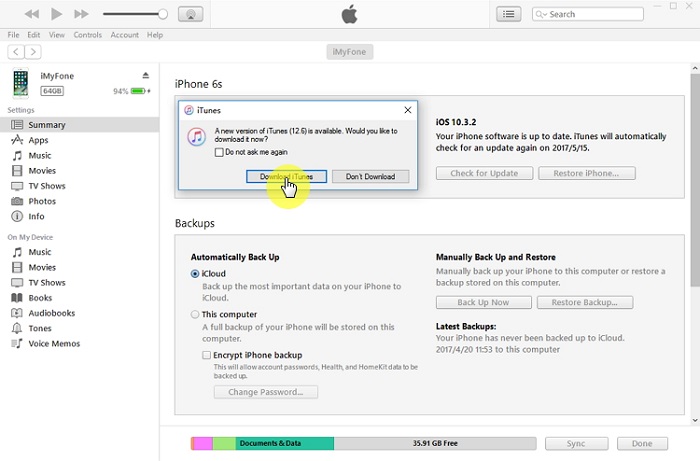
When iTunes could not backup or restore iPhone, the out-dated iTunes might be the reason. Ergo, we advise you to check if the iTunes is updated. If not, update it right away to get the backup and restore process done smoothly. Here is how you can do this. Follow the steps according to the PC you own.

Windows Users:


Launch iTunes and click on 'Help' from the menu bar.


Choose 'Check for Updates' and install the latest iTunes' version if any updates available.Gihosoft Free iPhone Data Recovery:iphonerecovery.com


Mac Users:


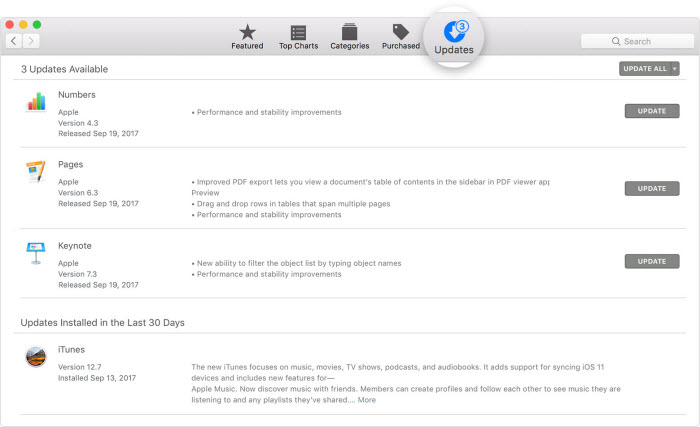
Go to the 'App Store' in your Mac.


Now, choose 'Updates' option at the top.


Look if there is any update present. If yes, then make sure to install it.


2.2. Delete or Move the Old iTunes Backups

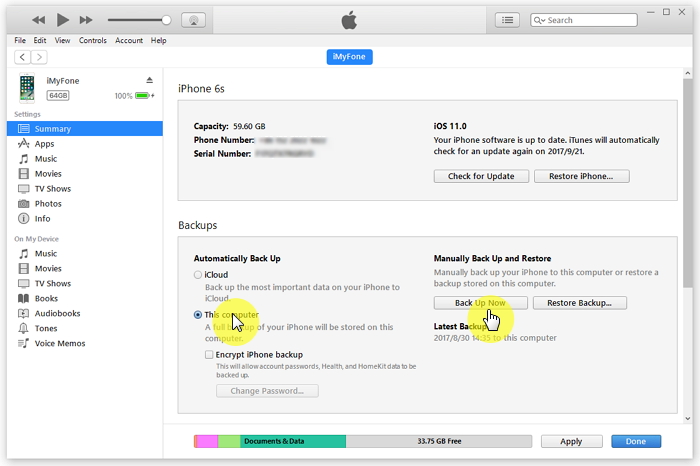
You can either delete or move the old backup files from iTunes to fix this issue. Deleting corrupted backups will make iTunes work for you.Sponsor ads:How to Fix “The action can’t be completed because…”

Gihosoft Free iPhone Data Recovery:iphonerecovery.com

If you use android phones, please choose Gihosoft Android Data Recovery


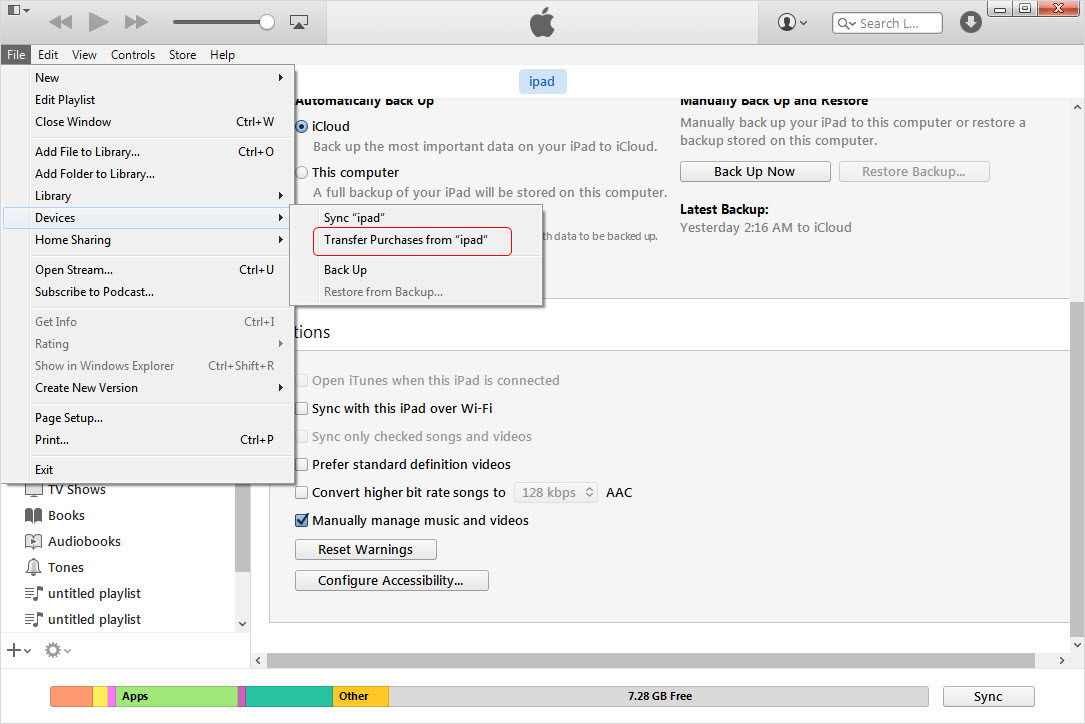
For Windows, go to 'Edit' > 'Preferences' > 'Devices' > 'Delete Backup'.


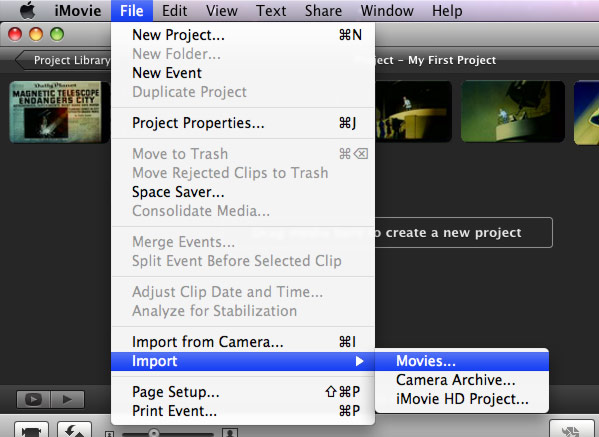
And for Mac, open 'iTunes' > 'Preferences' > 'Devices' > 'Delete Backup'


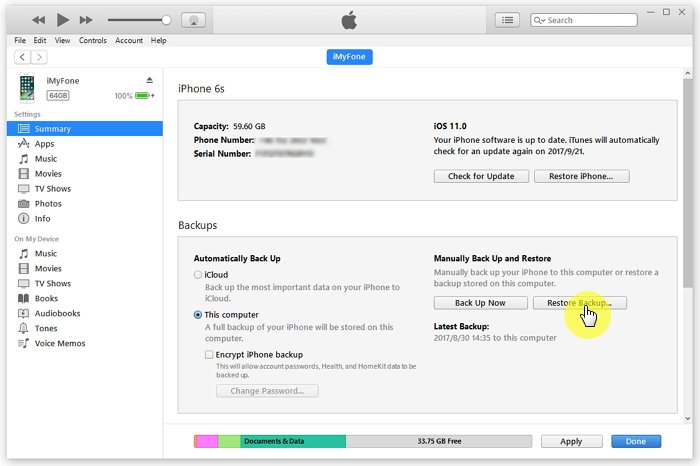
If you don't want to delete the files, just right click on the backup file and click on 'Show in Finder' option and simply move that particular backup file to some other location.
2.3. Try Another Computer

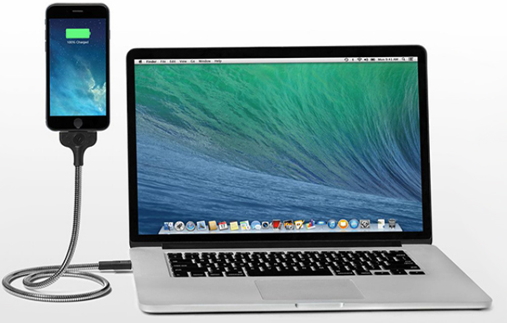
Maybe the computer you are making use of is the culprit. You can try the backup process using another computer. This should work if the problem is with the system. Take help from your friend by borrowing his/her computer.


2.4. Clean the Space of Your Computer

If still you get the pop-up error "The iTunes could not backup the iPhone because an error occurred while reading from or writing to the iPhone", please note that iOS backups take at the minimum of 1 or 2 GB space. Considering this, we would like to suggest you to free up your system's space. Make sure to clear up at least 5 GB space in your system.Sponsor ads:Check Who Viewed Your Facebook Profile?
Sponsor ads:Find Songs by Humming Online with Web/Mobile Apps
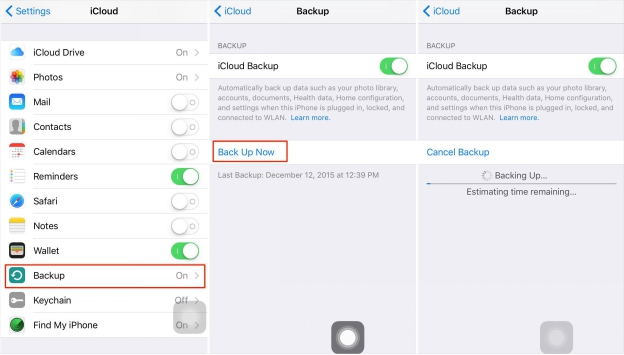
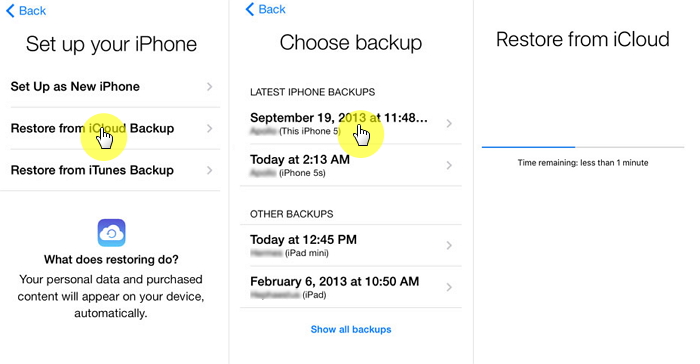
2.5. Using iCloud

Here is the last recommendation. You can try iCloud for backup and restore if iTunes could not backup or restore iPhone due to reading and writing error. However, iCloud only offers 5GB of storage which could also restrict you to backup data beyond this size. The solution is, you can purchase more space if you have the more data than 5 GB. This method is a little time consuming. Another thing you should bear in mind is that iCloud backup process will need a stable and powerful internet connection. Therefore, you should take help of iCloud as a last resort if iTune fails to make backup due to reading/writing error.


You may also like:

Wednesday, February 27, 2019

Unlock iPhone XR/XS/X/8/7/6 without Password


Way 1: Use Siri to Unlock iPhone XR/XS/X/8/7/6 without Password

Have you heard about Siri bypassing? It is the first excellent method you may want to use to unlock iPhone without using a password at all. The best part is that it is not difficult to do. However, if Siri is not enabled on the iPhone you want to unlock, you may have issues, but that can be solved quickly. Follow the steps below to unlock an iPhone with Siri.


Press and hold the Home button of the iPhone, the ask Siri "hey Siri what time is it?. if Siri is disabled, move to the next step.


Open “Control Center” and tap on “Clock”.


tap on “+” button to add world clock.


Now on the search box type anything and tap on “Select All”, then select “Share”. If you can’t see “Share”, then try a few more times to see it.


Then choose “Message”.


Now type a name following “To:” and tap on “return”. When the text changes to green, tap again.


Locate "Create New Contact" and tap.


Click on Add Photo which is below the mugshot icon, click "Choose Photo".


You have just accessed the iPhone without a password.


Way 2: Use iTunes to Unlock iPhone XR/XS/X/8/7/6 without Password


You can also take advantage of iTunes to open a locked screen. Below are steps you need to follow.You can also take advantage of iTunes to open a locked screen. Below are steps you need to follow.


Press down the power button until you see” Slide To Power Off.” Power it off.


Go to your PC and open iTunes.


While holding down the Home button, plug your iPhone into the PC. The device will power up in Recovery Mode.Sponsor ads:


Gihosoft Free iPhone Data Recovery:https://www.gihosoft.com/iphone-data-recovery-free.html


Gihosoft iPhone Data Recovery Free


Free iPhone Data Recovery Software for Windows/Mac


Recover up to 12+ types of files, including contacts, SMS, photos, WhatsApp, Viber, notes, etc.


Restore lost data from iOS devices directly or from iTunes and iCloud backup


Recover iPhone data lost due to iOS upgrade/jailbreak, accidental deletion, device lost or broken


Support all the latest iPhone, iPad and iPod Touch


Both Free and Pro version.


If you lost data after you updated to a new iPhone, you can always use Gihosoft iPhone Data Recovery to get the data back from the old iPhone or backup.You may also like: iphonerecovery.com


If you use android phones, please choose Gihosoft Android Data Recovery.


With Gihosoft Android Data Recovery, no longer afraid of data loss!


Must read:Youtube video downloader for pc


Gihosoft RePicvid Free Photo Recovery Software provides a free photo recovery software for windows to help users recover the deleted or lost photo for free.


Jihosoft Android Data Recovery: the best Android Data Recovery software for Windows and Mac to recover deleted contacts, messages, photos, videos, WhatsApp and etc from Android devices.Tips:How to transfer messages from iPhone to iPhone


jihosoft Free iPhone Data Recovery


Click OK. Then, restore and update the device. iTunes will restore the iPhone.


Way 4: Use iCloud to Unlock iPhone XR/XS/X/8/7/6 without Password

Follow the steps below to use iCloud to unlock a locked screen. This can work for both iPhone and iPad.


Go to “Find My iPhone”.


Sign in to iCloud with your details.


Click All Devices and select your device.


Click "Erase iPhone," and supply your Apple ID and any phone number.


Turn on your device, and wait for few minutes for iCloud to restore your device.


Restart your device and follow the set up prompt.


Click “Restore from iCloud Backup” and you are done.

You can also watch this YouTube video to know how to unlock using iCloud.

Tuesday, February 26, 2019

How to Switch to New iPhone?

How to Switch to New iPhone?
1. Switch to New iPhone X/iPhone 8 using Quick Start

You can switch to a new iPhone X/8 using the QuickStart method. If your old iPhone and new one both run iOS 11, this may be the best method for you. Follow the steps below.

1, Turn on both devices (preferably running iOS 11) and bring them near each other.

2, The Quick Start screen will appear so you can set up using your Apple ID. Keep the devices near each other and center the animation in the viewfinder.

3, Use the camera method if your old device can do so, or tap the choice to authenticate manually if you cannot use the camera.

4, Leave the devices near each other until all data and settings have been transferred completely. You can follow up by transferring data from other devices such as an Apple Watch, etc.


2. Switch to New iPhone by Backup and Restore

You can also switch data and service to new iPhone by backing up old device and then restoring the backup to new iPhone. This method works even you have an older iPhone or one not running iOS 11. More than one software or service can help you to switch from one iPhone to another and we will discuss in the following parts.
1 Switch to New iPhone by iCloud Backup and Restore

For this one, you should back up your old iPhone first and then restore the backup to the new iPhone. Follow the steps:
Step 1. Make an iCloud Backup for Old iPhone

Just connect your old iPhone to Wi-Fi network and then go to Settings > [your name] > iCloud > iCloud Backup. Make sure that the option iCloud Backup is toggled on and then tap Back Up Now to finish the iCloud backup.


Step 2. Restore iCloud Backup to New iPhone

Start your new iPhone and set up it until you see the "Hello" screen. Connect to Wi-Fi and then follow the on-screen instructions until you see the Apps & Data screen. Choose Restore from iCloud Backup and log in your iCloud account to choose a backup and restore it.


2 Switch to New iPhone by iTunes Backup and Restore
Step 1. Make an iTunes Backup for Old iPhone

Run iTunes on your computer and connect the old iPhone to it. Go to the section of Backups. Click Back Up Now and wait iTunes to finish the process.


Step 2. Restore iTunes Backup to New iPhone

Now connect the new iPhone to iTunes and turn it on, wait for the Hello screen and then choose Restore from iTunes backup on the Apps and Data screen. Click Restore Backup… on iTunes and wait for the restore process to finish.Sponsor ads:Also Read:Blogging Apps for iPhone and iPad to Start Your Blog

Gihosoft Free iPhone Data Recovery:https://www.gihosoft.com/iphone-data-recovery-free.html

Gihosoft iPhone Data Recovery Free

Free iPhone Data Recovery Software for Windows/Mac

Recover up to 12+ types of files, including contacts, SMS, photos, WhatsApp, Viber, notes, etc.

Restore lost data from iOS devices directly or from iTunes and iCloud backup

Recover iPhone data lost due to iOS upgrade/jailbreak, accidental deletion, device lost or broken

Support all the latest iPhone, iPad and iPod Touch

Both Free and Pro version.

If you lost data after you updated to a new iPhone, you can always use Gihosoft iPhone Data Recovery to get the data back from the old iPhone or backup.You may also like: iphonerecovery.com

If you use android phones, please choose Gihosoft Android Data Recovery.

With Gihosoft Android Data Recovery, no longer afraid of data loss!

Must read:Youtube video downloader for pc

Gihosoft RePicvid Free Photo Recovery Software provides a free photo recovery software for windows to help users recover the deleted or lost photo for free.

Jihosoft Android Data Recovery: the best Android Data Recovery software for Windows and Mac to recover deleted contacts, messages, photos, videos, WhatsApp and etc from Android devices.Tips:How to transfer messages from iPhone to iPhone

jihosoft Free iPhone Data Recovery


3 Using iMyFone D-Port Pro to Switch Devices with More Choices

Monday, February 25, 2019

Check If Your iPhone iOS 12 Is Unlocked 2019

Check If Your iPhone iOS 12 Is Unlocked 2019
How to Check if iPhone Is Unlocked with SIM Card

Using a SIM card is a reliable way to check if iPhone iOS 12 is unlocked, and it works well with iPhones because it only requires you to make a phone call. However, it is important to note that you will need two SIM cards from different carriers for this test. Therefore, you will need to temporarily borrow the SIM card of your friend or family member.

The following steps will guide you.

Step 1: Use the Sleep/Wake button to switch off your device.

Step 2: Eject the current SIM and insert the second SIM card.

Step 3: Power on your device to see if the second carrier SIM card is compatible with your iPhone. The name of the carrier will be displayed at the top left corner.

Step 4: Make a call to test if the SIM works, it’s the core of how to check iPhone unlock status.


Step 5: If the call goes through, then your device is unlocked. If not, then it is locked to the first SIM card carrier.
How to Check if iPhone Is Unlocked without SIM Card

Apart from the use of SIM card, you can check the lock status of your iPhone iOS 12 using your IMEI number, which is the serial number of your iPhone. It can be used to communicate with Apple servers and provide every data about your iPhone.


Using IMEI to Check for Unlock Status

Step 1: After getting your IMEI, visit any CTIA, accredited IMEI checker which can search Apple’s GSX database. You can do this using your favourite search engine. Note, not all Accredited IMEI checkers are free as some charge a regular fee.

Step 2: You can also go to some marketplace site such as Swappa and Orchard and add an IMEI Checker which runs both whitelist check and GSMA blacklist check.

Step 3: Your lock status will be revealed by the IMEI checkers.

Here is the video tutorial:

It is also a reliable and secure approach to check iPhone unlock status. If you don’t know how to find your IMEI number, use any of the following:

1.Go to Settings> General > About > IMEI.

2.Connect your iPhone with PC and look for it at iTunes.

3.Check the barcode of the IMEI provided you still have the original packaging of your iPhone.

4.Check the SIM card tray for the IMEI number. However, this is applicable for some special iPhone.

The above two are the common methods when people ask how to check if my iphone is unlocked, just follow them step by step, and you’ll get your answer.Sponsor ads:Best Torrent Search Engine Sites to Find Your Favorite TorrentsSponsor ads:Windows Media Player Won’t Play AVI Troubleshooting
Sponsor ads:Calendar Apps for iPhone in 2019 – Manage Your Schedule
Clear Call Log on Android

Unlock iCloud Locked iPhone 2019


Forgot iPhone Passcode Solution Two - Use iTunes

If you have previously synced your iPhone with iTunes, then you can retrieve your lost files. Here is the video tutorial:

You can also use iTunes to erase your passcode through the following steps.

Step 1: Plug your iPhone to PC using a USB cable.

Step 2: Launch iTunes to find and click on your iPhone.

Step 3: Select restore backup iTunes,(You’d better choose the latest one).

Step 4: Click on Restore button and wait for it to finish. Please keep your device connect to your computer at this process.
Forgot iPhone Passcode Solution Three - Erase with iCloud

Most people don’t know that there are other ways to solve forgot iPhone passcode problems apart from using iTunes. A useful way of solving this issue is via Apple’s Find My iPhone feature in iCloud. This allows you to lock, locate or reset your iDevice remotely. The following steps will guide you.

Step 1: Log into your iCloud account and visit the Find My iPhone feature, then click on the DEVICE option.

Step 2: Choose the iDevice that has been disabled.

Step 3: Now, find your iPhone, play a sound on it and lock it. You need to erase your device if you want to fix your disabled iPhone without iTunes.


Step 4: Tap on the Erase Device option and confirm. The Find My iPhone feature will erase your iPhone remotely.

Step 5: Then you have to restore your iPhone with your iCloud backup.

The only flaw to this method is that you will lose your data, but this wouldn’t be an issue if you recently backup your file. You can just restore them (this should serve as a useful reminder in case you don’t back up your data, do it now and make it a habit of doing it regularly.)
Forgot iPhone Passcode Solution Four - Erase with Recovery ModeSponsor ads:Best Torrent Search Engine Sites to Find Your Favorite Torrents

In case you have never backed up your iOS device with iTunes or set up the Find My iPhone feature in iCloud, then you can use the recovery mode. This will erase everything on your device and its passcode.

Step 1: Connect your device to PC and start iTunes. In case you don’t have a PC you can borrow one from your friend or visit the Apple Authorized Service Provider or Apple Retail Store.

Step 2: While your iPhone is connected to PC, force restart it. You will see the update or restore option. Click on Restore.

Step 3: Software will be downloaded for your iDevice. If this takes more than 15minutes, your iPhone will quit the recovery mode, and you will have to start over from step 2.

Step 4: Wait for the process to end so that you can set up and use your iPhone.

When you don’t have any backup, it’s the only way to fix forgot iPhone passcode issue.
Sponsor ads:iPhone/iPad Keeps Restarting? Here’s the Fix!


Sponsor ads:Set Spam Filter on iPhone to Stop Junk Mails and Texts

Forgot iPhone Passcode Solution 2019


Forgot iPhone Passcode Solution Two - Use iTunes

If you have previously synced your iPhone with iTunes, then you can retrieve your lost files. Here is the video tutorial:

You can also use iTunes to erase your passcode through the following steps.

Step 1: Plug your iPhone to PC using a USB cable.

Step 2: Launch iTunes to find and click on your iPhone.

Step 3: Select restore backup iTunes,(You’d better choose the latest one).

Step 4: Click on Restore button and wait for it to finish. Please keep your device connect to your computer at this process.
Forgot iPhone Passcode Solution Three - Erase with iCloud

Most people don’t know that there are other ways to solve forgot iPhone passcode problems apart from using iTunes. A useful way of solving this issue is via Apple’s Find My iPhone feature in iCloud. This allows you to lock, locate or reset your iDevice remotely. The following steps will guide you.

Step 1: Log into your iCloud account and visit the Find My iPhone feature, then click on the DEVICE option.

Step 2: Choose the iDevice that has been disabled.

Step 3: Now, find your iPhone, play a sound on it and lock it. You need to erase your device if you want to fix your disabled iPhone without iTunes.


Step 4: Tap on the Erase Device option and confirm. The Find My iPhone feature will erase your iPhone remotely.

Step 5: Then you have to restore your iPhone with your iCloud backup.

The only flaw to this method is that you will lose your data, but this wouldn’t be an issue if you recently backup your file. You can just restore them (this should serve as a useful reminder in case you don’t back up your data, do it now and make it a habit of doing it regularly.)
Forgot iPhone Passcode Solution Four - Erase with Recovery ModeSponsor ads:Best Torrent Search Engine Sites to Find Your Favorite Torrents

In case you have never backed up your iOS device with iTunes or set up the Find My iPhone feature in iCloud, then you can use the recovery mode. This will erase everything on your device and its passcode.Sponsor ads:7 Best iPhone Photo Editor Apps To Achieve Filter and Psychedelic Look

Step 1: Connect your device to PC and start iTunes. In case you don’t have a PC you can borrow one from your friend or visit the Apple Authorized Service Provider or Apple Retail Store.

Step 2: While your iPhone is connected to PC, force restart it. You will see the update or restore option. Click on Restore.

Step 3: Software will be downloaded for your iDevice. If this takes more than 15minutes, your iPhone will quit the recovery mode, and you will have to start over from step 2.

Step 4: Wait for the process to end so that you can set up and use your iPhone.

When you don’t have any backup, it’s the only way to fix forgot iPhone passcode issue.

2 Useful Tips to Reset iPhone Apple ID and Password 2019


2 Useful Tips to Reset iPhone Apple ID and Password
1 How to Find Back Apple ID If You Forgot

Peradventure you could not remember your password, or you have forgotten your Apple ID, then the steps below will guide you on how to recover it.

Step 1: On your computer, visit the Apple ID site.

Step 2: Tap Forgot Apple ID or password?

Step 3: When you see “If you forgot your Apple ID, you can look it up”, tap look it up.

Step 4: Input your first name, last name and email address (this can be any email you have previously used with Apple) then solve the captcha.

Step 5: Tap Continue.

Step 6: You will receive an email containing your ID or further instructions from Apple.


2 How to Reset Apple ID Password

Have you forgotten your Apple ID password and you want to recover it? If you don’t know how it’s simple, the steps below will guide you.

Step 1: On your computer, visit the Apple ID site.

Step 2: Tap Forgot Apple ID or password?

Step 3: Input your Apple ID.

Step 4: Type the verification code. Tap Continue.

Step 5: Check I need to reset my password and hit Continue.

Step 6: You can choose to Get an email or Answer security questions. And hit Continue.


If you choose Get an email, you will get an email to change the password.


If you choose Answer security questions, you should answer the questions and have access to change the password.
Sponsor ads:Help You Download Private Facebook Videos


Sponsor ads:How to Remove RAR Password Online in Windows without Software 2019

3 General Tips to fix “Cannot Delete Text Messages on iPhone” 2019


3 General Tips to fix “Cannot Delete Text Messages on iPhone”

Before we get into the guaranteed fix for this problem, below are some of the simple fixes that may or may not help you to delete your texts.
1 Reboot iPhone


Simply turning your iPhone off and back on again can fix a lot of the simple problems that you experience with your iPhone. This refreshes the iPhone UI and restarts the iOS, hopefully allowing you to delete your texts in the process.


2 Update iOS


Being unable to delete texts could be the result of an iOS bug and if that’s the case, it is probably fixed in the most recent version. Make sure that your iOS is up to date.


3 Delete Non-Official Apps


If you have any apps on your iPhone that you didn’t download through the App Store, they may be interfering with some of the iOS features. Uninstall them and try to delete your texts again.


You may also like:Sponsor ads:ISO Mounter Free Software for Creating Virtual CD Drive
Also Read:Download the Latest Version of Samsung Kies for PC and Mac OS Sponsor ads:Change Public and Private IP Address on Windows 10/7/8

3 Common Ways to Fix "iPhone Not Showing up in iTunes" 2019


3 Common Ways to Fix "iPhone Not Showing up in iTunes"
1 Inspect Your USB Cable to Solve iPhone Not Showing up in iTunes

This may sound very common but this can also be a cause of your iPhone not connecting to your iTunes. A damaged USB cord means that your iPhone will not be able to establish a connection with your computer and so may not be able to sync with iTunes. To check if this may be the problem, inspect your USB cable for any physical damage. Alternatively, you can try another USB cable to see if the USB cable is indeed the culprit.


2 Update Your Windows Driver to Fix iPhone Not Showing up in iTunes

If your windows drivers are outdated, they may not work with iTunes, especially if there has been a recent software upgrade.

Follow the steps below to fix iPhone not showing up in iTunes:

Step 1: Go to my computer and double click on it, inside your C drive, Search for USBAAPL.SYS and hit the enter key to search.

Step 2: Once the search results return with the folder, right click on it and select the “open file location” option.

Step 3: Copy all of the files in that folder into a newly created backup folder.

Step 4: Once you have successfully made a copy of the file, locate “Device manager” and then click on “Apple iPhone” under the “portable devices” menu.

Step 5: Go on to select the “Apple iPhone” and then finally click on “Update Driver”.


3 Uninstall iTunes from Your Computer to Recover iPhone Not Showing up in iTunes

Close and exit the iTunes program and close any other programs that may be using its service.

Step 1: Now, proceed to uninstall iTunes from your computer by heading to the Control panel.

Step 2: Once you successfully uninstall iTunes, it will still leave some files behind on your computer.

Step 3: Now you have to locate and delete those files.


Open my computer go to C: /ProgramFiles/Common Files/Apple if there is any folder in this path, then delete it too.Also Read:Download Lynda Videos for Free


Also Read:10 Best Party Planner Apps for your iPhone and iPad in 2019


Also, locate C:/User/Username (the username on your computer)/AppData/Local/Apple, Do the same for this file path to C:/User/Username/My Music and delete any iTunes related folder there.

Step 4: Once you have deleted any remaining folders, restart your computer and head on to the apple website to download and reinstall iTunes again.

How to Get Video from iPhone to Mac (Large & Recorded Video) 2019


2. How to Copy Purchased Video from iPhone to Mac Using iTunes

The above method with iMyFone software is the one that gives you the most freedom, but if you only want to transfer videos that you purchased, then you can use iTunes. Here is how to do that:


Open iTunes on your computer.


Click Account > Authorizations > Authorize This Computer to make sure that your computer can download the purchases. You may have to sign in with your Apple ID to verify.


Plug in your iPhone. A dialog window should come up. Click Transfer Purchases in that window. If it doesn’t come up, then just click File at the top, then Devices, then Transfer Purchases from iPhone.


Cons

Of course, there are some limits to this:


This will transfer all of your purchases, including video. If you only wanted to transfer video, then you are better off using the third-party method, where you can be selective.


This only works with purchases, of course. If you didn’t purchase the videos from the iTunes Store, you probably won’t be able to transfer them with iTunes.
3. How to Upload Videos from iPhone to Mac Using Image Capture

The next method is to transfer your videos using Image Capture. However, keep in mind that this only works with videos on your camera roll. If you are trying to transfer TV shows or movies, it won’t work. Here is how you can do it:


Plug your iPhone into your Mac.


Launch Image Capture.


In Image Capture, you should see a list of the photos and videos on your iPhone. These should come up automatically after a moment.


Hold down the Command key and click specific videos to select the ones that you want to transfer and click the Import button. You can also just click Import All to import all of your photos and videos to your Mac.


Now you just wait. Don’t unplug your device while Image Capture is importing. As your videos are imported, a green check mark will appear beside them.


4. How to Upload Videos from iPhone to Mac Using iMovie

Finally, you can upload videos from your iPhone to your Mac using iMovie. Once it’s in iMovie, you can edit it. Here is how it works:Sponsor ads:Fix SD Card Error on GoPro Hero


Plug your iPhone into your Mac.


Launch iMovie.


In iMovie, click the Import icon. It looks like a little arrow pointing down inside a gray box.


When the browsing window comes up, click on your device in the sidebar. You should now see a list of your iPhone videos in the window.


Choose the destination of where the imported video will go by clicking “Import to” and choosing an event.


Just as with Image Capture, you can Command-click specific videos that you want and click Import Selected, or you can just click Import All to import them all.


Wait until iMovie imports your videos. There may be a progress circle in the top right corner that shows you how long it will take. Don’t disconnect your iPhone until the importing is done.


You may also like:Sponsor ads:Create Boomerang from Existing Videos on Android/iPhone 2019

What Should I Do If I Lose Data after Restoring My iPhone? 2019 Guide


What Should I Do If I Lose Data after Restoring My iPhone?

First of all, without backing up your data first, you will lose all of your data for good. Doing a restore wipes everything—your files, your contacts, your apps, and so on. If you have a backup, though, you can rescue your lost data by simply restoring the backup onto your iPhone after it is wiped.

Now you might be wondering how you can restore your iPhone from a previous backup. The process is actually very simple, and there are a few ways that you can do it:
Restore iPhone from Previous Backup Using iTunes

This is the official method of restoring your backup. Assuming you made a backup in iTunes before you factory restored your iPhone (which is advisable), all you have to do is follow these steps:

(1) Launch iTunes on your PC or Mac and connect your device via USB.

(2) Click on your device in iTunes. You should see a summary page on the main screen.

(3) On the summary page, click Restore Backup... in iTunes. You can find this under "Backups" and "Manually Back Up and Restore" towards the bottom.

(4) Choose a backup. It will show the dates and times for the backups, and normally you pick the most recent. Of course, if you wiped your iPhone because you were having software issues, you might want to restore from an older backup.

(5) Click Restore and wait until iTunes finishes restoring the backup. Do not unplug your iPhone during this time.Also Read:Remove the U2 Album from iPhone in 2019


Now, there are some disadvantages to this method as well. For example:


You can't restore your media files in the backup, such as the songs that you had saved in your iPhone's storage. (You will have to add them later via an iTunes sync—if you purchased the music through iTunes.)


You might not need all of the data in the backup, but there's no way to selectively restore. You will have to restore the whole backup.


Sometimes you might encounter a restore error when you try to restore an iTunes backup. iTunes can be buggy occasionally.Also Read:Set a Voice Recording as a Ringtone on iPhone Xs/X/8/7/6s

Sunday, February 24, 2019

How to Restore iPhone 8 Entirely or Selectively 2019


How to Restore iPhone 8 Entirely or Selectively


Tip 1. Restore iPhone Backup to a New iPhone 8 via iTunes


Tip 2. Restore iPhone Backup to New iPhone 8 via iCloud


Tip 3. New Way to Restore iPhone Backup to iPhone 8 Selectively
1. Restore iPhone Backup to a New iPhone 8 via iTunes

Restoring the data from an old iPhone to a new one via iTunes is very easy. To begin with, check to make sure that you have a latest backup of the old iPhone and then follow these simple steps.

Step 1: Open iTunes on your computer and then connect the new iPhone 8 to the computer using USB cables.

Step 2: Select the iPhone when it appears in iTunes and then click "Restore Backup".


Step 3: Select the latest backup and then click "Restore" and wait for iTunes to complete the process. Keep the device connected until the process is complete.
2. Restore iPhone Backup to New iPhone 8 via iCloud

You could also choose to restore the old iPhone's backup to the new iPhone 8 via iCloud. Here's how to do it.

Step 1: Follow the prompts on the set-up screen for the new device until you get to the Apps & Data screen. Select "Restore from iCloud Backup."

Step 2: Sign in to iCloud and then choose the most relevant backup based on the date and size of the backup.

Step 3: Stay connected to the Wi-Fi network until the process is complete.


While the above two processes are effective in the transfer of data from an old iPhone to another, they do have a few shortcomings. To begin with, the whole process whether you are using iTunes or iCloud can take quite a while, almost an hour. It is also impossible to specify the data you would like to transfer to the new device; you can only restore the entire backup.
3. Restore iPhone Backup to iPhone 8 Using iMyFone iTransor

Sponsor ads:

Gihosoft Free iPhone Data Recovery:https://www.gihosoft.com/iphone-data-recovery-free.html

Gihosoft iPhone Data Recovery Free

Free iPhone Data Recovery Software for Windows/Mac

Recover up to 12+ types of files, including contacts, SMS, photos, WhatsApp, Viber, notes, etc.

Restore lost data from iOS devices directly or from iTunes and iCloud backup

Recover iPhone data lost due to iOS upgrade/jailbreak, accidental deletion, device lost or broken

Support all the latest iPhone, iPad and iPod Touch

Both Free and Pro version.

If you lost data after you updated to a new iPhone, you can always use Gihosoft iPhone Data Recovery to get the data back from the old iPhone or backup.You may also like: iphonerecovery.com

If you use android phones, please choose Gihosoft Android Data Recovery.

With Gihosoft Android Data Recovery, no longer afraid of data loss!

Must read:Youtube video downloader for pc

Gihosoft RePicvid Free Photo Recovery Software provides a free photo recovery software for windows to help users recover the deleted or lost photo for free.

Jihosoft Android Data Recovery: the best Android Data Recovery software for Windows and Mac to recover deleted contacts, messages, photos, videos, WhatsApp and etc from Android devices.Tips:How to transfer messages from iPhone to iPhone


jihosoft Free iPhone Data Recovery

Friday, February 22, 2019

6 Tips Offered When iTunes Doesn’t See iPhone 2019

When I connected my iPhone to iTunes, it was not able to recognize my device. Is the issue with my iPhone or iTunes? I tried restarting my iPhone but it was not fruitful. Please help me; I have no idea why iTunes not detecting iPhone. Thanks!

You are not the one whose iTunes doesn't see iPhone. It has been faced by many owners of iPhone. There could be many reasons behind the problem. However, we have included some methods in this article to solve this issue.


2 Make Sure Lightning Cable & USB Port Are Good

2.1. Check Lightning Cable

Any hindrance in a stable connection between the computer and the device may result with iTunes won't recognize iPhone. One cause of it could be the lightning cable. Double-check if the lightning cable you are using is of high quality or not, cables with low quality can work for charging but not for connecting to computer or syncing data. When buying a cable from store or if already bought, check if "Made for iPhone" (MFi) logo is there on the box or not – if it's there your cable is MFi certified and is of high quality.
Check Lightning Cable

2.2. Check USB Port

To maintain a stable connection, USB port plays an equal role as that of cable. Since, USB ports are not invincible they too can wear out. Try another USB port to connect your iPhone to the computer or clean the dirt or debris in the USB port (if any) and plug the device back in. Also, make sure that you connect your device directly into the Computer instead plugging it through a USB Hub.
Check USB Port


3Update iTunes & iOS

If iPhone won't connect to iTunes after checking the above things, please make sure that iTunes and iOS are up to date. Also, this is to keep in mind that the problem can occur easily if you are connecting a newly bought phone with the older Mac or computer. A new device always demands latest iTunes version. Hence, updated iTunes and iOS is mandatory to make the iOS device detected with Mac.
Update iTunes


4Reset Location & Privacy

Here is another simple action you should take when the above fixes didn’t work. To reset location and privacy in the device, check out the following steps.Sponsor ads:
Must Read:If you lost data after you updated to a new iPhone, you can always use Gihosoft iPhone Data Recovery to get the data back from the old iPhone or backup.
Gihosoft Free iPhone Data Recovery:iphonerecovery.com
If you use android phones, please choose Gihosoft Android Data Recovery
  • Open "Settings" and hit on "General" option.
  • Go to "Reset".
  • Now, tap on "Reset Location and Privacy".
  • Type in the passcode and then tap on "Reset Settings".
Reset Location & Privacy


5If iTunes Doesn't See iPhone on a Mac

When iPhone won't connect to iTunes, inspect that your Mac is able to recognize it or not.
  • Hit on "Apple" to open the Apple menu. Click on "About This Mac".
  • Subsequently, click on "System Report". It will launch the System Imformation app.
  • Now click on "USB" and search for iPhone
If you find iPhone in System Information but not in iTunes, you need to start with the third step in the following instructions. And in case it is not there, perform all the steps.
  • Try on another USB port in your Mac.
  • Use a different Lightning cable.
  • Make sure to deactivate third-party security software as they can act as hindrance between USB device and Mac connection.
  • Reset the iTunes lockdown folder.


6If iTunes Doesn't See iPhone on a Windows Computer

6.1. Check Apple Mobile Device USB Driver

Enable the Driver
When iTunes won't recognize iPhone and you can see Apple Mobile Device USB Driver in iTunes, it's time to update it. You will get three options on right-clicking Apple Mobile Device USB Driver. They are, "Update Driver Software", "Disable" and "Uninstall". If you find "Enable" instead of "Disable", click on it and check the problem is fixed.
Uninstall the Driver
Go to "Uninstall" and the driver will be removed from Windows. Subsequently, disconnect your iPhone and reconnect it. This will make the computer detecting the device. Moreover, an updated version will be installed too. Don’t forget to click on "Trust".
Update Driver Software
On clicking "Update Driver Software" option, there will be two options on the screen i.e. "Search automatically for updated driver software" and "Browse my computer for driver software".
  • Now select, "Search automatically for updated driver software" if you want the wizard to look on the internet and install the updated driver.
  • If you select "Browse my computer for driver software" and navigate to the path where you have downloaded the updated driver software.

6.2. What to do if Apple Mobile Device USB Driver is Missing

If you are not able to see Apple Mobile Device USB Driver, go to "Portable Devices" option in the device manager. A tiny triangle is to be clicked now that is just right on "Portable Devices". Now, you will observe Apple iPhone listed on the screen. You are now required to select "Browse my computer for driver software" and a wizard will appear on the screen. On the wizard, click "browse" and navigate to the following address below.
  • C:\Program Files\Common Files\Apple\Mobile Device Support\Drivers
Once done, click "Next" on the wizard and after a couple of seconds, a message pops on your screen saying "The driver software has been successfully installed on your computer".


iTunes not detecting iPhone can be a big problem. Most of the things can be done when we connect iPhones to iTunes and the issue can easily disappoint anyone. So, we came here with solid fixes, expecting to make you out of the trouble. Hope the above tips work and we did what we expected.

Wednesday, February 20, 2019

Why iOS 12 Will Make Your iPhone Run Faster?


Why iOS 12 Will Make Your iPhone Run Faster?
1Tweaked Animation

Tweaked animation in iOS 12 is a simple trick that makes your phone work fastly. iOS 12 can also be said as tetchier because many animations were slightly tweaked & shortened in it for its better working. It is not very clear that which animations are enhanced, but users can easily notice the difference instantaneously after upgrading their version from iOS previous versions. iOS 12 helps in fixing many frame drops, hops, and odd viruses. Many simulations are seen in iOS 12 when you start or exit any app. iOS 12 is packed with fully secured files so that its users should be impatient to install immediately.


2New File System

APFS is the abbreviation of the Apple File System. You can replace the existing HFS+ file system, but only for Apple devices like Apple Watch, Apple TV, iPhone, iPad etc. It also gives you fast updates and has a backup of your data. It also does several things to make your Apple device faster. It has Two most prominent features named as snapshots and clones. Discussing both features we must know that Snapshots creates only a read-only duplicate file of the system at a solo point in time while the Clones are copies of both real files and the Mac's shoved folders.Sponsor ads:Fix ios device

Sponsor ads:Android Email Apps


Must Read:If you lost data after you updated to a new iPhone, you can always use Gihosoft iPhone Data Recovery to get the data back from the old iPhone or backup.

Gihosoft Free iPhone Data Recovery:iphonerecovery.com

If you use android phones, please choose Gihosoft Android Data Recovery


Sponsor ads:Free Antivirus for iPhone

Tuesday, February 19, 2019

How to Sync Music from iPod to iTunes Library via iTunes (Only for Purchases) 2019


How to Sync Music from iPod to iTunes Library via iTunes (Only for Purchases)

Here is how you use good old iTunes to perform the sync. Just keep in mind that there are some limitations, which we will go over further below.

Step 1: Turn on your computer and launch iTunes.

Step 2: Plug in your iPod.

Step 3: Click on “Edit”.

Step 4: Go down and click “Preferences”.

Step 5: Click on “Devices”.

Step 6: Look for the words “Prevent iPods, iPhones and iPads from syncing automatically” and the check box next to it. Click the box.

Step 7: Click “File”, then “Devices”.

Step 8: Click on where it says “Transfer Purchase from [X]” where X is the name of you device.


This method is the official one, but unfortunately it only really works for music that you purchased officially from the iTunes store. If you have other kinds of data on there that you didn’t necessarily purchase, it could end up being lost during the sync.
How to Sync Music from iPod to iTunes without iTunes (for Purchases & Non-Purchases)Sponsor ads:

Gihosoft Free iPhone Data Recovery:iphonerecovery.com

Free iPhone Data Recovery Software for Windows/Mac

Recover up to 12+ types of files, including contacts, SMS, photos, WhatsApp, Viber, notes, etc.

Restore lost data from iOS devices directly or from iTunes and iCloud backup

Recover iPhone data lost due to iOS upgrade/jailbreak, accidental deletion, device lost or broken

Support all the latest iPhone, iPad and iPod Touch

Both Free and Pro version.

If you lost data after you updated to a new iPhone, you can always use Gihosoft iPhone Data Recovery to get the data back from the old iPhone or backup.

Top 10 Best FRP Bypass Tools to Bypass Google Account on Android Device 2019

Worth reading:download youtube 1080p

If you use android phones, please choose Gihosoft Android Data Recovery

Jihosoft Android Data Recovery: the best Android Data Recovery software for Windows and Mac to recover deleted contacts, messages, photos, videos, WhatsApp and etc from Android

Monday, February 18, 2019

How to Deal with iCloud Backup Storage Full


How to Deal with iCloud Backup Storage Full


iCloud Backup storage full could also happen by accident. If that is the case with you, you need to verify your storage status. Besides, your iCloud backup storage could become full if your subscription for more space is short. Whatever the reason for the backup storage full, you must find a way around it or risk losing your important data if you lost your iPhone.


How to Deal with iCloud Backup Storage Full

To optimize your full iCloud backup storage and free up some space, you may need to take some drastic actions. We have 3 tips to help you.
1 Do Away with Backup You Do Not Need

The first thing to do is to get rid of redundant backups. Remember that iCloud storage is limited. Therefore, it pays to be choosy about what else your device backs up in iCloud.

To do this from your iPhone or iPad, click on Settings > General > Usage. Look through the list and click Manage Storage. Right there, you will see all the devices associated with your Apple ID. Simply click on the one you are interested in to see the date of its last backup and the size. From the Backup Options, you can just turn off the backup for the one you selected.
2 Backup More and Wisely

If you use up your iCloud backup storage quickly, the best thing to do is always to buy more. You can buy bigger storage space of 10 GB or more at not more than $20 per year. You may also choose to get an additional 20GB at $40 per year, and the list goes on. However, before you get more storage space, check to see if you can trim down backups you no longer need.
3 Move Messages to Mac or PC

Another way to optimize your full iCloud backup space is to delete email messages from your iCloud email account. Remove those messages from your iPhone, iPad, or iPod touch to your Mac or PC as well. This will free up space.


How to Better Clear up iCloud Backup StorageSponsor ads:

Gihosoft Free iPhone Data Recovery:https://www.gihosoft.com/iphone-data-recovery-free.html

Gihosoft iPhone Data Recovery Free

Free iPhone Data Recovery Software for Windows/Mac

Recover up to 12+ types of files, including contacts, SMS, photos, WhatsApp, Viber, notes, etc.

Restore lost data from iOS devices directly or from iTunes and iCloud backup

Recover iPhone data lost due to iOS upgrade/jailbreak, accidental deletion, device lost or broken

Support all the latest iPhone, iPad and iPod Touch

Both Free and Pro version.

If you lost data after you updated to a new iPhone, you can always use Gihosoft iPhone Data Recovery to get the data back from the old iPhone or backup.You may also like: iphonerecovery.com

If you use android phones, please choose Gihosoft Android Data Recovery.

With Gihosoft Android Data Recovery, no longer afraid of data loss!

Must read:Youtube video downloader for pc

Gihosoft RePicvid Free Photo Recovery Software provides a free photo recovery software for windows to help users recover the deleted or lost photo for free.

Jihosoft Android Data Recovery: the best Android Data Recovery software for Windows and Mac to recover deleted contacts, messages, photos, videos, WhatsApp and etc from Android devices.Tips:How to transfer messages from iPhone to iPhone

jihosoft Free iPhone Data Recovery

Sunday, February 17, 2019

Fix Accidentally Crashed iPad? Why It Crashed?


Reason 3 Lots of Apps Running in the Background

If you're asking yourself over and over, “why does my iPad crash,” it might actually be for a very simple reason: you have too many apps running. You may not even realize how many apps are running in the background, just under the radar, hogging up system resources. Simply double click Home button on your iPad and you will know which apps are running. Slide each app up to close the unnecessary ones.
Reason 4 Software Problem

The iOS software is very robust, but this doesn't mean it can't have problems. To solve this issue, you have 3 choice to choose from.


Reset: Go to “Setting > General > Reset > Erase All Content and Settings”.


iOS Update: Go to “Settings > General > Software Update”. Make sure your iPad is connected to Wi-Fi network.


Restore: Connect your iPad to computer & open iTunes > tap iPad tab and click “Restore iPad” button. (Make sure you have the latest version of iTunes)

As you can see, there are many reasons why an iPad may crash. Chances are, the reason can be narrowed down to one of the ones mentioned above. With a little detective work, you should be able to figure out your issue in no time.Restoring Lost Photos and Videos from iPhone

If you have deleted some of your pictures or videos from your gallery, then there is a straightforward way to Recover Deleted Files iPhone back.

After you delete the media files from your gallery, be it photos or videos, then you must know that iOS has a feature that the deleted media files doesn’t get deleted immediately, but it gets compiled to a temporary folder from where it gets deleted after 30 days. If you lost data after you updated to a new iPhone, you can always use Gihosoft iPhone Data Recovery to get the data back from the old iPhone or backup. Should you wish to recover these files, you must go to that “recently deleted” folder and retrieve these files before 30 days.

If you use android phones, please choose Gihosoft Android Data Recovery.

Tuesday, February 12, 2019

Fix ‘iPhone X Stuck in Recovery Mode’ – 3 Quick Solutions


Part 1. Steps for Entering iPhone X into Recovery Mode

The first step for every iPhone X user is to enter recovery mode. It is ideal for users who are experiencing any one of the above-mentioned problems. This procedure also aids you in restoring the iPhone X.


Go to recovery mode.


Ensure that the iPhone X has a full charge.


Ensure that you have new iTunes versions successfully installed on PC/Mac.


Connect the iPhone to PC/Mac.


After that, you can launch iTunes.


The next step is to force restart iPhone X by clicking on home and power buttons at a time continuously until you see Apple logo on the screen. Now, you need to release your power button and keep holding the home button. Once you find cable signs and iTunes on your screen, you can release the home button.


Finally, you can enter recovery mode.


Part 2. What Cause iPhone X Stuck in Recovery Mode

There are many causes for iPhone X stuck in Recovery Mode, such as:


Factory reset


Hardware problem


Software corruption


Incorrect function during the jailbreak

The hardware problems may happen when you drop the iPhone X in your swimming pool. When it comes to software problems, they can cause the iPhone X display stuck on join with iTunes logo.


Part 3. How to Get iPhone X Out of Recovery Mode

It is pleasing news for iPhone X users that they are not hugely vulnerable to malfunctions and errors. Some users experience ‘iPhone X Stuck in Recovery Mode’ problem which may happen at certain instances due to software problems, hardware damage of improper user. This section covers different ways to address this problem and enjoy the outstanding performance of your iPhone X again.
1. Restore iPhone X in DFU Mode by Using iTunes

When you fail to perform the 2nd recovery mode restore, you can simply prefer DFU Mode process. It is the highly preferred system restore mode ideal for even iPhone X. The main function of this restore mode is to put your iPhone X in a position where iPhone X is capable of communicating with the iTunes on your computer. In this process, there is no need for activation of a bootloader.

It increases the possibilities of fixing your iPhone X when your operating system is completely damaged. It is significant to know that this restore mode ensures that you get the iPhone X successfully back up and smoothly running afterward. When you decide to try this restore mode, you can look at the following guidelines.


The first step is to connect iPhone X to a computer by using lighting cable or USB cable. You can open iTunes on the computer once connected successfully.


Press and release your Volume up option quickly, then rapidly press as well as release volume down switch. Press and continuously hold the Power key until the display goes black


Once the display turns black, press and grasp volume down key while keep grasping down the Power key.


Release Power button after five seconds but keep grasping down volume down key until you see iTunes on iPhone X.


Now, release the volume down key.


Finally, follow your onscreen guidelines for restoring iPhone X.

If this mode does not work well, you can go for alternative methods.
2. Exit iPhone X out of Recovery Mode With No Data Loss

If you want to get the iPhone X back to standard condition without any data loss, you can opt for iMyFone Fixppo. The good thing about this repair tool is that it supports to fix your ‘iPhone X stuck in Recovery Mode’ issue in one click without any data loss. It is well-known for its striking features including:Sponsor ads:

Gihosoft Free iPhone Data Recovery:iphonerecovery.com

Free iPhone Data Recovery Software for Windows/Mac

Recover up to 12+ types of files, including contacts, SMS, photos, WhatsApp, Viber, notes, etc.

Restore lost data from iOS devices directly or from iTunes and iCloud backup

Recover iPhone data lost due to iOS upgrade/jailbreak, accidental deletion, device lost or broken

Support all the latest iPhone, iPad and iPod Touch

Both Free and Pro version.

If you lost data after you updated to a new iPhone, you can always use Gihosoft iPhone Data Recovery to get the data back from the old iPhone or backup.

Top 10 Best FRP Bypass Tools to Bypass Google Account on Android Device 2019

Worth reading:download youtube 1080p

If you use android phones, please choose Gihosoft Android Data Recovery

Jihosoft Android Data Recovery: the best Android Data Recovery software for Windows and Mac to recover deleted contacts, messages, photos, videos, WhatsApp and etc from Android

Friday, February 1, 2019

Complete Information about iPhone Restore Mode 2019

Complete Information about iPhone Restore Mode 2019

Baffled about the iPhone restore mode? What is it, when it is used or how to boot iPhone in restore mode? Well, fret not. We have your back covered. To clear your doubts, we came up with today's post that offers you in depth information about iPhone restore mode. In addition, will also make you aware about what needs to be done if your iPhone stuck on restore mode. So let's get started.


1. Common Questions about iPhone Restore Mode


1.1. What Is iPhone Restore Mode?


1.2. When Should We Use iPhone Restore Mode?


1.3. How to Put Your Device into iPhone Restore Mode?


1.4. Will You Lose Data When Puting Your Device Into Restore Mode?


2. How to Fix iPhone Restore Mode not Working or iPhone Stuck on Restore Mode
1. Common Questions about iPhone Restore Mode

There are many questions that iPhone users have asked about restore mode. Here we will pick out the most commonly asked questions and provide detailed answers for them.
1.1. What Is iPhone Restore Mode?

iPhone Restore Mode comprises of two different modes, namely Recovery mode and DFU mode. The major difference between DFU mode and Recovery mode lies in iBoot bootloader. Recovery Mode makes use of iBoot bootloader while you perform upgrading or restoring operations over iPhone. While on the other hand, DFU mode skips iBoot bootloader which enables you to downgrade your iOS firmware version. When your iPhone is in recovery mode, it shows the iTunes logo. When your iPhone is in DFU mode, it shows black screen. iTunes will only tell you that a device in recovery mode is detected.


1.2. When Should We Use iPhone Restore Mode?

Both Recovery mode and DFU mode of the iPhone Restore Mode are used to update or restore iPhone or when jailbreaking your iPhone. It is usually recommended that you put your iPhone in DFU mode if you want to completely restore your iPhone to factory settings.


1.3. How to Put Your Device into iPhone Restore Mode?

It's now time to uncover the step by step tutorial on how to boot your iPhone in Restore Mode (i.e. Recovery mode or DFU mode). You simply need to follow the instructions ensued, depending upon the iPhone variant you possess.
Boot iPhone in DFU Mode

iPhone 6/6s or earlier:


Get your iPhone linked with your PC and run iTunes.


Next, hit and hold the 'Home' + 'Power' key down for about 8 seconds. Afterwards, release the 'Power' key but ensure to keep holding the 'Home' key.


You'll now notice that your iPhone screen has turned black completely but iTunes has detected your iPhone in restore mode. That's it.


iPhone 7/7 Plus:


Step 1 remains the same as above and then hold on the 'Power' key + 'Volume Down' key altogether for 8 seconds. Thereafter, release the 'Power' key but ensure to keep holding 'Volume Down' key.


Step 3 will be the same as above.


iPhone 8/8 Plus/X/XS/XS Max/XR:


Step 1 remains the same as above. Then push the 'Volume Up' key, followed by 'Volume Down' key and subsequently hold down 'Power' key till the iPhone screen turns black. Then, hit and hold 'Volume Down' key + 'Power' key for 5 seconds. Release 'Power' key thereafter but make sure not to release the 'Volume Down' key.


Step 3 will be the same as above.


Boot iPhone in Recovery Mode

iPhone 6/6s or earlier:


Shut off your iPhone. Then, launch the iTunes application and get your iPhone linked to your Windows or Mac computer. Now, hold down the 'Home' key on your iPhone, till you get to witness 'Connect to iTunes' screen.

iPhone 7/7 Plus:


Switch off your iPhone. Launch iTunes application on your Windows or Mac computer. Now, get your iPhone linked to your PC. Then, keep the 'Volume Down' key down of your iPhone until you get to witness 'Connect to iTunes' screen.

iPhone 8/8 Plus/X/XS/XS Max/XR:


Briefly push 'Volume Up' button, followed by 'Volume Down' button and then hold on the 'Power' button till the time 'Connect to iTunes' screen flashes up on your iPhone.


1.4. Will You Lose Data When Puting Your Device Into Restore Mode?

This simply depends on what operations you perform after entering iPhone restore mode. In case, you simply just enters the iPhone restore mode and then exits it normally, there won't be any data loss. But on the adverse side, if your iPhone stucks on restore mode somehow, then you run high chances of losing all your data.


2. iPhone Restore Mode not Working or iPhone Stuck on Restore Mode?

Sponsor ads:

Gihosoft Free iPhone Data Recovery:https://www.gihosoft.com/iphone-data-recovery-free.html

Gihosoft iPhone Data Recovery Free

Free iPhone Data Recovery Software for Windows/Mac

Recover up to 12+ types of files, including contacts, SMS, photos, WhatsApp, Viber, notes, etc.

Restore lost data from iOS devices directly or from iTunes and iCloud backup

Recover iPhone data lost due to iOS upgrade/jailbreak, accidental deletion, device lost or broken

Support all the latest iPhone, iPad and iPod Touch

Both Free and Pro version.

If you lost data after you updated to a new iPhone, you can always use Gihosoft iPhone Data Recovery to get the data back from the old iPhone or backup.You may also like: iphonerecovery.com

If you use android phones, please choose Gihosoft Android Data Recovery.

With Gihosoft Android Data Recovery, no longer afraid of data loss!

Must read:Youtube video downloader for pc

Gihosoft RePicvid Free Photo Recovery Software provides a free photo recovery software for windows to help users recover the deleted or lost photo for free.

Jihosoft Android Data Recovery: the best Android Data Recovery software for Windows and Mac to recover deleted contacts, messages, photos, videos, WhatsApp and etc from Android devices.Tips:How to transfer messages from iPhone to iPhone
jihosoft Free iPhone Data Recovery

macOS Catalina Is Causing Issues with Select eGPUs

macOS Catalina is apparently breaking many apps. Users have reported that they are facing problems after updating to macOS Catalina with...