Monday, October 29, 2018

How to use the built-in level in the iOS 12 Camera app 2019


One thing people may have missed in the iOS Camera app is a built-in level —though it appears only under very specific circumstances.


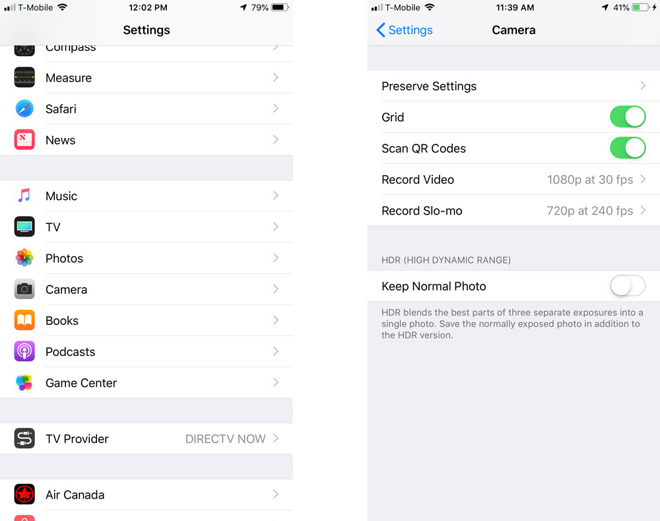
Before anything, you'll have to have the Camera's grid layer enabled. Usually the grid is there only to aid regular composition, for instance when obeying the rule of thirds.


To turn the grid on, open the Settings app, then scroll down until you find the Camera menu. You'll find the toggle there.


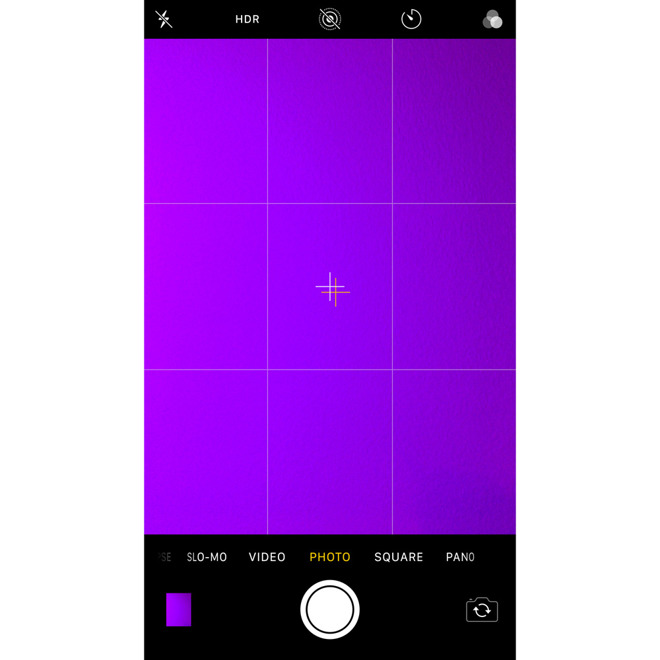
The level still won't appear if you aim at most objects. Instead, it only appears as crosshairs when you point straight up or down, presumably so you can get a perfectly flat view of subjects at those angles, which might otherwise be difficult to judge. This can be especially handy for capturing documents to email or scan with OCR (optical character recognition).


Align the crosshairs, and you should be shooting level.If you lost data after you updated to a new iPhone, you can always use Gihosoft iPhone Data Recovery to get the data back from the old iPhone or backup.

You may also like:iPhone Backup Extractor - Extract Data from iPhone Backup

Must Read:Jihosoft iTunes Backup Unlocker

Sunday, October 28, 2018

How To add Rainbow Text On Instagram Story 2019


Instagram, a giant photo and video sharing social networking site sure knows how to keep its users engage to their application. As in the past and even current year, Instagram has introduced a number of cool updates to their platform. Be it the GIF stickers where you can put amazing animations to your Insta stories, a question poll, funny face filters, the introduction of the mute button, and of course the ever popular IGTV. So, it though seems like Instagram is here to be for the longest time. And they know that Instagram story is a one-shot way for doing so. As a majority of teens nowadays love to share their day-to-day life socially with their friends and followers. And what best way to do it then posting it on their Instagram story section! Because of which Instagram is sure bringing more and more features to upgrade the story game of its users.


And one such hidden feature that Instagram has to offer to make your stories more eye-popping than ever is through a rainbow colored text. Yes, you read it right a rainbow colored text! You might have seen that for the respect for the Pride month Instagram introduced rainbow colored tags to their features such as hashtags, location tags, filters, and so on. But that’s not it through Instagram you can also change your normal text into something colorful or should I say into something rainbow.

Worth Reading: How to Post Instagram on PC

So, for changing your normal basic text into a rainbow just follow the steps mentioned below and unlock a whole range of gradient colors.


How to do Rainbow Text on Instagram Story:


Open your Instagram account.


Head over to your Instagram story section. Now click a photo for the background or either add one from your camera roll. (For a plain background select the pencil, choose a color and tap and hold your finger on the screen).


Once your background is selected, now comes the little tricky part. Write the text you want in rainbow then select the whole text.


Once you have selected your text you will see various colors options at the bottom of your screen. Now for getting a rainbow, long press on the extreme right color and you will see a number of color gradients pop up on the screen.


Then using both your hands (up to your choice) drag one finger across your text and simultaneously. And drag your other finger on the color palette but go slowly. And once you have covered all your text then you will have the colored or rainbow text you wanted. (keep your hands steady on a surface so that they won’t move in the process).


Once you are done turning your normal text into a rainbow, you can now share it on your Instagram story.


Though this rainbow text is a little difficult to get your hands on. But with practice, you can surely achieve this amazing feature. And there is no harm in doing so. As in return, you will get beautiful and colorful letters that will enhance your Instagram story. So, don’t get disheartened if you are unable to complete it in the first attempt. Do hang on to this rainbow text feature.


Although there is one more method for doing a rainbow text, and that is to write each letter individually and then color it separately. But it is sure time-consuming and may take a while depending on the length of your text. So, it is most preferable to try the above steps for a quick and easy rainbow text Instagram story.
Related Posts:

Backup and Restore Kik Messages on Android

How to Enable USB Debugging on your Android Device

Fix Samsung Galaxy Not Receiving Messages

The Best Web Browser for Android

How to Hide Secret Apps on Android Phone

The Best 2 Call Recorder Apps to Record Phone Calls on Android


So, if you find this article helpful or interesting don’t forget to share it on social media and do comment on your reviews.


Jihosoft Photo Eraser

Erase unwanted objects and perfect your amazing photos!

Remove objects from photos with Photo Eraser is almost as easy as taking a shot. Now you can use this tool to erase undesirable objects from your pictures, such as tourists, watermarks, logos, texts, blemishes and other unwanted things without real photo-editing skills required at all.


Jihosoft Android Data Recovery

The most powerful and professional data recovery software for Android that can restore deleted or lost contacts, photos, videos, audios, SMS, call logs, WhatsApp chat, Viber messages from any Android devices due to accidental deletion, virus attack, formatting. It supports all popular Android smartphones and tablets like Samsung, HTC, LG, Huawei, Motorola, Nexus, etc. In the meantime, you will be guided step by step if you never used this kind of tool before.

Thursday, October 25, 2018

How to Fix iPhone Photos Disappeared from Camera Roll 2019


Option #1 Sign Out of iCloud and then Sign Back in

Another solution from appletoolbox to help you get your photos back is to simply sign out of iCloud and then sign back in. This will refresh the app and allow the iPhone to download the photos back on to the device. Here’s a step by step guide to help you do that;

Step 1: Sign out of iCloud on your iPhone.

Step 2: Go to Photos and then delete all the photos including photos in the “Recently Deleted Folder” and albums.

Step 3: Now “Force Close” the Photos App. To do that, double-tap on the home button and the swipe up on the Photos app to close it.

Step 4: Sign in to iCloud and all your photos will be downloaded back on to your device.
Option #2 Apple's Solutions to Try If Photos Are Still Missing

The following are just some of the solutions you can try to help you find the missing photos;
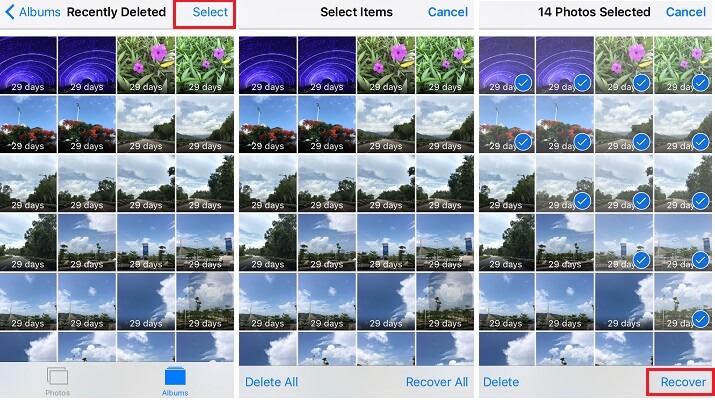
Check Your Recently Deleted Folder


Step 1: Go to Photos > Albums > Recently Deleted.


Step 2: Tap Select and then tap on each of the photos that you want to recover.


Step 3: Tap “Recover” and confirm that you want to recover the photos.


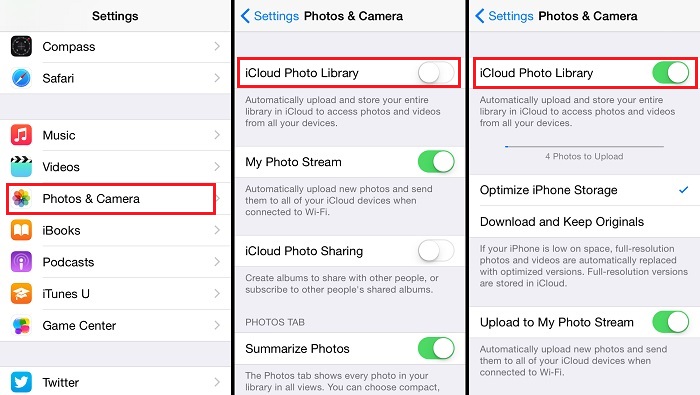
Make Sure iCloud Photos is Turned on

With iCloud photos, you can access all photo and videos store in iCloud on any device. If you are not seeing them on your iPhone, it is possible that iCloud Photos is not turned on. Here’s how to turn on “iCloud Photos” on your iPhone;


Step 1: Go to Settings > {Your Name} > iCloud.


Step 2: Tap “Photos” and then turn on “iCloud Photos.”


Unhide Your Photos

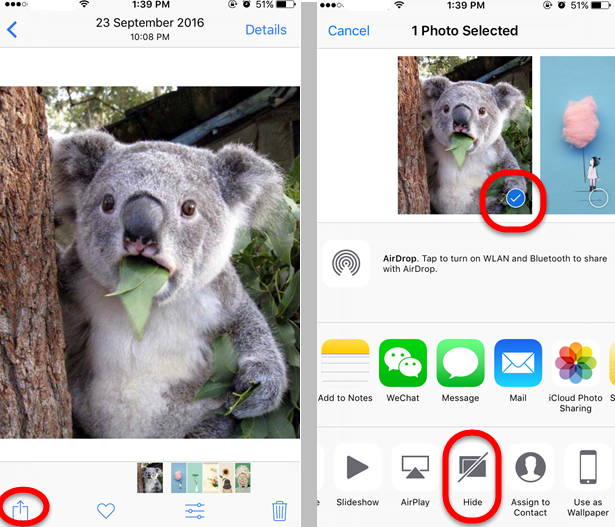
You may also have hidden the photos in your Moments, Collections and Years view. In this case, the photos will not appear on your camera roll, but will be in your Hidden Album. You can unhide the photos using these very simple steps;


Step 1: Open the Photos app and then tap on the Album tab


Step 2: Under “Other Albums,” tap on “Hidden.”


Step 3: Select the photos you want to unhide and then click on “Unhide.”


Sign in Using the Same Apple ID

For your photos and videos to appear on the iPhone, you need to make sure that you are signed in with the same Apple ID on all devices. You can check the Apple ID you are using on your iPhone under “Settings” and on your Mac under “System Preferences.” If you are not using the same ID, sign out and then sign back in using the right ID.

If you lost data after you updated to a new iPhone, you can always use Gihosoft iPhone Data Recovery to get the data back from the old iPhone or backup.

Must Read:Jihosoft iTunes Backup Unlocker

You may also like:online youtube downloader

Thursday, October 18, 2018

3 Ways to Get Back the Lost Contacts after Update 2019 Guide


3 Ways to Get Back the Lost Contacts after Update

These heartfelt and frustrated complaints show how common this problem can be. The good news is we have found some solutions that may work for you. They include the following;
Option #1. Re-Sync the iCloud Contacts

If you have enabled contacts in iCloud, the contacts are saved in iCloud. You can go to icloud.com and check whether your contacts are still there on iCloud. If the contacts are showed there, follow the steps below to re-sync and restore the cotacts back on the device.

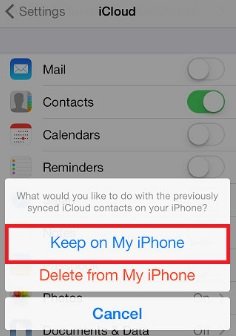
Go to Settings> iCloud > Contacts on your iPhone and turn the contacts off first. A window pops up indicating what would you like to do with the previously synced iCloud contacts on your iPhone. Choose "Delete from My iPhone"


Then re-turn on the contacts. All your contacts stored in iCloud will re-sync to your iPhone.
Option #2. Make Sure You Have Checked All Groups in Contacts App

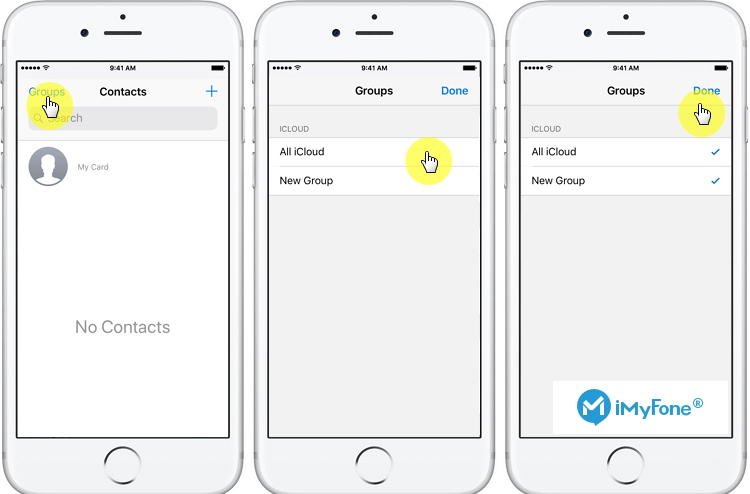
You also need to make sure that the groups which stores your contacts are checked in the Contacts app. If they are, it may not be easy to see the contacts on the iPhone. Here’s how to do it;

Step 1: Launch the contacts app on your device and then tap on “ Groups.”

Step 2: Tap on “All iCloud” or other groups that you store your contacts. If it is unchecked, check it. Then tap “Done” in the upper right hand corner.


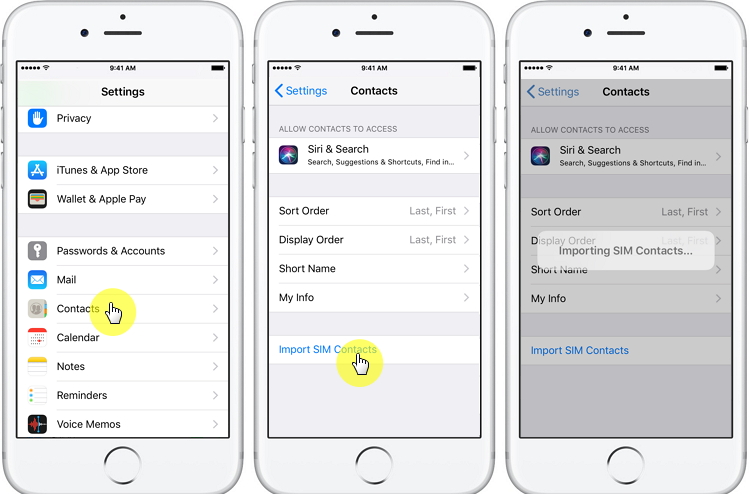
Option #3. Import Contacts from SIM

If you have a record of the missing contacts on your SIM card, you may want to import them from the SIM to the device.Gihosoft Photo Eraser Erase unwanted objects and perfect your amazing photos!

If you lost data after you updated to a new iPhone, you can always use Gihosoft iPhone Data Recovery to get the data back from the old iPhone or backup.

Must Read:Jihosoft iTunes Backup Unlocker

Jihosoft Photo Eraser

Free iTunes/iPhone Backup Extractor for iPhone, iPad

iPhone Backup Extractor - Extract Data from iPhone Backup

You may also like:online youtube downloader

You can do that by going to Settings > Contacts > Import SIM Contacts.


Saturday, October 13, 2018

How to Sync Old iPhone to New iPhone with iTunes?


How to Sync Old iPhone to New iPhone with iTunes?

You can create a backup of your old iPhone using iTunes and use the backup to set up your new iPhone.
Here’s how you can create a backup of your old iPhone using iTunes:


Connect your old iPhone to your PC.


Launch iTunes and ensure that you are running the latest version.


Pick your device and click the “Back Up Now” button.


Once the backup process is complete, check iTunes Preferences>Devices to see if the backup was successfully created. Just check for the name of your device along with the date and time of the backup created by iTunes.
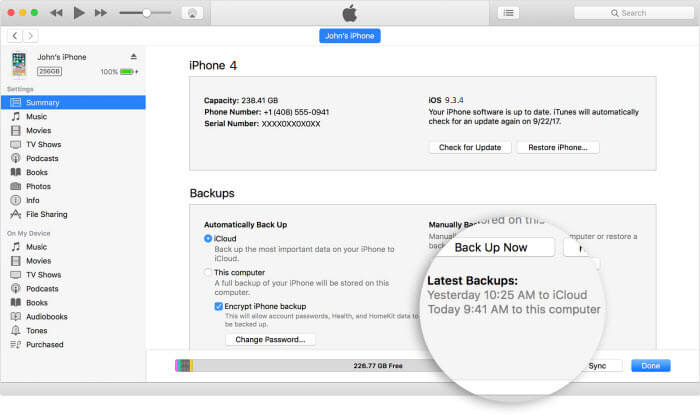


Once you’ve created the backup, follow these steps to set up your new iPhone using the iTunes backup:


Switch on your new device and wait for the message “Hello” to appear on the screen.


Continue with the steps until the “Apps and Data” screen is visible to you.


Then tap the “Restore from iTunes backup” option and hit the “Next” button.


Connect your new iPhone to the same PC you used to back up your old iPhone.


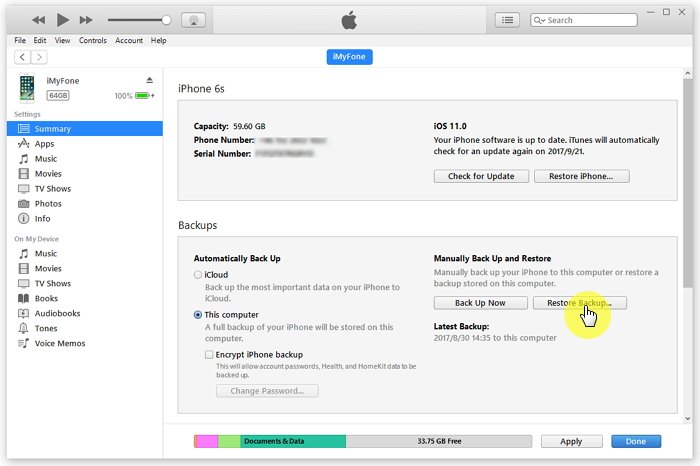
Launch iTunes on your PC and pick your new device.


Pick the “Restore Backup” option and choose a relevant backup.


Patiently wait for the restoration process to complete after which your old iPhone data will be transferred to your new iPhone.


How to Sync Old iPhone to New iPhone with iCloud?

In this section, we’ll guide you on how to sync old iPhone to new iPhone using iCloud. Keep reading to know more.

Similar to the two methods mentioned above, sync using iCloud is also a two-stage process, i.e., taking a backup with iCloud for your old iPhone and setting up the new iPhone using the iCloud backup from the old iPhone. Sounds confusing? Don’t worry. Check out the steps below:
Back up your old iPhone using iCloud


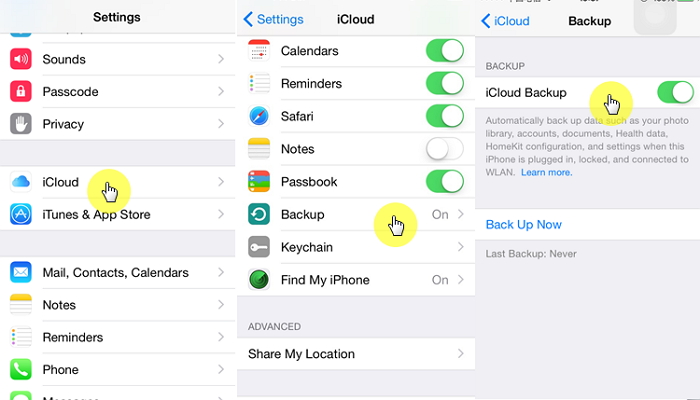
Launch the “Settings” on your old iPhone.


Tap on your picture on the top followed by iCloud.


Scroll down to the “Back Up iCloud” option and tap the button.


Check if the iCloud backup is switched on to green.


Now, hit the “Back Up Now” button to force a backup.


Turn on the new iPhone


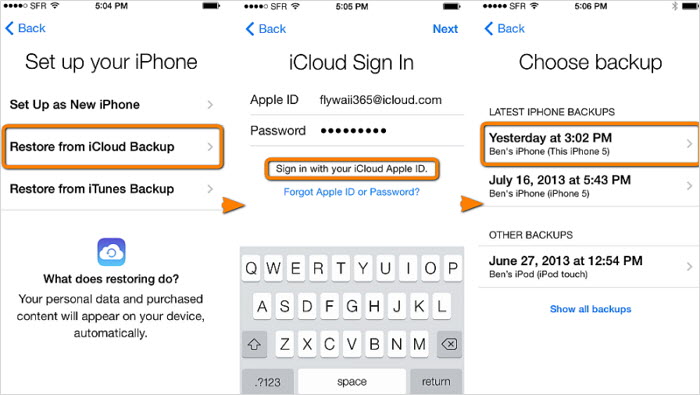
Switch on your new device and wait for the message “Hello” to appear on the screen.


Log in your iCloud account on the new iPhone.


Continue with the steps until the “Apps and Data” screen is visible to you.


Then tap the “Restore from iCloud backup” option and hit the “Next” button.


Limitations:

If the backup of your old iPhone is too large, you may have to purchase extra iCloud storage to completely back up the data.

Gihosoft Photo Eraser Erase unwanted objects and perfect your amazing photos!

If you lost data after you updated to a new iPhone, you can always use Gihosoft iPhone Data Recovery to get the data back from the old iPhone or backup.

Jihosoft Photo Eraser

Free iTunes/iPhone Backup Extractor for iPhone, iPad

iPhone Backup Extractor - Extract Data from iPhone Backup

You may also like:online youtube downloader
Tuesday, October 9, 2018

How to Transfer Photos from iPad to PC without iTunes 2019


How to Transfer Photos from iPad to PC without iTunes 2019

How to Transfer Photos from iPad to PC without iTunes

1 Using Windows Explorer to Transfer Photos from iPad to PC without iTunes

Windows treats the iPad either as a file system or a digital camera based on how they pictures are accessed. Using the windows explorer is the easiest way to get images from your iPad to a Windows PC.

Step 1: Start MY COMPUTER.

Step 2: Locate your iPad; you will see it under Portable Devices section.

Step 3: Run iPad to look for your Photos.

Step 4: Choose the images you want to copy and paste them to a location you can easily access on your PC.

Note

If the pictures are not displayed in Windows, ensure the iPad is unlocked first. Else, the iPad will be found in MY COMPUTER; however, all the content in it will be inaccessible and invisible.
2 Using iCloud to Transfer Photos from iPad to PC without iTunes

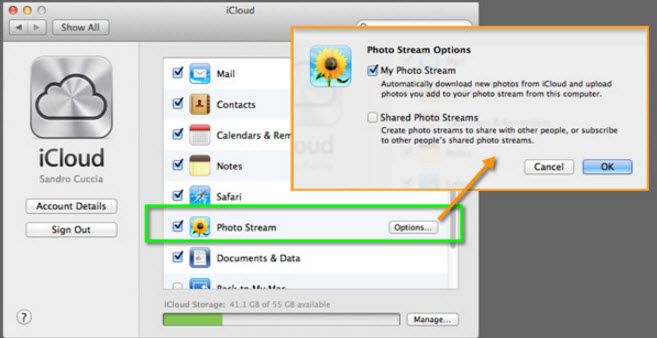
Apple iCloud service can be used to sync photos from iPad to your PC or laptop. All you have to do is enable iCloud on your iPad in Settings and switch on Photo Stream.

Step 1: Download iCloud control panel on your PC.

Step 2: On your iPad, launch the Dropbox app and switch to the Upload tab.

Step 3: Press the + icon and choose the images you want to export. Select and the location you want to save the files and start uploading.

Step 4: When you get to your PC, the selected photos will be waiting to be downloaded to the folder of Dropbox.


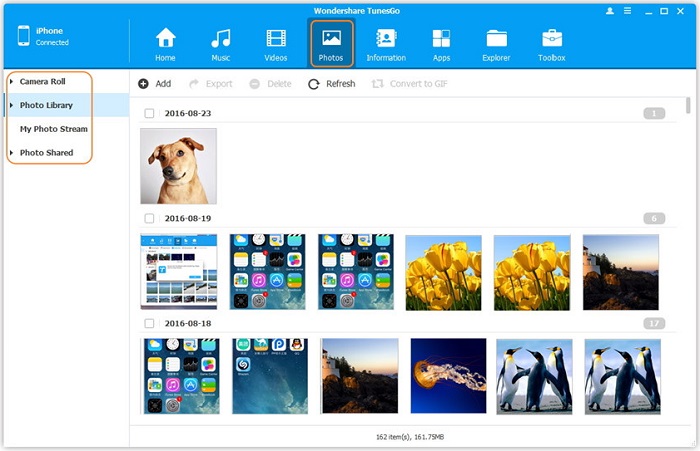
3 Using Tunesgo to Transfer Photos from iPad to PC without iTunes

This may be regarded as one of the best iPad transfer tools for amateur iPad users who get quickly tired of complicated operations to export files between iDevice and PC or between iOS devices.

Step 1: Launch iPad/iPod/iPad transfer tool (Tunesgo).

Step 2: Use a USB cable to connect your iPad to your PC.

Step 3: Tap the PHOTOS button located in the left directory tree to display the photo window.

Step 4: Find the iPad photos and tap EXPORT TO to transfer the images to any preferred destination on your PC.

Step 5: Tap OK when the transfer is completed.


Gihosoft Photo Eraser Erase unwanted objects and perfect your amazing photos!

If you lost data after you updated to a new iPhone, you can always use Gihosoft iPhone Data Recovery to get the data back from the old iPhone or backup.

Jihosoft Photo Eraser

Free iTunes/iPhone Backup Extractor for iPhone, iPad

iPhone Backup Extractor - Extract Data from iPhone Backup

You may also like:online youtube downloader
Sunday, October 7, 2018

How to Turn off Find My iPhone without Password 2019 Guide


Part 1: How to Turn off “Find My iPhone” without Password

It sounds impossible to turn off Find My iPhone without password. However, if you are an iOS 7 user, it can be achieved easily. Below are the detailed steps:

Step 1: Open your iPhone, go to Settings>iCloud>Account.

Step 2: Delete the current password and input any code into it, then click Done.

Step 3: There will be a pop-up window shows you that “User name or password is incorrect”.Sponsor ads: Transfer Music from Android to Android

Step 4: Tap Ok and then Cancel.

Step 5: Go to your iCloud account again.

Step 6: Delete the description, tap Done, then you will go back to the iCloud main interface automatically.

Step 7: Scroll down to Find My iPhone, you will found that it is disabled.
Part 2: Turn off “Find My iPhone” without iPhone from iCloud.com

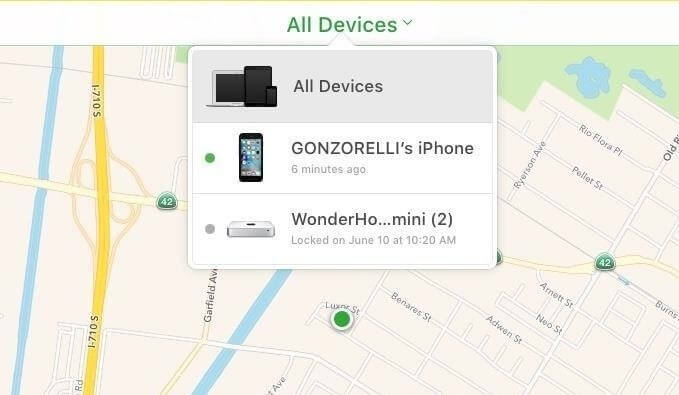
Alright, the first step toward turning off “find my iPhone” without using your iPhone device is to use your computer for the task. From the computer, we are going to log into iCloud.com and perform the task right from there. The steps below will get you through.

Step 1: From your computer, login to iCloud.com and sign in with your Apple ID and password.

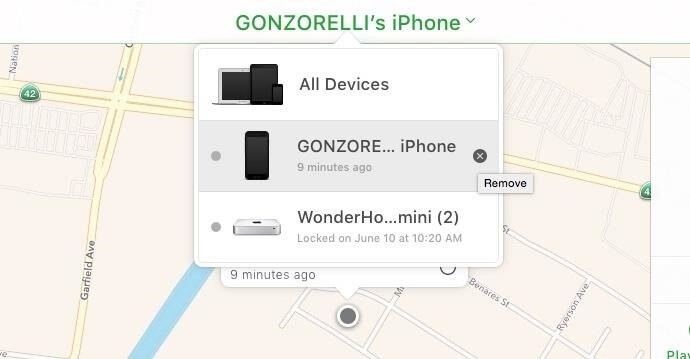
Step 2: Once inside, click “All Devices” which is at the top on your screen.


Step 3: Choose your device.

Step 4: Ignore the Window and go to the next.

Step 5: You will see the name of your device, click it


Step 6: Now, “X” will appear next to the device you selected. Click on it.

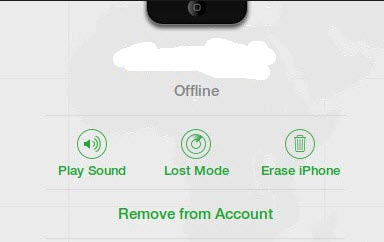
Step 7: “Remove” will appear on the next Window.


Step 8: Click Remove.

Step 9: Done!

So simple, right? So, that is how to turn off “find my iPhone” without your iPhone device.

However, if you are not very sure of the above steps, you can watch a YouTube video that highlights it better. But, to save your time, follow this link to look at a tutorial on turning off “find my iPhone” without using your iPhone device:

Gihosoft Photo Eraser Erase unwanted objects and perfect your amazing photos!

If you lost data after you updated to a new iPhone, you can always use Gihosoft iPhone Data Recovery to get the data back from the old iPhone or backup.

Jihosoft Photo Eraser

Free iTunes/iPhone Backup Extractor for iPhone, iPad

iPhone Backup Extractor - Extract Data from iPhone Backup


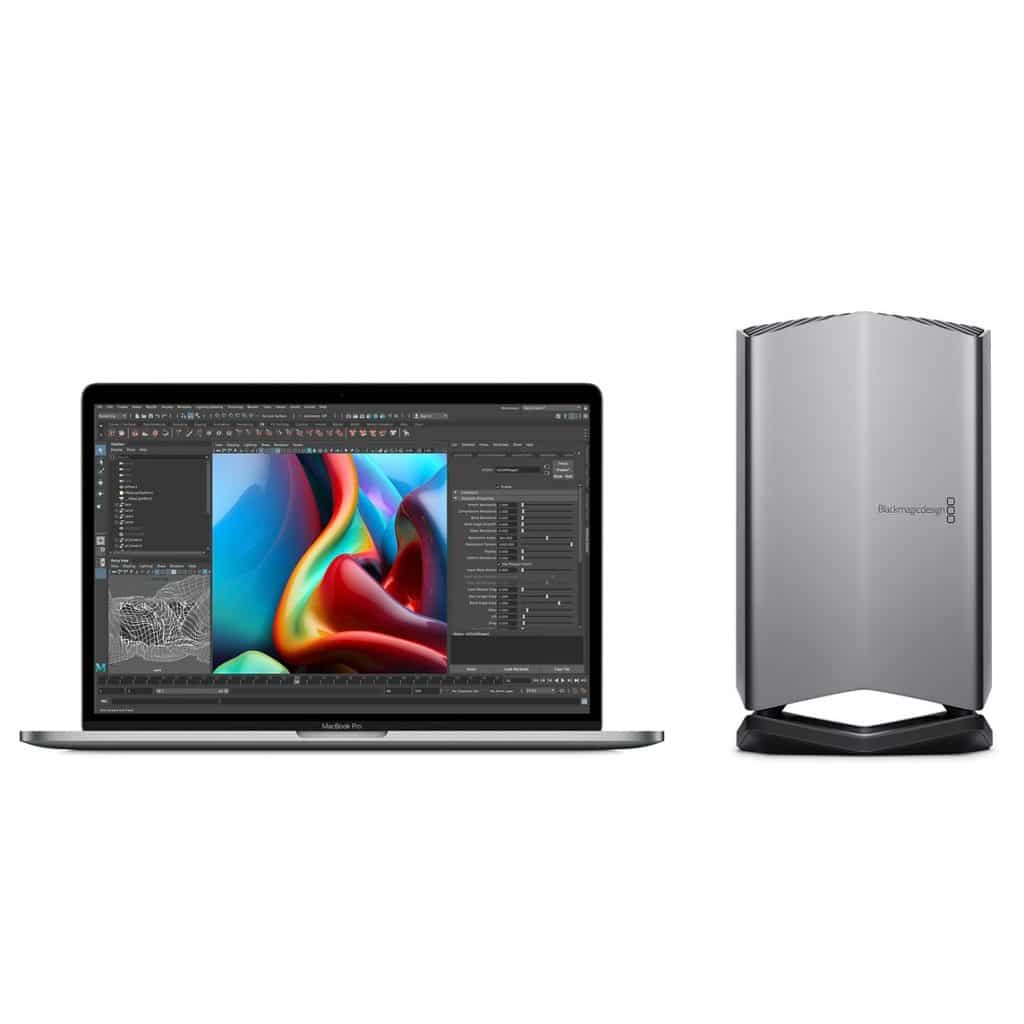
macOS Catalina Is Causing Issues with Select eGPUs

macOS Catalina is apparently breaking many apps. Users have reported that they are facing problems after updating to macOS Catalina with...